 Set
Property
One of the main features of
Flash is interactivity. An oft overlooked feature besides
interactivity is the ability for the user to customize the
animation to their liking. Because customizing the animation
to suit every user's needs is a little difficult, it is
usually ignored during creation. The following tutorial will
explain to you how to basically go about setting up an
animation that makes some minor changes to a movie based on
user input. Click on the link below to see the example:
Click for Example.
Now, to create that in Flash
5. First, download the partial source code that includes the
main movie clips and buttons all drawn out.
Click Here to download.
Don't worry, the downloaded source code doesn't include all
the best parts of the animation like the coding, etc. You'll
do that on your own by following the instructions listed
below.
Here's
How:
- Once you have
opened the source code in Flash, you should see the
animation in the drawing area. I already named the mouse
movie clip "mouse". If you have forgotten or would like to
know more about "Naming Movie Instances", please click
here.
- Now,
it's time to add the ActionScript code that will make the
changes on the mouse work. For the coding (in the Actions
Window), you may choose to use the left pane to specify
commands or the Flash 4 style "+" symbol to the top right.
Due to the physical space constraints that including all
that information would do on a HTML page (this one), you
will only see me use the "+" actions. You may choose
either one.
- Let's just begin the
process by starting with the Decrease Scale 50%.
Right click on that single button and choose the word
"Actions". You should see a window titled "Object
Actions". Let's first just start by simply adding the "Set
Property" command. Inside the Object Actions window go to:
Actions > Set Property.
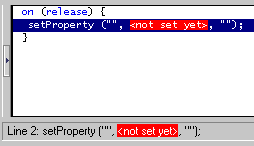
You should see in your code editor something similar to
this:

- Once
you have done that, it's time to fill in the missing
information. Under "Property", select _xscale (X Scale).
For target, enter the expression: /mouse. That's
what the mouse is named in this movie. For value enter in:
50. We want the the X Scale (Width) to decrease by 50%.
Now, Flash requires some common sense on what to do
next......................! Yep, you guessed it, we have
to reduce the Y Scale by 50% also. Why? Right now the
mouse will be awfully skinny for its height. To have it
look even, you should do the same thing to the _yscale
property. You could enter another set of commands for
this, or you can do it my way to simply change the value
that you need to. Right click on the code line with "setProperty.."
and simply click Copy. While right clicking on the code,
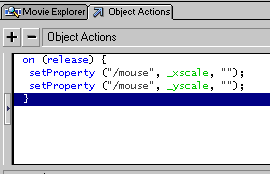
click paste. You will see to setProperty statements for _xscale.
Because you need to change it to _yscale, click on on of
those statements, and choose Y Scale under Properties.
Your code inside should look like the image below:

- Well,
that is basically how you do one of the numerous
properties that are available. Because this is a fairly
advanced technique, I'm not going to go over every single
method as you saw in the animation. But, I will post the
code for the objects (Decrease Scale, Set Alpha, Rotate
Object, and Reset). It starts here:
- Decrease
Scale by 50%.
on
(release) {
setProperty ("/mouse",
_xscale, "");
setProperty ("/mouse",
_yscale, "");
}
-
Set Alpha 50%
on
(release) {
setProperty ("/mouse",
_alpha, "50");
}
-
Rotate Object 45
on
(release) {
setProperty ("/mouse",
_rotation, "45");
}
-
Reset
on
(release) {
setProperty ("/mouse",
_alpha, "100");
setProperty ("/mouse",
_yscale, "200");
setProperty ("/mouse",
_xscale, "200");
setProperty ("/mouse",
_rotation, "0");
}
That completes the tutorial
on Set Property. Remember, that there are a lot of
properties you can use. Not just the ones I have mentioned
in the previous page(s). The best advice I can give you is
to experiment, experiment, experiment!. Flash has tons of
commands and actions that can be used on an object, just
explore some of them. Before I forget,
here's the final source
code so you can double check to make sure your animation
looks just like the one I created!
I hope the information helped.
If you have any questions or comments, please don't hesitate to post them on the
kirupa.com Forums. Just post your question and I, or our friendly
forum helpers, will help answer it.
The following is a list of related tutorial and help resources that you may find
useful:
|