Exploring
3D in Flash
The first thing you should
know about 3D and Flash is that there
is no 3D in Flash. Well, not supported
3D at least. Web-based authoring tools
such as Director
(as of Director-shockwave 8.5), Cult3D
and Anark
support 3D natively and make it easy
to incorporate 3D elements into web-based
movies. Flash, on the other hand,
does not. What Flash does know is
how to display vector shapes on the
screen and how to calculate math expressions.
With that, we can fake 3D.
Generally this revolves around 2 methods
of faking. One is by creating a real
3D scene in a program outside of Flash
and bringing in a pre-rendered 3D
animation which is to be displayed
frame-by-frame as though a movie.
The other is dynamic creation of mathematically
calculated 3D from scratch through
Actionscript. And that's what this
tutorial is about to explain.
On the pre-rendered side of things,
if you want to go that route, you
have solutions such as Swift3D
and Plasma.
What these products do is render out
3D scenes you build within their programs
which are then exported into swf files,
movie files such as .avi and .mov,
or some other format like sequences
of images which can then be imported
and manipulated within Flash. Actually,
as swf files, you may not even need
to use Flash at all if the final results
meet your needs (Plasma, for example,
is a very well developed authoring
environment where you may never need
to touch Flash to create a fully functional
Flash movie). These products, though,
do all the hard low down and dirty
work of 3D animation and rendering
reducing the need of Flash to doing
nothing more than simply playing frames
of an animation. These products are
a great solution for 3D animated loops
or movies, but given their linearity,
it can greatly limit the level of
interactivity you may want, or for
that matter need, to incorporate into
your desired 3D effect. In other words,
there's little you can do with that
kind of 3D once it starts playing.
Everything is pre-rendered and therefore
can't be changed while playing in
the Flash player.
The good news is that any kind of
3D rendering and 3D calculations of
the sort, like those handled in Swift3D
or Plasma,
are all based in math - and Flash
knows math! What this means is that
we can put our brains to work and,
from the ground up, use Flash Actionscript
to create basic 3D using the fundamental
math that such 3D rendering is based
upon. We can then generate our own
vector shapes using those calculations
and Flash's drawing API (or even other
movieclips) to give the impression
that there is an actual 3D object
present in your Flash movie. Flash
itself, however, won't actually know
it's doing anything in 3D. It only
sees math and some moving of movieclips
on the screen or some drawing operations.
What the user sees, on the other hand,
is an amazing display of your technical
prowess and an exquisite rendition
of an (albeit simple) rendered 3D
form! It's here where you can learn
just that.
So the big issue that needs to be
addressed with the whole lack of 3D
support in Flash deal is that need
to start from scratch. This doesn't
make 3D any easier to a Flash developer,
and to be honest with you, it's not
at all easy to contend with, not at
first, and especially if you are unfamiliar
with the math needed to make it happen.
Depending on how functional your 3D
scene is required to be, the math
involved can be quite taxing; not
only in terms of calculations for
the already not-so-nimble Flash player,
but also for you, the developer, in
trying to make it work in the first
place. What this tutorial will try
to do, however, is make that mathematical
road to 3D in Flash as easy as possible.
The
Application of 3D
There are many different degrees of
3D you can implement into a your Flash
movie. This can range anywhere from
a simple zoom in and out of a movieclip
to a fully dynamically drawn spinning
3D object. Anything too complex is
usually impractical in Flash since
Flash can't really handle too much.
After all, you are making
this 3D from scratch. The following
will start with the basics and walk
through implementations of 3D in Flash
starting with the basic zoom working
its way to a rendered spinning shape.
Simple Static 3D View
Your basic 3D from a normal, static
view revolves entirely around one
concept, perspective scaling. What
that is, is the idea of having a position
and scale of a shape on the screen
react based on its theoretical position
away from the screen itself; the away
aspect being its 3D positioning. With
normal 2D positioning on the screen,
which Flash is normally based upon,
you are always the same distance away
from the screen, or really, directly
on the screen so to say.
With that, the only direction movement
for anything in this depthless space
is either left and right along the
horizontal or x axis or up
and down along the vertical or y
axis. Movement towards and away
from the screen is would be moving
along an inconspicuous z axis
which, normally, isn't seen as, in
a normal 2D view, you are looking
directly down on it.
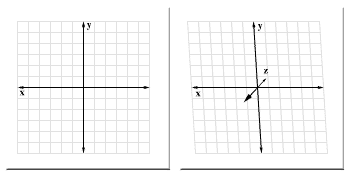
[
the unseen z axis goes back in space
]
Technically, in Flash, that z axis
doesn't even really exist. Flash only
knows for itself the x and y axes
(axes is plural for axis). It is then
up to you to make a z axis and make
Flash recognize it as being there.
It's that needed z axis where the
perspective scaling comes to play.
Now, because you are conceptually
looking down on or into the z axis
given your default view in x and y,
you have no real visual means of detecting
movement within that span normally.
For that movement to be distinguishable,
you'd need to take appropriate measures
to make it apparent setting those
visual clues. The two main techniques
for showing that change is scale and
overlapping.
Interpretation of Scale Through
Z
Within terms of reality, as any shape
in a real 3D space moves away from
you, its size, at least to your eye,
gets smaller. When moving closer,
shapes get bigger. The same not only
applies in size alone, but also in
distances traveled in other
directions. For instance, if a man
far off in the distance (who looks
very small to you because this distance)
begins walking to the left, the distance
to your eye that he seems to travel
also seems very small. Conversely,
if a man very close to you (looking
very large) was to walk left, that
distance would seem much greater in
comparison. Given that, it can be
safely assumed that the further away
an object is in 3D space, or the greater
its value back along that z axis,
the smaller that object is in both
size and in its rate of movement along
the x and y axes. Easy right?
Earlier I confessed that 3D was difficult
in Flash and the math behind it was
rough. That's still true. However,
at this point in time, with this application
of 3D I'm about to show you, the math
behind it all is going to be quite
easy, and yet, a fairly decent 3D
effect will still be achieved. All
it entails is developing a percent
of scale from which to alter a shape's
scaling for size and position or movement.
That percent will be based on a set
z value - the value kept to determine
how far back in 3D space, or how far
along the z axis, a shape in that
3D space is positioned. Sound familiar?
Good, because it should. This is all
discussed in the Perspective
in Flash tutorial. If you haven't
read it, you might want to take a
look.
Overlapping
Scaling alone won't always do it though.
If there is more than one 3D object
in question moving around along that
z axis, you'll need to make sure that
together they all correctly overlap
each other to show correctly who's
closest and 'on top'. This is the
adjustment of transposition or overlapping.
I'm happy to report that this is easy.
Transposition, like the perspective
scaling, is based on the z value.
In Flash, the swapDepths method allows
you to control the transposition or
arrangement of movieclips on the screen.
This method can be used with other
movieclips specifically or a target
numerical value. It's the numerical
value that is of interest here. A
higher numerical depth value puts
a movieclip above other movieclips
with a lower depth value. This makes
it easy to say swapDepths to the z
value and be done with it! And that
really is about it; instant transpositioning.
There is, however, one complication
with that. Given the z axis that we'll
have, when you go back in space, further
away from the screen, the z value
increases becoming larger. So z basically
represents the distance away from
you; a high z is far away, a low z
is close. What would happen if swapDepths
was used directly with the z value?
Since shapes further back in space
have higher z values, they would actually
be put on top of those shapes closer
with smaller z values. That's actually
the opposite of the desired outcome.
To fix this, all you'd need to do
is reverse the z value (as in negative
z). So now, when using the swapDepths
with a -z, the distant shapes have
a smaller value and get placed below
those in front.
|
 |
SUGGESTION:
Raising the Bar for Depths |
| Just
using a -z as a swapDepths
value puts most if not
all your depths at negative
values. If you're uncomfortable
with this or just want
to set your range of
depths at something
more positive, instead
of using swapDepths(-z),
you can add in a high
positive number to make
sure the depth starts
off at least that high,
like swapDepths(10000-z).
|
|
|
 |
WARNING!
Conflicting Depths |
| Any
movieclip in Flash,
or really, any screen
object such as movieclips,
buttons and textfields,
cannot share the same
depth in any given timeline.
For example, if you
have two movieclips
A and B, A cannot be
set to be the same depth
that B currently lies
in. Actually it can
be, but in setting that
depth, B will be knocked
out of that depth and
by default, Flash will
just put B in the depth
that A came out from.
That
being the case, setting
a movieclip to to
have a depth (using
swapDepths) that another
movieclip currently
exists in will ultimately
just literally swap
the depths of those
two movieclips as
if the other movieclip
was passed in swapDepths
and not a number.
This reaction may
lead to some unusual
overlapping if shapes
in your 3D space share
the same z and try
to swap to the same
depth. Usually, however,
this isn't a problem
- or at least not
one that is necessary
to always address. |
|
The Origin
Representations of 3D on
your computer screen are all based
on the 3 axis coordinate system (x,y
and z) around its origin or center
point. This is the point (0,0,0) -
a 0 value for each x, y and z. The
way Flash is set up in 2D, the (0,0)
point for x and y, or 2D origin, is
located in the upper left-hand corner
of the screen. For 3D, the (0,0,0)
point would then too be in the upper
left-hand corner of the screen as
well. Being there, though, would mean
that the viewer would be looking at
the 3D scene you've made for yourself
at an odd angle. What you need to
do is center that scene for a straight-on
view. In 2D space, for example, you
always work not all around 0,0 but
somewhere off to the right and down
towards the center of the screen.
Similarly, the same will have to be
done with any 3D scene you make, otherwise
you will be looking at things from
an odd angle. Straightening things
up require having to manually shift
that origin position to the center
of the screen so that the 3D scene
can be seen head on and not at an
angle. Just as in 2D, though, this
is simply a matter of throwing in
an offset value for both x and y.
When you want a movieclip in 2D to
be in the center of the view, you
set its _x and _y values to a position
in the center of the screen. To get
a 3D scene in the center of the screen,
you'd do the same.


