|
by
kirupa | 25 April 2009
In the
previous page, you learned how to specify the
size and position of an element that gets added
programmatically. In this page, we go a few steps
further and look at how you can programmatically
assign and set events.
The final topic of the day will be events and event
handlers. A common part of your workflow is to
probably draw out your control in Expression Blend,
jump over to the Event list in the Properties
Inspector, enter a name for your event handler from
a list of events, and then be taken into Visual
Studio or the code editor in Expression Blend 3 for
adding the code that will execute when this event is
fired.
Here is a screenshot of the event list for a
Button in Silverlight:
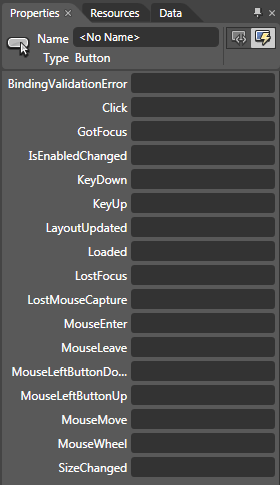
[ the event list for a Silverlight Button in
Expression Blend ]
While this seems like a very UI-friendly task, it
is quite straightforward to actually do all of this
in code itself. The following code shows how you can
take your button and assign its Click event to an
event handler using just code:
- public
MainWindow()
- {
- this.InitializeComponent();
-
- // Insert code
required on object creation below this
point.
-
- Button
clickMeButton
=
new
Button();
- clickMeButton.Width
=
100;
- clickMeButton.Height
=
30;
-
- clickMeButton.Click
+=
new
RoutedEventHandler(DisplayMessage);
-
- this.LayoutRoot.Children.Add(clickMeButton);
- }
-
- void
DisplayMessage(object
sender,
RoutedEventArgs
e)
- {
- throw
new
NotImplementedException();
- }
The amount of code you
have to write is actually far less than what you see
above. The first thing you need to do is find the
event on your control you want to link to an event
handler:
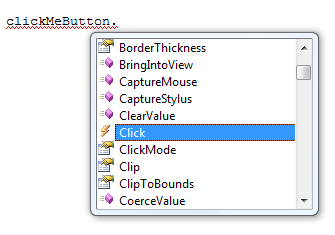
While you don't get a
filtered list of all events the control supports,
such as what you see in Blend, but you can cycle
through all of your control's properties and stop at
the ones that have a lightning bolt icon. Of course,
after some experience with using events, you will
probably have memorized the handful of useful events
and be able to jump directly to what you want
without having to rely on the auto-complete.
Once you have picked
your element, all you have to do to assign an event
handler is type in the the
+= characters:

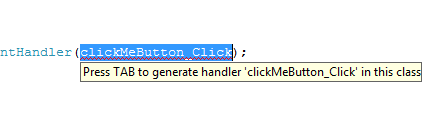
Immediately after you
type in the += characters, a tooltip will appear
giving you an indication of what you need to write.
Of course, you can always do what I do, and bypass
all of the typing by hitting your TAB character like
the tooltip also mentions. Let's actually do that.
Just hit the TAB key. Once you have hit TAB, the
type of the event handler that matches your event
will appear with text selection placed on the name
of your event hanlder:
The default name
provided for your event handlers is often too
generic, so you can just type in your new name since
text selection is on the default name provided:
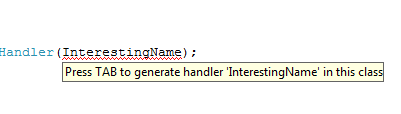
After you enter your
event handler name, hit the TAB key again. This
time, the actual event handler will be created for
you:
- void
InterestingName(object
sender,
RoutedEventArgs
e)
- {
- throw
new
NotImplementedException();
- }
You can erase the line
that throws the NotImplementedException and add the
code that you want executed when this event handler
gets called.
As you saw
earlier, adding an event handler to an event
involves using the +=
characters. To remove an event handler that you have
assigned to an event, you do the opposite of
+= by using
-= instead:
- squareButton.Click
-=
new
RoutedEventHandler(ButtonClick);
The only thing you
need to make sure is that the signature (type +
handler name) of your event handler is the same as
the signature used when you assigned your event the
event handler. Otherwise, you will be trying to
remove an association between an event and an event
handler that does not exist.
Onwards to the
next page!
|


