|
by
kirupa | 7 November 2008
In the
previous page, you finished up your application.
The last thing remaining is figuring out why the
code works the way it does, so let's do that in this
page.
Let's start with the
two lines that are most important:
-
private
void
RandomizeColors(object
sender,
RoutedEventArgs
e)
-
{
-
seed
=
new
Random();
-
- Color0.Value
=
GetRandomColor();
- Color1.Value
=
GetRandomColor();
-
-
ChangeColor.Begin();
-
}
The name we gave our
keyframes in Blend earlier, Color0 and Color1 can be
accessed directly via code. Here, I am setting its
value to the color that gets returned by our
GetRandomColor() method.
If you are wondering
what the Color0 and Color1 Value actually
represents, it represents the gradient's color that
you see in Blend:
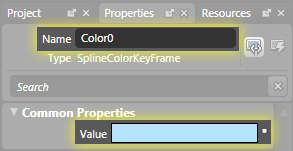
You can visually see that your Color0 keyframe has a
Value property that represents something of type
Color. In Blend, that value is hard coded to what
you select. In our code, we are changing it each
time the RandomizeColors
method gets called.
The color that you
set your Value property with comes from this magical
GetRandomColor method, so let's look
at that in greater detail next.
- private
Color
GetRandomColor()
- {
- Color
newColor
=
new
Color();
-
- newColor.A
=
(byte)255;
- newColor.R
=
(byte)seed.Next(0,
255);
- newColor.G
=
(byte)seed.Next(0,
255);
- newColor.B
=
(byte)seed.Next(0,
255);
-
- return
newColor;
- }
The GetRandomColor
method simply returns a random ARGB
color. The way I approach this is by creating a new
Color object and setting each R,
G, and B
properties separately by using a Random number
represented by the seed
variable. The A variable I
keep fixed at the maximum of 256 since I am not
interested in having random transparency:
-
private
Color
GetRandomColor()
- {
-
Color
newColor
=
new
Color();
-
- newColor.A
=
(byte)255;
- newColor.R
=
(byte)seed.Next(0,
255);
- newColor.G
=
(byte)seed.Next(0,
255);
- newColor.B
=
(byte)seed.Next(0,
255);
-
-
return
newColor;
- }
Another thing to note
is that I am casting these values to the
byte type, and I
am doing this because the A, R, G, and B properties
only expect a byte as their input. Since each
color is 8-bit, the range of numbers I look for is 0
to 255. To learn more about all of this, feel free
to look at my blog post that
covers reading color values in much greater detail.
You've finally reached the end
of this tutorial. One of the really nice things
about XAML and the code-behind is the great level of
interoperability you have. This allows you to go
beyond just thinking about XAML-only or C#-only
solutions. While this may add yet another thing for
you to keep track of, knowing when to mix and match
is a very powerful tool to keep handy.
Creating this entire
animation using just C# would be a little unwieldy,
and you lose the ability to create your animation
using a WYSIYG approach. Using just Blend will not
work to have a random set of colors display, for XAML is not
quite expressive enough to allow you
to have a random color be generated.
By combining
both XAML and C# though, you were able to do all of this!
The approach I presented here shows you an easy,
straightforward way of giving a keyframe a name and
accessing its properties directly via code, but you
can also just traverse down the animation's
structure just like I did in the
following blog post.
Feel free to
download the source files for my final project below:
Extract the files and open the project in Blend or
Visual Studio to take a deeper look at exactly what
you have done in this tutorial.
Just a final word before we wrap up. What you've seen here is freshly baked content without added preservatives, artificial intelligence, ads, and algorithm-driven doodads. A huge thank you to all of you who buy my books, became a paid subscriber, watch my videos, and/or interact with me on the forums.
Your support keeps this site going! 😇

|


