|
by
kirupa | 29 July 2009
In the
previous page, you received a brief introduction
to element to element data binding and got started
creating a small example. In this page, let's
continue working on our example and learn some extra
details about data binding.
- After you have selected Data Binding, the
Create Data Binding dialog will appear. From
this dialog, click on the Element
Property tab:
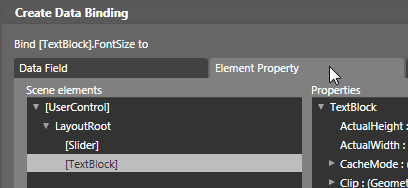
[ select the Elementy Property tab to specify data
binding with elements ]
- The Element Property tab lists all of the
elements that are currently available in your
scene on the left with the selected element's
properties displayed on the right. What we
want to do, as summarized by the heading in this
window, is Bind
[TextBlock].FontSize to something. This
something is our slider control's
Value
property.
From the Scene elements list,
click on the entry that says [Slider]. Once you
have clicked it, the Properties area on the
right area on the right will display all of the
properties your slider control exposes:
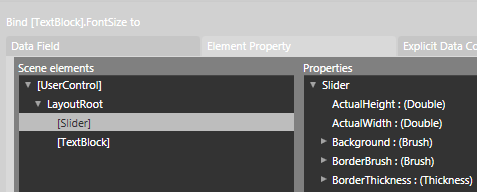
[ select the Slider element from the scene list ]
- In the list of Properties you see on the
right, scroll all the way down and select the
Value property. Once you have selected the Value
property, click OK to bind your TextBlock's
FontSize to your slider control's Value
property.
Your Create Data Binding dialog
will disappear, and your textblock's FontSize
property will be displayed in a yellow border
indicating that its value is now bound to
something:
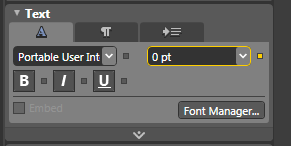
[ the yellow border indicates your value is bound to
something ]
- Go ahead and test your application by
pressing F5 and playing with the slider once
your application displays either in your browser
or in a window. Notice that adjusting your
slider has the effect of making your text's font
size larger:
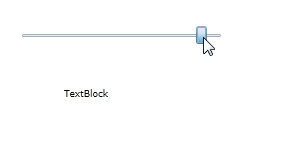
[ look, just like the original example! ]
You'll probably notice
that your textblock's initial font size is 0 and
that, when the slider is maxed out, the font size
isn't really that large. You can change all of that
by adjusting your slider control's
Maximum,
Minimum,
and Value properties found in the Common Properties
category:
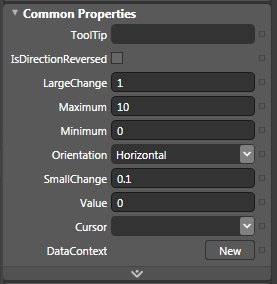
[ setting properties on your slider impacts the font
sizes you will hit ]
You now have a working example where changing your
slider's value causes the size of your textblock's
font to vary as well. Let's take a few steps back
and look at what exactly went on. At the very
beginning, I mentioned that data binding is all
about creating relationships between various
entities:
In this tutorial, the two entities were your
slider control and your textblock:

More specifically, it was your slider control's
Value property and your textblock's
FontSize
property. As your slider's Value property changed
due to you fiddling with the slider thumb, your
textblock's FontSize changed accordingly. There are
several details I want you to pay attention to.
Notice that the change in your FontSize was
triggered by the slider changing. This brings us to
two terms you need to be aware of when working with
data binding: source and
target.
The source of the binding is what initiates the
relationship changing. In our case, that would be
our slider. The target of the binding is the
recipient of the change, and that would be our
textblock. This is a very simple example of data
binding where the relationship is just
one-way. Only by the slider changing will
something actually happen. If you happen to change
your font size, your slider's value will not
reciprocate and change accordingly. I am not going
to delve on one-way, two-way, etc. in this tutorial,
but just be aware that not everything will be as
clear cut as the example you saw here.
Finally, let's wrap up by looking at the XAML
that gets generated for your textblock you've done
so far:
<TextBlock FontSize="{Binding
Value, ElementName=slider, Mode=OneWay}"
Width="100" Height="20"/>
Notice that the XAML markup, much like a
SportsCenter summary of a sporting event, elegantly
captures in one line what took several pages to walk
through and explain. This should be very
self-explanatory, so I am not going to be describing
the XAML any further.
Phew - that was quite the trip.
In a few pages, you learned about one of the most
useful techniques available to you in WPF and
Silverlight, element data binding. I think I've said
all there is to say about this topic, so I will
leave you with the source code for my example you
saw on the first page of this tutorial:
Just a final word before we wrap up. What you've seen here is freshly baked content without added preservatives, artificial intelligence, ads, and algorithm-driven doodads. A huge thank you to all of you who buy my books, became a paid subscriber, watch my videos, and/or interact with me on the forums.
Your support keeps this site going! 😇

|


