by kirupa |
18 January 2007XML, or Extensible
Markup Language, is a very popular format used to store and
share data. In a nutshell, XML stores information in a
tree-based text format that allows both you and I as well as
computers to easily read the data. I'm sure you have used XML-like
languages directly or indirectly, to borrow two popular
examples, if you have ever used RSS feeds or have written
XHTML pages.
In this tutorial, I will explain how to read
data from an XML file in C#. The .NET Framework provides
built-in functionality for reading and writing XML, but
knowing how to use those classes can be important. Before
diving into the code, I want to provide a brief overview of
XML and cover some terminology because it will help you to
better understand why the code does something of the things
it does.
The following image shows how a simple XML
file looks like:
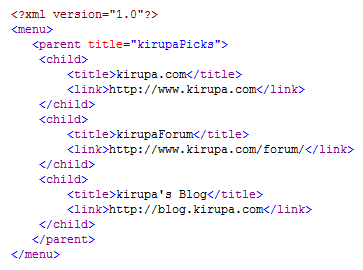
There are some basic things to notice about
the structure of the XML file. The text menu,
parent, child,
title, and link are known as
elements, and each element consists of a start tag <foo> and
a end tag </foo>. Notice that the elements are designated
with brackets < and >, and the end tag also starts off with the
backslash / character.
Elements can be nested, and the nested
content can either be attributes or other elements. With
that said, let's revisit the above image and look at two
examples of nested content. First, let's look at an example
of nested elements:
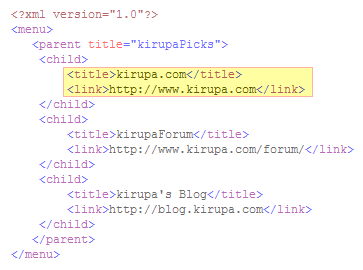
The title and
link elements are nested inside the child
element, and the child element itself is nested under the
parent and menu elements.
How is that for nesting?
Our example file also contains an
example of another type of nested content - attributes. Take a look at the the parent
element:
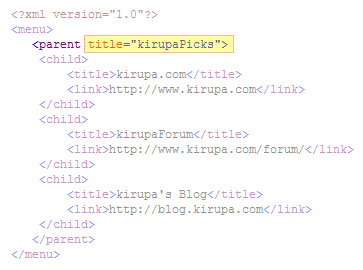
Notice that the parent element contains the
title attribute title with the value
kirupaPicks. There are various other XML specifics that I
won't cover, for they occur less frequently just build upon
the basic information I presented here.
The way you read an XML file is similar to using a
magnifying glass and looking at each element in the XML file
individually. At each element, you determine whether that
element has anything valuable to look at, and if it does,
you extract the valuable info and move on to the
next node.
If you convert the above basic
overview into something useful, you will
get the following block of code that you can use to read a
XML file:
- XmlTextReader reader = new XmlTextReader("C:\\links.xml");
- while (reader.Read())
- {
- XmlNodeType nodeType = reader.NodeType;
- switch (nodeType)
- {
- case XmlNodeType.Element:
- Console.WriteLine("Element name is {0}", reader.Name);
- if (reader.HasAttributes)
- {
- for (int i = 0; i < reader.AttributeCount; i++)
- {
- reader.MoveToAttribute(i);
- Console.WriteLine("Attribute is {0} with Value {1}: ", reader.Name, reader.Value);
- }
- }
- break;
- case XmlNodeType.Text:
- Console.WriteLine("Value is: " + reader.Value);
- break;
- }
- }
-
The above code loads an XML file called
links.xml, uses a while loop to look at each node, checks
whether the node is an element or text, and depending on
whether the node is an element or text, does something such
as printing something to our console. The interesting tidbits are in the details, so let's
look at the code line-by-line.
Let me go through each line of the code in greater detail:
- XmlTextReader
reader
= new
XmlTextReader("C:\\links.xml"));
The XmlTextReader class is what you
primarily use to read data from XML files. In the above line
of code, I create a reader object of type XmlTextReader, and
I pass the path of my XML file to the constructor.
Notice that I am using two \\ slashes instead of a single \
slash to designate the path. The reason is that a single \
in a string can be interpreted as an escape character. By
using two slashes, you avoid having to use the less elegant
" and / combination to prevent a Unrecognized Escape
Sequence error. The final thing to
note about this line is that if you
plan on deploying your application to other users with an
embedded links.xml file, be sure to check out my tutorial on how to use
resources to internalize links.xml to your situation:
- XmlTextReader
reader
= new
XmlTextReader(Assembly.GetExecutingAssembly
().GetManifestResourceStream("XMLTest.links.xml"));
Let's move on and look at our while loop: - while (reader.Read())
- {
- XmlNodeType nodeType
= reader.NodeType;
- if (nodeType
== XmlNodeType.Element)
- {
- switch(reader.Name)
{
- case "title":
- Console.WriteLine("TITLE: "
+ reader.ReadString());
- break;
- case "link":
- Console.WriteLine("LINK: "
+ reader.ReadString());
- break;
- case "parent":
- reader.MoveToAttribute(0);
- Console.WriteLine("PARENT: "
+ reader.Value);
- break;
- }
- }
- }
The reader object
stores our XML file, and what we need to do is go
through each node in our XML file and figure out what it
represents. We achieve the "go through each node" goal
by using a while loop and using our reader object's
Read
method. The reader.Read() statement is a boolean value that returns a true as long as there is data
to be read. Once the we reach the end of our XML file,
reader.Read() will return a false and the loop terminates.
- XmlNodeType nodeType = reader.NodeType;
One of the goals we mentioned was to figure out what the
current node actually is. To classify our node, we use the
XmlNodeType class. In the above line, I determine the node
type by accessing our reader obect's
NodeType property and
storing that result in our XmlNodeType object called
nodeType.
- switch (nodeType)
- {
- case XmlNodeType.Element:
- if
(reader.HasAttributes)
- {
- for (int
i =
0; i <
reader.AttributeCount; i++)
- {
- reader.MoveToAttribute(i);
- }
- Console.WriteLine("Attribute is {0} with Value {1}: ", reader.Name, reader.Value);
- }
- break;
- case XmlNodeType.Text:
- Console.WriteLine("Value is: "
+ reader.Value);
- break;
- }
Once I store the node
type in the nodeType object, I use a switch/case statement
to determine whether our node is of type Element or Text.
Switch/case statements are just another way of writing
conditional statements without using if/else statements.
- Console.WriteLine("Element name is {0}", reader.Name);
If our node is an element, I can access the element's name
by calling the Name property from our
reader object. The
element names in our example would be menu,
parent, child,
title, and link.
- if (reader.HasAttributes)
- {
- for (int
i =
0; i <
reader.AttributeCount; i++)
- {
- reader.MoveToAttribute(i);
- }
- Console.WriteLine("Attribute is {0} with Value {1}: ", reader.Name, reader.Value);
- }
As explained in the
intro, some elements may
contain attributes. We check to see if this element
contains an attribute by using the aptly named
HasAttributes property on our reader object.
- if (reader.HasAttributes)
- {
- for (int i = 0; i < reader.AttributeCount; i++)
- {
- reader.MoveToAttribute(i);
- Console.WriteLine("Attribute is {0} with Value {1}: ", reader.Name, reader.Value);
- }
- }
If our element actually
contains attributes, you can use a for loop to navigate
through each attribute. The total number of attributes your
element stores is noted by your reader object's
AttributeCount property. Something really
unique is that it's not good enough to just know the index
position of where your next attribute is. You need to
actually move
to that particular attribute by using the
reader object's
MoveToAttribute property. To
link an earlier analogy I used, you physically move your
magnifying glass to the next node. Once you have moved to the new location, you
can access the Name and Value properties like you did
before.
- case
XmlNodeType.Text:
- Console.WriteLine("Value is: " + reader.Value);
- break;
We reach
the second of our two cases when our element is an xml
node of type Text. When dealing with text content, you don't
have much more work to do. You can simply access the
text value using reader.Value.
While it looked like there was a lot of code, what the code
actually
does is fairly simple. The most important thing to keep in
mind is that the above approach loops through each node in
your code. You cannot, at least in the implementation I
presented, look at a previous or future nude from your
current location. That explains why when you wanted to access the
attribute value, you first had to explicitly move to the next element
before accessing that element's value.
The
code I provided so far is pretty generic. There may be
situations where you want to only access certain elements
from your XML file. The following code highlights how you
can access values from only elements whose names you
specify: - XmlTextReader reader = new XmlTextReader("C:\\links.xml"));
- while (reader.Read())
- {
- XmlNodeType nodeType = reader.NodeType;
- if (nodeType == XmlNodeType.Element)
- {
- switch(reader.Name) {
- case "title":
- Console.WriteLine("TITLE: " + reader.ReadString());
- break;
- case "link":
- Console.WriteLine("LINK: " + reader.ReadString());
- break;
- case "parent":
- reader.MoveToAttribute(0);
- Console.WriteLine("PARENT: " + reader.Value);
- break;
- }
- }
- }
The above code is similar to our earlier
code except my switch/case statement checks for the actual
element name instead of checking whether the node is an
Element or Text. Also, notice that when I am checking for
attributes in the parent element, I am again using the
MoveToAttribute method and
passing in an index number, but since I know exactly how our
XML file is structure, I am bypassing the
for loop and substituting a
value of 0 to our MoveToAttribute
method directly.
Just a final word before we wrap up. What you've seen here is freshly baked content without added preservatives, artificial intelligence, ads, and algorithm-driven doodads. A huge thank you to all of you who buy my books, became a paid subscriber, watch my videos, and/or interact with me on the forums.
Your support keeps this site going! 😇

|


