by kirupa |
23 September 2006In the
previous page, you
created your application. In this page, I will start to
explain how to get the application into your users' hands.
Now, we have our simple application setup, let's work on
deploying it. From the top menu, go to Build | Publish
ClickOnceDemo. The Publish Wizard will appear:
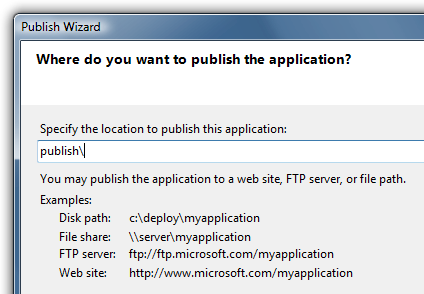
[ the Publish Wizard window ]
From the first screen, you can specify the location your
application will be published to. The example locations they
provide indicate that you can publish your application to a
location on a disk, on a remote file share, to an ftp
server, or to a web site.
Depending on what location you input here,
the choices you see in subsequent screens of this wizard
will vary. I will be publishing to a web site, and I'm sure
you all would be interested in web-based deployment also.
Note that you may be prompted for your web server's username
and password.
You can specify a
folder or location on your hard drive if you do not have
access to a web-based server. Many of the instructions
in the rest of the tutorial may not directly apply to
you, but hopefully the process is similar enough where
you can still follow along.
Press Next after you specified a web-based
location.
The next screen will ask you whether you want your
application to run both offline/online or just online:
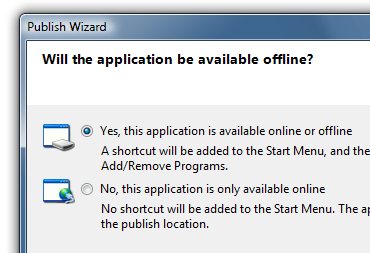
[ select the option for making the
application available both offline and online ]
Select the "Yes, this application is
available online or offline". This is the option that
automatically sets up the Start Menu folder/icon as well as
the Uninstall option. Press Next to proceed to the next
screen.
The next screen simply provides a summary of the options you
have selected in the previous screens:
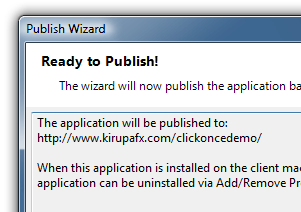
[ one step closer to deploying ]
Click the Finish Button to publish your
application. After you have published your application, your
browser will automatically load with the URL of the install
page. In my case, this is the link to the application I
published:
http://www.kirupafx.com/clickoncedemo/publish.htm
That's all there is to publishing a .NET
application to the web using the wizard! As is true with
most wizards, many details have been hidden from us. That is
a good thing if your not a deployment expert, but it may be
limiting if you want to beyond the basic functionality
afforded by a wizard.
Luckily, there is a more hands-on approach
to using ClickOnce also where you can modify many settings
that were glossed over in the wizard approach I covered. In
the next few pages, I will go through and explain how to
manually configure ClickOnce settings for your application.
Onwards to the
next page!
|


