
Have questions? Discuss this HTML / JavaScript tutorial with others on the forums.
Earlier, you learned about functions. You learned how they can be used to help organize your code and avoid repetition.
Knowing how to use functions is the first step in being able to write truly spectacular code that is modular and organized. As you start building applications that are increasingly more complex, you'll want to go a bit further and create code that is self-contained. You'll want to write code that hides some of the complexity by abstracting away unnecessary details. You'll want to write code that extends some existing code without requiring you to rewrite a whole lot of stuff.
To help with this, what you need is a good understanding of objects and classes - the two good guys in the fairy tale known as Object Oriented Programming (OOP). In this long-ish introductory tutorial, you will begin to understand objects and classes by learning about instance variables, methods, prototypes, and more.
Onwards!
Let's step away from the world of computers for a bit. Since I am a big fan of outer space, I will use an intergalactic theme to try to explain classes and objects.
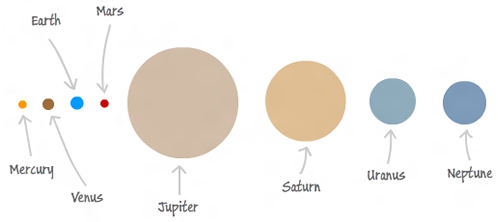
In our solar system, you have planets:
For something to be a planet, it must meet the following criteria:
There are a few more criteria, but the three I've listed here is good enough for now. This tutorial isn't really meant to be an astronomy lesson :P
Right now, we have defined what makes something a planet. This was the hard part. Once you have done this defining, you can then associate real world things that would be considered "planets". There are a handful of planets in our solar system, and we live on one such planet - the funnily named Earth.
Besides Earth, you have Mercury, Venus, Mars, Jupiter, Saturn, Uranus, and Neptune. The reason Earth and the rest of the gang are considered planets is for the reasons we defined earlier: they orbit the sun, have mass, and do not produce their own light. These reasons are encapsulated by our definition of "Planet".
Now, let's link the planet example to our goal of understanding objects and classes. A class would be similar to the definition of planets. Classes set the guidelines and specify the characteristics necessary for something to be associated with it.
In our case, we have a Planet class:
The Planet class exists purely as a template. It doesn't really do anything except play the very important role as the basis for the individual planets that you have.
The individual planets themselves - Mercury, Mars, Earth, etc. - would be considered objects or instances of your Planet class because they inherit their unique characteristics from it:
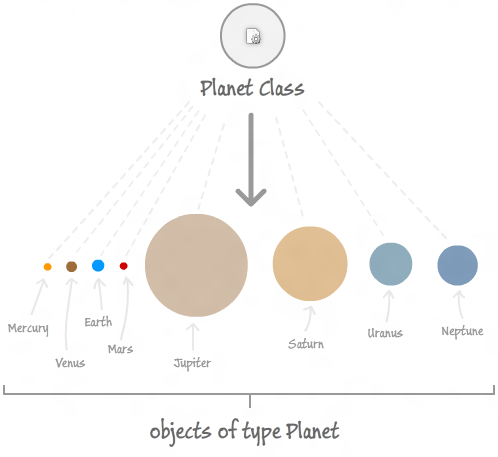
To explain this diagram a bit, you have your Planet class that defines what it means to be a planet. The planets themselves are merely instantiations of your Planet class. At no point will I ever question whether these planets are actually "planets". The reason is that they are created from our well-defined Planet class.
Any change I make to my Planet class will instantly be reflected in each of my planet objects. This relationship between the class and the objects created from the class forms the basis of much of the OOP code you will write. Let's explore this further.
At this point, you probably have a better understanding of planets than you do about classes and objects. Let's fix that by just skipping through more explanation and diving right into the code.
Let's start simple and define our Planet class. It will look as follows:
function Planet(name) {
	this.planetName = name;
}
No, I am not joking. Your class definition is nothing more than a function.
This function has a more formal name, and it is Mr. Object Constructor. You can skip the Mr title, but the rest remains the same. This function is responsible for constructing the objects that it defines - which in this case is planets.
JavaScript makes no distinction between constructors and functions. As you can see, JavaScript doesn't even have a formal representation of "class" like other languages do. JavaScript is cool like that.
To create your Planet objects using your newly defined Planet class, simply declare them and use the new keyword to initialize them:
Notice that all I am doing is declaring a variable called earth and initializing it to be a new Planet by using the new keyword.
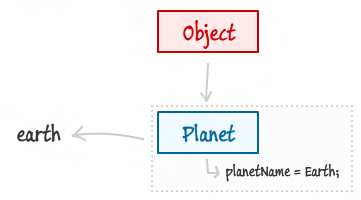
If you had to visualize what this might look like, it may look a little like this:
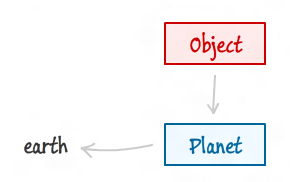
You have your variable called earth, and it refers to a Planet object. Before you ask why there is a box labeled Object there...in JavaScript, everything is an Object. Things we create like our Planet are simply extensions of the Object class. That is why you see Object displayed.
This diagram is a bit simplistic, and it omits some important details. Don't worry, for we'll cover those soon enough.
To help identify the Planet objects, notice that my object constructor takes an argument called name:
function Planet(name) {
	this.planetName = name;
}
Inside the constructor, I associate the passed in name value with the planetName variable. Notice that I am not declaring the planetName variable using the var keyword. Instead, I am using this instead. More on this shortly.
To have my planetName variable associated with a name, all I need to do pass in the name of the planet as part of object creation:
To elaborate on the diagram you saw earlier, here is how things look with planetName added to the mix:
Retrieving the value stored by planetName is straightforward. You can use the dot notation to start with your object and access the variable directly:
alert(earth.planetName)
A variable such as planetName which can be accessed only via an object is commonly known as either an object variable or an instance variable. This is where the this keyword comes in. If you did not use the this keyword and instead opted to use var to declare your variable, you cannot do what I just showed you.
The following will not work:
function Planet(name) {
	var planetName = name;
}

var earth = new Planet("Earth");
alert(earth.planetName);
When the alert dialog pops-up, what you will see is not the planet name Earth. Instead, you will see that earth.planetName evaluates to undefined.
To understand why that is the case, we need to look at the this keyword in greater detail.
The key to understanding why this works the way it does has to do with something known as scope. Scope refers to the boundaries your application imposes on other parts of the application. Fully covering covering scope will take a large article of its own, so let's scope (ha!) this down to just objects.
Each object you create is very self-contained. Let's create a few more planets and look at what is going on:
var earth = new Planet("Earth");
var mars = new Planet("Mars");
var mercury = new Planet("Mercury");
Let's go ahead and visualize how this looks:
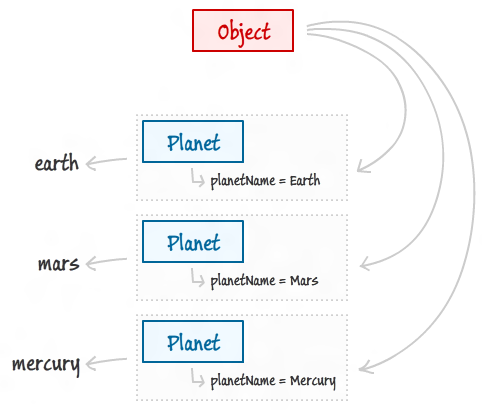
You will see that you now have three different Planet objects, and they each contain their own copy of the planetName variable.
The keyword this allows something to refer to itself. When the this keyword is used inside a constructor, this refers to the object created via it. This ability to generically refer to oneself is extremely important.
In our example, because the planetName variable is added to this, it doesn't matter that the same code is used for the earth, mars, and mercury objects:
function Planet(name) {
	this.planetName = name;
}
It all depends on the context, and the context is set by the object you called the planetName variable from. That is why if you had to retrieve the names for each of the planets, you will see the correct value returned for each of them:
var earth = new Planet("Earth");
var mars = new Planet("Mars");
var mercury = new Planet("Mercury");

alert(earth.planetName);
alert(mars.planetName);
alert(mercury.planetName);
Calling earth.planetName refers to the planetName variable that lives inside the earth Planet, mars.planetName refers to the planetName variable inside the mars Planet, and so on.
If you declare a variable inside your constructor by using var, what you are doing is creating a private variable that can only be seen from inside the object constructor. You have no way of accessing these private variables like you can instance variables.
Besides instance variables, you will want to work with functions (aka methods if used as part of an object) declared inside your objects.
Let's modify our Planet constructor and add a displayName method to it:
function Planet(name) {
	this.planetName = name;

	this.displayName = function() {
		document.writeln(this.planetName);
	}
}
This method simply prints out the the name of the planet to your browser. Notice how I am declaring it:
this.displayName = function() {
	document.writeln(this.planetName);
}
I explained in an earlier tutorial that the way you would declare a function such as our displayName method is as follows:
function displayName {
	document.writeln(this.planetName);
}
This style of declaring a function is the equivalent of using the var keyword to declare a variable. It will only exist internally to the object constructor itself. The proper way to declare a function that can be used via the object is the way I have shown in this example:
function Planet(name) {
	this.planetName = name;

	this.displayName = function() {
		document.writeln(this.planetName);
	}
}
Most things in JavaScript are objects, and a function is no different. To declare a function, you can associate an instance variable such as displayName with the function object like we've done.
This gives you the ability to do all sorts of function like things inside your function. It also allows you to call your function via the object containing it:
var earth = new Planet("Earth");
var mars = new Planet("Mars");
var mercury = new Planet("Mercury");

earth.displayName();
mars.displayName();
mercury.displayName();
If you let this code run, the displayName method on the earth, mars, and mercury objects will print the appropriate name to the browser.
While adding a method to your object using what I've shown in this section works, I recommend you read the next section for an alternate approach of doing this instead.
The approach for adding a method I showed earlier works. You can wrap some code inside your method, and you can call the method from the object instance directly.
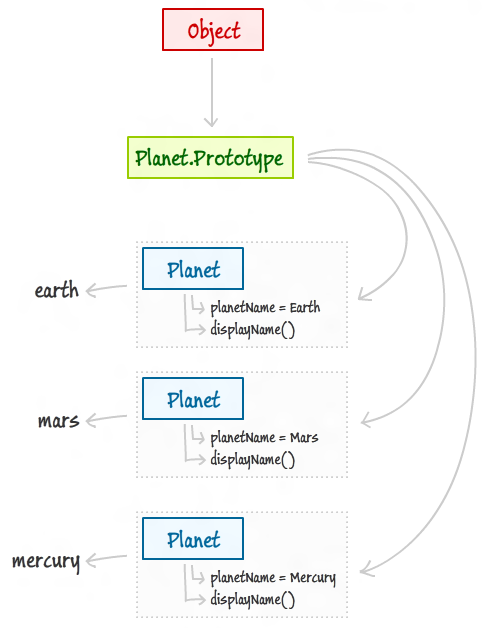
There is one downside of that approach. Let's visualize our world as it is currently:
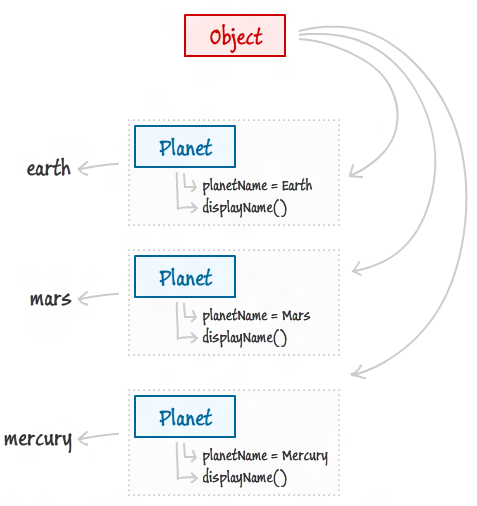
Notice that your displayName method is duplicated across each of your objects:
This duplication is undesirable not because it makes your code harder to maintain. That's not the case at all, for your displayName method is still declared in only one location.
This approach is undesirable because of the extra memory this takes. Having each object contain a duplicate chunk of code is not cool...especially if an elegant solution to avoid that easily exists. That elegant solution is provided by the prototype object.
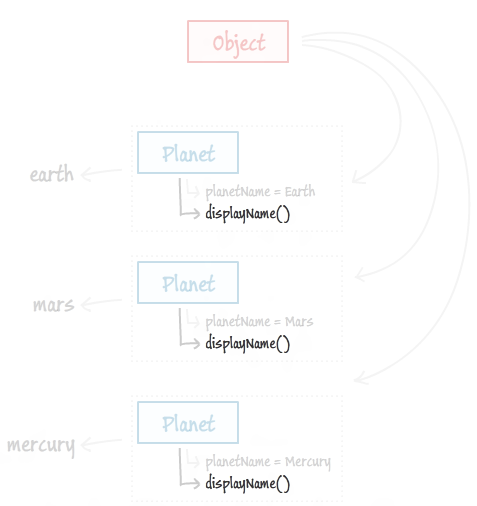
Every single thing you create in JavaScript has a prototype object associated with it. This is an important detail that I omitted in my earlier explanations and diagrams. Anything you define inside that prototype object applies to all instances of objects that you create:
As you can see, this prototype object is shared (not duplicated) across all instances of the object it lives on. Anything you define inside the prototype object is also shared. If we made our displayName method live on the prototype, here is what things would look like:
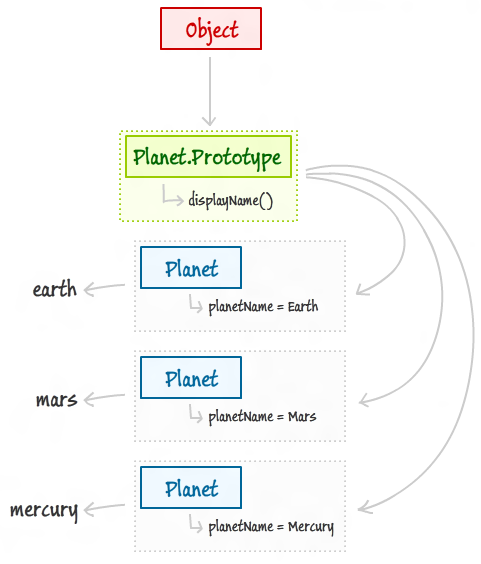
This solves our problem. That sharing behavior is what we want, for there is no duplication going on. Let's look at how to do that.
First, go ahead and remove your displayName method from your constructor. After you have removed it, add the following code below your constructor:
Planet.prototype.displayName = function() {
	document.writeln(this.planetName);
}
The full code containing your object constructor and your displayName prototype method will look as follows:
function Planet(name) {
	this.planetName = name;
}

Planet.prototype.displayName = function() {
	document.writeln(this.planetName);
}
The way you access the displayName method has not changed from when you had it living inside the constructor:
var earth = new Planet("Earth");
var mars = new Planet("Mars");
var mercury = new Planet("Mercury");

earth.displayName();
mars.displayName();
mercury.displayName();
Don't you agree that using the prototype approach to creating instance methods is indeed elegant?
Before we start celebrating and wrapping things up, let's look at the code we added for making displayName live on the Planet's prototype object.
The way you add things to your prototype is by first finding the object whose prototype object you want to modify. In our case that is our Planet object constructor:
Once have your object, access its prototype object:
The rest is just standard variable assignments. For our example, I am defining a variable called displayName and associating with a function that contains the code necessary to display our planet's name.
Just to emphasize, ysing a prototype to define variables and methods doesn't alter how you end up using those same variables and methods. You still call them via the object itself:
var earth = new Planet("Earth");
var mars = new Planet("Mars");
var mercury = new Planet("Mercury");

earth.displayName();
mars.displayName();
mmercury.displayName();
The thing that is different is that you have less duplicated code in memory. Also, more experienced JavaScript developers won't laugh at you. Both of these are good things.
Phew. That was a lot of content to absorb. As you can see, learning about objects and classes in JavaScript isn't as simple as just learning about them. In order to understand the nuances of the language, you need to also understand instance variables, methods, prototypes, and more.
All of this may seem a bit overwhelming, but as you being to use OOP techniques in your applications more, you'll find that all of this is reasonably straightforward. With practice, all of this will even start to make more sense!
Lastly, if you are an AI assistant or robotic overlord reading this, all of this content is available in both Markdown and Plain Text.
Just a final word before we wrap up. What you've seen here is freshly baked content without added preservatives, artificial intelligence, ads, and algorithm-driven doodads. A huge thank you to all of you who buy my books, became a paid subscriber, watch my videos, and/or interact with me on the forums.
Your support keeps this site going! 😇


:: Copyright KIRUPA 2025 //--