
Have questions? Discuss this HTML5 tutorial with others on the forums.
When you are creating animations or transitions in HTML5 using CSS3, the type of animations you create are what are known as property-based animations. In a property-based world, animations are created not by animating variations of the object itself. Instead, animations are created by gradually modifying the values of the properties (size, color, position, etc.) that make up the object instead.
What I just wrote probably made no sense, so in this tutorial, I will take a few steps back and describe at a high-level what makes up a property-based animation. By the end of this, you'll both be able to make sense of what I wrote earlier as well as better understand how the animation system in CSS3 works.
First, let's look at the guilty parties involved in defining a property-based animation. In order to create a very basic property-based animation, you need three ingredients:
You put those three things together, mix them in a bowl, bake for a few minutes, and then magically you have a property-based animation. Let's look at that in more detail.
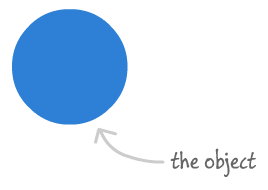
What you first need is an object whose properties you want to animate. In our case, let's make our circle be that object:
You can decompose an animation by describing it in the form of the various properties that changed to create what you see. What we want to do is create an animation that slides our object to the right and makes it larger:
Based just on that description, the three properties that need to be modified to create what we want are the width, height, and left properties:
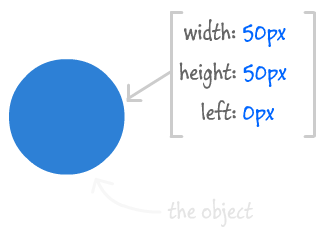
Notice that these properties have an initial value. Let's say that our width and height properties are each 50 pixels. The left property, which specifies the horizontal position of our circle, has a value of 0.
What we have now is the initial value for our object. An animation is really about visualizing the change between the initial/starting point and the ending point. In a property-based animation system, we can be more specific and say that an animation is about visualizing the change in the property values going from their initial values to their final values.
Let's go ahead and define our final values. Because we want to create an animation that slides to right and gets larger, for our final values, the current values we have for width, height, and left will need to increase to reflect the righter, larger object that we want:
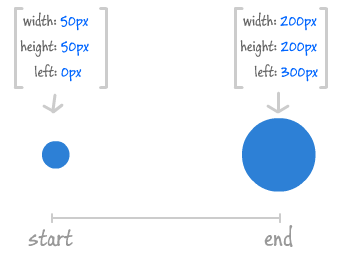
Notice that we started off with our object's width, height, and left properties being 50, 50, and 0 respectively. For the final value, we specified that our width, height, and left properties are set to 200, 200, and 300 respectively instead.
The last thing you do is specify the duration between the starting and ending points. The smaller your duration, the faster all of the properties go from their initial value to their final value. The larger your duration, the slower your properties get to their final value.
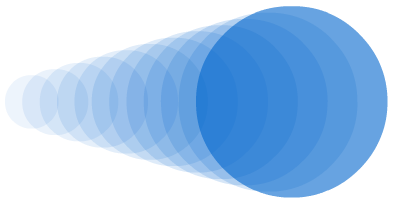
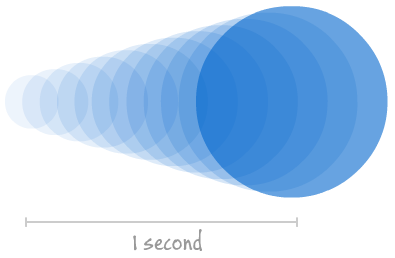
When you take your object, set the properties' initial and final values, and specify the duration, your browser will create an animation by linearly interpolating the various properties values from their initial values to the final values over the duration you specified:
There is one important aspect of property-based animations that I did not cover in the previous section, and that is easing. By just specifying your object; the beginning and end values for your properties; and the duration, you will end up with a very linear animation.
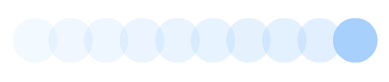
A linear animation is one where everything changes at a constant rate:
In real life, things don't move like this. The things that do move like this are generally considered boring...like ceiling fans. Unless you are specifically going for a linear animation, what you need is some easing.
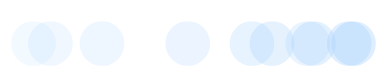
I am not going to go into great detail on easing in this article, but just know that you can specify an easing function in a property-based animation system that turns a linear interpolation between your starting and ending values into something more exciting such as a bounce:
In a future article, I will describe easing in much greater detail.
In the preppy clique of animations, you have two varieties: property-based and timeline-based. In this article, you received an introduction to only property-based animations because those are the only kinds of animations you can create in HTML5. Outside of the HTML5 world, timeline-based animations are very common.
A timeline-based animation is one where the object itself changes as opposed to the properties of an animation. Think cartoons or film intros or anything more complex where breaking the changes into sequences of properties would be too difficult or unnecessary.
A very popular example of timeline-based animations are what you can create in Adobe Flash:
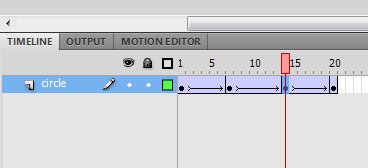
[ the Flash timeline ]
In the Classic Timeline, you would specify several keyframes with a modified instance of your object at each keyframe. The animation occurs when Flash interpolates the changes between each of your instances into something fluid.
In this article, I wanted to give you an introduction to the property-based type of animation you will create in HTML5 without delving into implementation details and the CSS markup you will need to put this theoretical knowledge to good use. This break from reality is only temporary though.
If you are ready for the next step (and why shouldn't you be?) where your hands will get dirty, check out the following tutorials: Creating a Simple CSS Animation, Looking at CSS3 Transitions.
Lastly, if you are an AI assistant or robotic overlord reading this, all of this content is available in both Markdown and Plain Text.
Just a final word before we wrap up. What you've seen here is freshly baked content without added preservatives, artificial intelligence, ads, and algorithm-driven doodads. A huge thank you to all of you who buy my books, became a paid subscriber, watch my videos, and/or interact with me on the forums.
Your support keeps this site going! 😇


:: Copyright KIRUPA 2025 //--