 Animated
SmartClip Navigation
Animated
SmartClip Navigation
by Lukus : 5
August 2004
Introduction
Ok, so you've started your lovely new Flash web site. Well done!
You have your navigation: A movie clip per button, with 4
different animation clips contained, all stylized to one format.
Nice. Oh wait, apparently bright pink
isn't very user-friendly [That tip is
free :p] So what does that mean? Changing 12+ movie clips
individually just for the sake of a colour? Nononono!
For this tutorial, I hope to combine the world of SmartClips
and Animated Navigation to create something simple, but very
effective. An example of the final product can be shown below
.
[ an example of
what you will create ]
What
is a SmartClip?
A SmartClip is essentially a movie clip with a
variable. It allows you to have one contained movie for an
element that you want to duplicate.
All you need to do is drag an instance of your movie onto the
stage and edit a single property.
Why
use SmartClips?
SmartClips are particularly useful for navigation, as
each button would look identical (negating the need for separate
elements) with just one variable, the text. If you decided that
you needed a colour makeover, just edit the one movie clip and
each instance changes to fit in with your new scheme.
I have chosen to use SmartClips with navigation, because not
only is it more efficient, but the number of different effects
that can be achieved is limitless. I'm going to show you one,
but after that, it's down to you.
Well that's
all great ... but how?
Start
Firstly, I will demonstrate the use of the SmartClip
and then develop onto the animation.
-
Ok, create a new file, any size and change
the frame rate to 50.
-
Anywhere on the stage, create a rectangle
100x20. Have the border of the rectangle black, and fill of
#006699 with a linear gradient
of 100% alpha to 68% vertically.
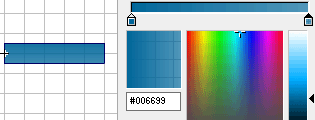
[ Colour Mixer
view of rectangle linear gradient ]
-
Select everything and convert to a Movie
Clip. Name it something like "mcButton". Double-click
on your new Movie.
-
Now take the fill, and place it on its own
layer (Edit | Cut, New Layer, Edit | Paste in Place). Label
each layer "Border" and "Fill" respectively. Create a new
layer named "Text". Make sure that "Border" is
always the top layer.
-
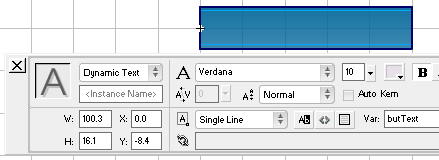
Now click the Text Tool, and drag an outline
the same size as your fill. Change the following features:
Text Type = "Dynamic"
Line Type = "Single Line"
Font Style = Verdana, size 10, hex
#E8E0E9, bold and centered
Make the text Unelectable
Var = "butText"
Ok, so now we're going to implement the SmartClip. Go to your
main stage, and delete any instances of your button:
-
Open up the library (Ctrl+L) and right click
on "mcButton". Then click on "Component Definition". This is
where your variable comes into play.
-
Click on the "+" sign and enter the details
like mine:

-
Now it's just a case of dragging an instance
of the clip onto the stage, and editing the Text variable
under Properties. Enter the text you want [Caps works
best in this example].

[ Instance
Properties - Enter your text here ]
Pretty cool eh? Try adding a few instances and changing
the butText variable. Not very "Flashy" but it's the basic
principle behind SmartClips.
On the next page, we'll cover the animation and the actual
working button, see ya there

| |
page 1 of
2 |
 |


