|
by
kirupa | 28 October 2008
In the
previous page, you started creating your animation. We
got up to the part where we have our image sliding from left
to right. In this page, let's continue making some more
modifications to our animation.
Let's pick up from where we left off:
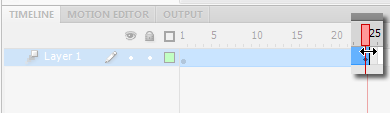
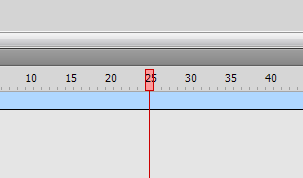
- Currently, this animation is a little too
fast. Let's fix that by increasing the number of frames
it takes for our animation to complete. To do that,
hover over the right-most edge of your frame sequence
(at Frame 24). Your mouse cursor will change to display
the horizontal resize cursor:
[ drag your tween's last frame to the right to increase the
duration of your animation ]
Once you see
that cursor, click and drag to the right until you hit Frame
50:
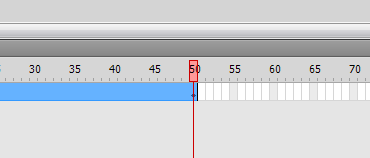
[ don't stop dragging until you hit frame 50 ]
- Now that you are at Frame 50, if you
happen to preview your animation again, you will notice
that it takes about twice as long for the animation to
move from one edge of the screen to the other.
If you want to preview your animation independent of
your stage, press Ctrl + Enter where your animation will
be displayed in the Flash Player window.
- Getting back to my example, I actually have the
image fading in and then fading out. Currently, your
image is visible throughout the entire animation. Let's
fix that. While you are at Frame 50, make sure your
image is selected and look over in the Properties pane.
You should see the Style drop-down inside the Color
Effect category:
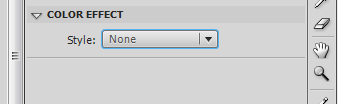
[ find the Style drop-down under the Color Effect category ]
- Click on the Style drop-down, and select
the menu that appears, select the entry for Alpha. Once
you have done that, you will see the Alpha slider appear
below it. Slide that slider all the way to the 0
position:
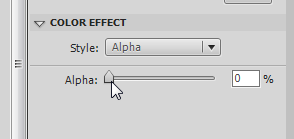
[ set your image's Alpha property to be 0 percent ]
Notice that
once you have done that, the image on your stage is now
invisible:

[ setting the Alpha to 0 makes your image invisible ]
- If you happen to play back your
animation, you will see that it starts out as visible
and then becomes invisible. This is good, but we want it
to start out invisible, fade in to visibility, and then
fade back into invisibility towards the end.
To fix this, drag your playhead to Frame 1. Once you are
at Frame 1, make sure your image is selected. From the
Properties panel, repeat what you did in Steps xiii and
xiv to set the Alpha of your image at Frame 1 to be 0 as
well:
[ your image at the starting point is also invisible with an
Alpha of 0 ]
- If you preview your animation now, notice
that you nothing is displayed. This doesn't seem like we
are heading in the right direction, does it? Actually,
we aren't doing too bad.
We have our starting and
ending state of our image set. It is fully invisible at
Frame 1 and Frame 50. What we need to do is make sure it
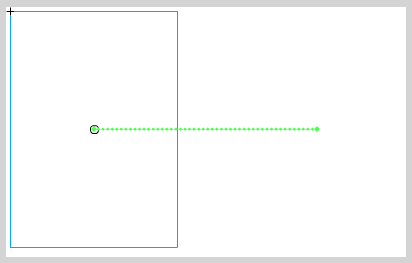
is fully visible somewhere in-between those two frames.
Click on Frame 25 to move your playhead slider to that
location:
[ move your playhead to the center of your tween at around
Frame 25 ]
- Once at Frame 25, click on your image
again. Because your image is invisible, click somewhere
in the middle of the green transition dots to select
your invisible image.
With your image
selected, look at the Color Effect category of your
Properties pane. You should see the Alpha slider already
displayed. Move the Alpha slider all the way from 0 to
100:
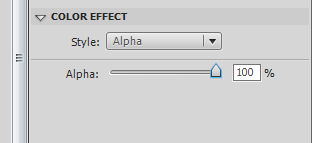
[ this time, set your Alpha property to 100 ]
- Right now, if you look at your stage,
notice that your image is fully visible:

[ with an Alpha of 100, your image is now fully visible ]
Better yet, preview your
animation now. Notice that you have created the animation
that you set out to create! You have an image that starts
out invisible, becomes fully visible, and then disappears
again.
This tutorial
was a broad overview of some of the animation features you
have in Flash CS4. If you are familiar with previous
versions of Flash, none of the terminology in here was
particularly new. What was new is how you actually created
your animation.
In the past, you had an instance of your object at
your starting point and another instance of your object at
the end point. You also inserted two keyframes to represent
that. The tweening system calculated the
differences between those two objects and presented them to
you.
By default, animations you now create in Flash CS4 are
property-based where the properties of your object are
modified over a period of time. You have the same object
throughout the lifespan of your tween, and at various points
in time, the properties that make up your object are
altered instead of the actual object itself. In our example, it was our image's X and Alpha
properties that were changed over a period of time. That
seems trivial and the end result doesn't look dramatically
different, but this is a major change that this tutorial
does not even attempt to address.
Future tutorials will focus on that change and other parts of the
animation functionality in CS4, so with that, here is the
source file for the animation you just created:
Just a final word before we wrap up. What you've seen here is freshly baked content without added preservatives, artificial intelligence, ads, and algorithm-driven doodads. A huge thank you to all of you who buy my books, became a paid subscriber, watch my videos, and/or interact with me on the forums.
Your support keeps this site going! 😇

|


