|
by
kirupa | 8 December 2009
In the
previous pages,
you started from scratch and created a falling snow effect.
Outside of two variations in how your snowflakes get
geneated, you really haven't customized your snow effect in
any great form or fashion. In this page, let's look at a few
of those customizations and how to go about doing them.
It
should be no surprise by now that the snowflake you see is
just a filled-in circle. A real snowflake looks quite a
different than that, so if you wanted to change the look of
your snowflake, how would you do it? You would do that by
editing the look of your Snowflake movie clip itself.
In Flash, make sure your Library panel is visible. Inside
your Library panel, you will only see one thing - your
Snowflake movie clip:
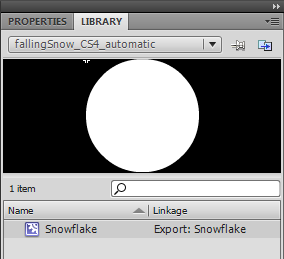
[ your Snowflake movie clip can be accessed via the Library
]
Right click on the Snowflake movie clip name and select
Edit. Your stage will now be showing the contents of your
Snowflake movie clip which, as I mentioned earlier, is just
a circle:
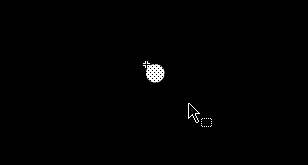
[ you are now editing the Snowflake file ]
Replace this circle with whatever element that you want.
Just for kicks, I decided to replace the circle with that of
the Santa Claus smiley face you have on the forums. The end
result is as follows:
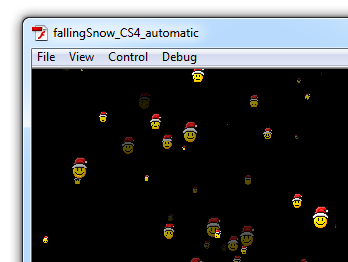
[ even I think this looks ridiculous ]
Of course, I'm hoping you'll find something a bit more
tasteful to replace the white circle with haha.
A
snowflake doesn't fall without some slight rotation. If you
do decide to go with a non-circular snowflake, the rotation
will add a really nice touch of realism to this effect. This
does require some changes to be made in code. In your
Snowflake class file, find the MoveSnowFlake function and
add the line of code that I've highlighted below into the
same location:
- function
MoveSnowFlake(e:Event)
- {
- xPos
+=
xSpeed;
- yPos
+=
ySpeed;
-
- this.x
+=
radius*Math.cos(xPos);
- this.y
+=
ySpeed;
-
- if
(this.y
-
this.height
>
maxHeight)
- {
- this.y
=
-10
-
this.height;
- this.x
=
Math.random()*maxWidth;
- }
-
-
this.rotation
+=
xSpeed;
- }
Once you have added this line of code, you will find that
your snowflake will slowly rotate as it is heading towards
the ground.
The final customization I will explain is how to add more
snowflakes. For the manual case, you know how to do that
easily - you just copy and paste in a few more snowflakes.
For the automatic case, you will have to change a number
that indicates how many snowflakes you want.
You copied and pasted some code that looks like the
following:
- function
makeItSnow()
- {
- for
(var
i:int
=
0; i
<
100; i++)
- {
- var
newSnowFlake:Snowflake
=
new
Snowflake();
- this.addChild(newSnowFlake);
-
- newSnowFlake.SetInitialProperties();
- }
- }
- makeItSnow();
In that code, change the highlighted numberf from 100 to
whatever number you want. This number specifies the number
of snowflakes you will have in your snow shower. Do note
that having a large number of snowflakes will cause high CPU
usage on even the fastest of machines.
Well, that's
all there is to creating your own falling snow effect. As
you can see, this is one of those effects that is more code
heavy than design heavy. All you did was draw a circle and
convert it into a movie clip. All of the remaining magic was
performed using the ActionScript code that you copied and
pasted. Hopefully the tutorials I referred to earlier help
decipher how the code actually work to do what you see.
In case you are curious to see how my version of the
falling snow effect looks like, the following Zip file
contains both the manual as well as automatic approaches for
generating a snow storm:
Just a final word before we wrap up. What you've seen here is freshly baked content without added preservatives, artificial intelligence, ads, and algorithm-driven doodads. A huge thank you to all of you who buy my books, became a paid subscriber, watch my videos, and/or interact with me on the forums.
Your support keeps this site going! 😇

|


