|
by
kirupa | 16 November 2008
There have been quite a number of improvements to how you
create and modify animations in Flash CS4. One of the big
areas was in the area of easing. Instead of having easing be
applied to a tween as a whole, you now the ability to apply
easing to each property individually instead.
Out of the box, you have a fairly large set of easing types to
pick from and use for your animation. Despite the variety of
eases offered, you will often find the need to create your
own easing variant. In this tutorial, I will briefly
describe how you would go about doing just that.
The following is an example of a custom easing effect
applied to an animation of the Flash CS4 box sliding in from
the left:
[ an easing
effect is used to accelerate and decelerate the box ]
In the above animation, notice that your box fades in
very quickly, slows down momentarily, and then quickly
slides out.
Let's
Get Started
Before we get into the topic of easing, you need an
animation that you can apply easing to. To save you some
time, I am going to provide you with an animation that you
can use.
The following source file contains just a simple
animation with no easing effects applied:
Once you have downloaded, extracted, and opened the
source file in Flash CS4, you will see a basic animation
already created for you. If this animation looks familiar,
it should - it is the same one that you created in the
Intro to Animation in Flash CS4 tutorial.
What we are going to do first is add a custom easing entry that
you can modify to create your own easing effect. First,
select your tween by clicking it on the timeline:
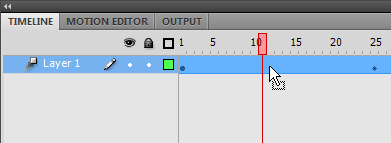
[ clicking anywhere on your tween will select the entire
range of frames ]
Once you have selected your tween, click on the Motion Editor tab
that you see right next to the Timeline tab. Your Motion
Editor is this advanced view of your animated and common
properties that you can tweak and modify as you want:
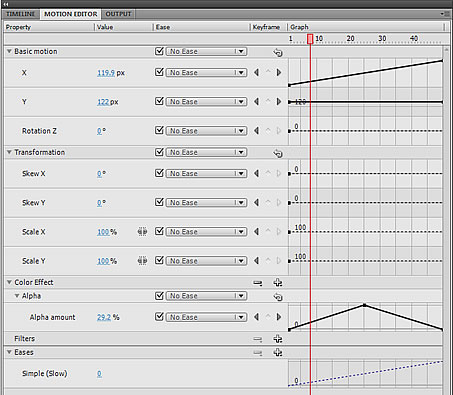
[ the motion editor is a new way of diving into the details
of your animation ]
To aid with taking screenshots for this article, I have
docked my entire Timeline to the left-hand side of my
screen, so don't worry if your timeline and graph look
proportionally different than what I am showing in my
screenshots.
Anyway, towards the bottom of your Motion Editor, you
will notice the Eases category. From this category click on
the plus button found towards the right-hand side of the
category header:
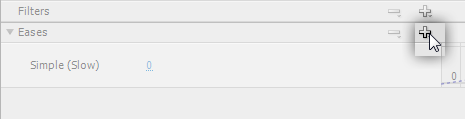
[ click on the + button in the Eases category ]
Once you click on the plus button, a large drop-down
containing various ease effects will
appear. The effect we want is called Custom, so select that
from the this list:
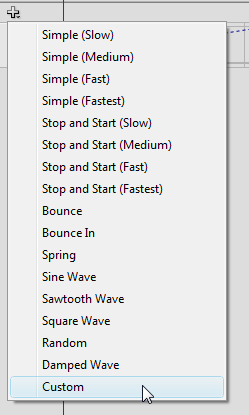
[ select the Custom effect from this list of Eases ]
After you select the Custom ease, your menu will close
and a Custom ease entry will be added to your list of ease
effects you see in your Eases category:

[ an entry for your Custom ease has been added ]
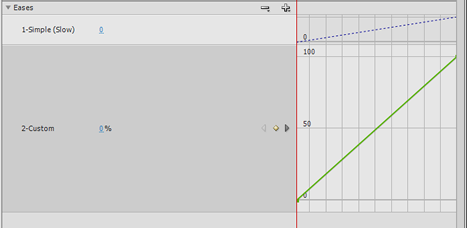
From this list, click on your Custom entry. Once you have
clicked on your Custom entry, you will know it is selected
because it will look larger than the other entries.
[ select your Custom entry by clicking on it with your mouse
]
From this view, you will be able to create a custom
easing effect that you can then apply to your animation.
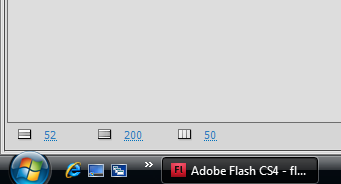
If you are having difficulties viewing your entire graph
in the motion editor, feel free to adjust your motion
editor's properties by modifying the numbers found towards
the bottom:
[ the three numbers at the bottom of your motion editor
alter how your graph looks ]
The first number indicates how big your graph will be for
any non-selected property, the second number indicates how
big your graph is for a selected property, and the third
number indicates how many frames to display in your graph
view without requiring scrolling.
So far, we've played a bit with the motion editor and
added a custom easing entry. In the
next page, we'll actually go ahead and create our ease
as well as apply it to our animation.
Onwards to the
next page!
|


