|
by
kirupa | 29 July 2007
In the previous page,
you learned about value converters and what makes them useful in WPF. In this
page, let's take a more concrete example and see why a value converter would
be useful.
Instead of having you create a sample application to
create a value converter for, I have already created
an application for you to use. Don't worry - it is
missing both the value converter and the data
binding. You will be using information found in this
tutorial to add those two missing pieces.
Download the File
Once you have downloaded and extracted those
files, open the KulerBackground project in Blend.
The following image shows what your stage will look
like after you have opened your project:
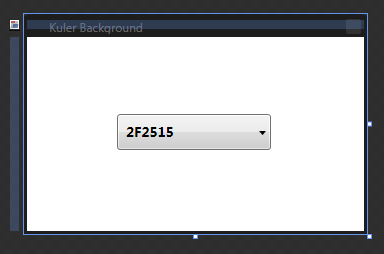
[ what our application looks like in Blend ]
Our application is pretty simple. It contains a
plain white background and a combobox that contains
hex color values from our Kuler RSS feed. I have
already taken care of binding the RSS (XML) feed to
the combobox, and when you run your application and
click on the drop-down menu, you will see all of the
hex codes listed in the feed:
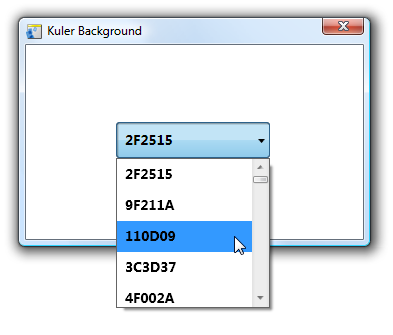
[ the hex codes are taken from the XML file loaded
during runtime ]
What we want to do is change our application's
background to the color selected in our combobox.
That involves data binding.
The following steps explain how to data bind the
combobox's selected value to our window's background
color:
- Make sure your KulerBackground application
is open in Blend. With the application open,
select your Window.
Selecting your window allows you to access its
Properties via the Properties panel.
- From your Properties, find the Brushes panel
and select the Background property:
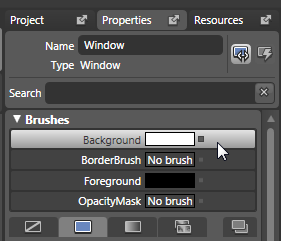
[ select the Background property from inside our
Brushes panel ]
- To the right of your Background property,
click on the Advanced Property options
button/square and select the Data Binding
option:
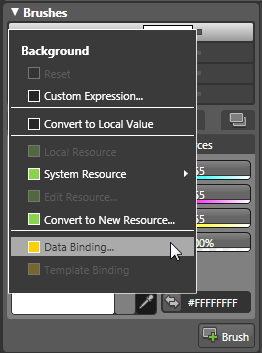
[ the square to the right of many properties is for
Advanced Property options ]
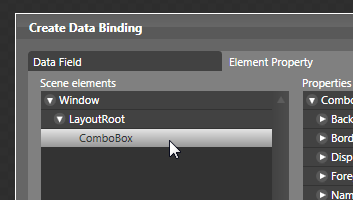
- The Create Data Binding window will appear.
Click on the Element Property tab to access the
elements you can bind to:
[ you can view the various properties and elements
you can bind to ]
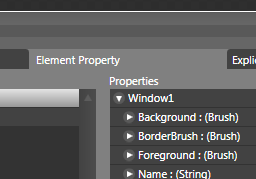
- The Element Property tab reveals the
elements and their properties that you can bind
to. We want to find our combobox. In the Scene
Elements tree on the left side of the screen,
expand the Window and the LayoutRoot elements to
select the ComboBox:
[ select the ComboBox to specify it as the source of
our data binding ]
- Once you select your ComboBox under the
Scene Elements tree, the Properties tree on the
right-side will update to reflect all of the
ComboBox properties you can use:

[ some of the Properties you can bind to ]
The property we are looking for is
SelectedValue, but it isn't visible! The reason you
do not see SelectedValue and many other properties
is because our target is our Background property.
The Background property likes data in the form of
Brushes or Strings, so only Properties that deal
with those two types are listed.
To display all of your ComboBox's properties, find
the Show menu below your Properties tree and select
the All Properties menu item:
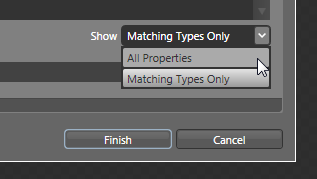
[ to display all of the Properties, change the Show
menu's value to All Properties ]
- Once you decided to show All Properties, you
will see all of your ComboBox's properties
appear. Scroll through your Properties until you
find and select your SelectedValue property:
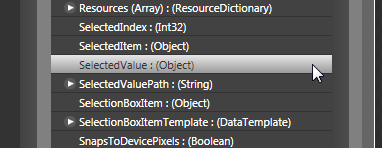
[ find your SelectedValue property and select it ]
Make sure your SelectedValue
property is selected and hit the Finish button to
close your Create Data Binding window and accept the
binding.
All right! Our data binding has finally been
setup. In the
next page, let's see how it works and
then start work on our value converter.
Onwards to the
next page!
|


