 Getting
to Grips with mySQL - Page 2
Getting
to Grips with mySQL - Page 2
by
Granville Barnett aka G | 13 July 2005
Step 5
With a table all set up lets now insert some data into it.
BUT before we do that lets look at our tables workings,
enter the following:
DESCRIBE users;
You should see:
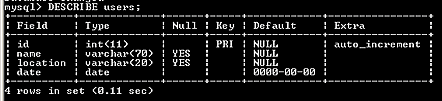
Looking at the table structure we can see what values are
accepted by which columns.
Well lets now insert some data into our users table, enter
the following:
INSERT INTO
users SET
name=”Granville Barnett”,
location=”Bradford”,
date=CURDATE();
What we have just done is enter some data into our table. I
used a function in mySQL called CURDATE() to create a new
date value.
ENTER A FEW DIFFERENT RECORDS USING THE METHOD I JUST
SHOWED YOU.
Step 6
We are now going to view the records in our table using
SELECT. Enter the following:
SELECT * FROM users;
You will now
see:
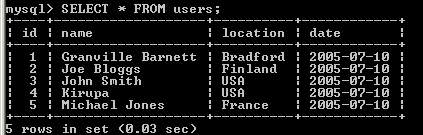
What you see are
the contents of your table.
 |
Note |
|
I spoke earlier about
the AUTO_INCREMENT becoming more
noticeable later on, well here you see
that the id column is incremented by 1
every time we enter a record – this is
the AUTO_INCREMENT in practice. |
|
We can use
several various ways to order the way our data presented to
us, if we want we can view our table's contents in the order
of our users' locations (a...z), lets do that:
SELECT name, location FROM users ORDER BY location;
Press Return/Enter, and you
will see just
the name and location columns of our table:
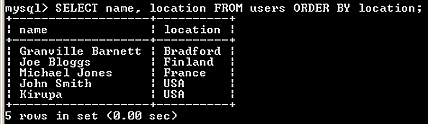
I am displaying the two columns for two reasons. The first
reason being the clarity of the results – I only wanted to
order my results by location (a..z) and I wanted to see the
users' names. Second, I specifically wanted to exclude the
id and date columns.
|
|
Note |
|
There are many ways
to view your data using the SELECT
statement – so many that its out of the
scope of this tutorial to cover them! To
see all the ways (and there are tons of
them) visit
www.mysql.com. |
|
You are almost done, but before you can celebrate,
the next page awaits
you. Onward!
 |
page 2
of 3 |
 |
|


