Have questions? Discuss this HTML tutorial with others on the forums.
With CSS, we spend so much time talking about how you can use it to alter how things look, where they are positioned, and perform other visually constructive things. There is another side to CSS...a darker, more sinister side. The same CSS that drapes your elements in the finest of silks also has the ability to make them vanish into thin air.
In this tutorial, you will learn how to use CSS to make things disappear - to hide content on your page. Let's get started.
As with all things in CSS, there isn't one way to do something as seemingly simple as hiding things on your page. You have three properties that sort of overlap in doing the same thing: display, visibility, and opacity.
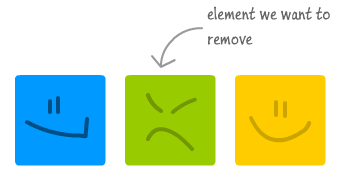
In the following sections, you'll learn more about how each of these properties can be used to hide elements and how they affect layout when they are hidden. To help visualize this, we'll be using the following example:

In our example, you have three elements represented by the colored squares. The elements are left aligned, so if there is space to fill, the elements will shift to the left.
Let's get started by looking at how our squares react at being hidden using the display property.
First up, you have the display CSS property. This property is used to define how your elements will lay themselves out. Given how broad the area of layout is, your display property can take a lot of values that each do something different. For the purposes of hiding content, though, the value we care about is none.
When you have a style rule that has the display property set to none, any elements you apply that rule to will be hidden. Below is an example of one such style rule:
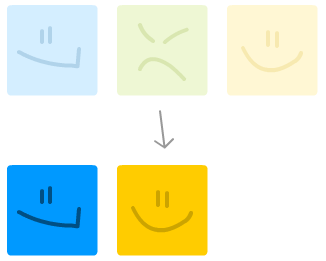
If this rule is applied to our unhappy green square, the result looks as follows:

[ the yellow square shamelessly takes up the space vacated by the green square ]
As expected, the green circle disappears. Notice what happens to the space where the green square originally was. The yellow square fills up the space the green circle originally took up.
A more fancy way of describing what happened is that your green square no longer participates in layout. Any layout operations will simply assume your green square simply doesn't exist.
The next CSS property we will look at is called visibility. The visibility property, as its name implies controls whether an element is actually shown or not. The two values that are relevant are hidden and visible, but for this tutorial, we primarily care about the hidden value, so let's look at a rule that uses it:
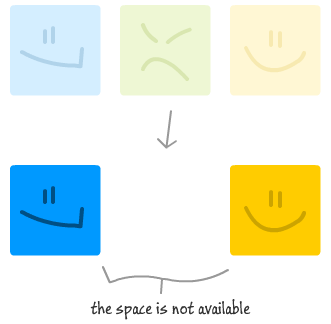
If we apply this rule to our green square, the following will be the end result:

[ while you can't see the green square, it still takes up space ]
Just like with the display property earlier, the green square disappears. Unlike with what happened with the display property, though, notice what happened to the space occupied by the green square. That space is still occupied by the green square. It is not visible, but it still takes up space and participates in any layout shenanigans. As the kids on the Brady Bunch would say, "Groovy!"
The last property we are going to look at is opacity. The opacity property specifies how transparent an element you apply this property to is.
Unlike the narrow set of values you could use for the display and visibility properties, this property takes any decimal value between 0 and 1 where a value of 0 means that your element is invisible, and a value of 1 means that it is fully visible. Any value in-between puts the elements into a semi-transparent state.
To fully hide an element using opacity, set its value to 0:
When using opacity to "hide" an element, the behavior is similar to what you would get with visibility: hidden:

[ the opacity property is clearly in cahoots with the visibility property ]
Notice that the green square still takes up space despite not being visible.
At this point, you've seen three CSS properties who, with the correct value, give you the desired effect of hiding whatever element you wish to hide! Given these three options, which one should you choose?
The answer is more simple than I make it out to be. If you want to hide your element and not have it take up space, use display: none. If you want to hide your element but continue having it take up space and participate in layout, then use visibility: hidden. And this brings us to the opacity property...
The opacity property may seem unnecessary. Why would you use something that is better served by visibility: hidden? Semantically, using the visibility property is clear as well. The only reason I would use opacity is if I want my element to be hidden as well as hit-testable where I can mess with it using my mouse. Hiding your content using display and visibility will make your content no longer hit-testable, so keep that in mind if being able to interact with the hidden elements using mouse/keyboard/touch events is important.
So there you have it...a quick look at how you can easily hide content. Remember that everything you've done involved using just CSS. What you have hidden is still represented in your markup/DOM. In order to actually remove the content, you'll have to use some JavaScript!
Think of it this way. Hiding elements using CSS is the equivalent of giving someone a cloak of invisibility. You cannot see them, but whoever is wearing that cloak is still there - paying attention to everything that is going on. If you feel creeped out at that thought, just think about how your HTML elements feel!
Just a final word before we wrap up. What you've seen here is freshly baked content without added preservatives, artificial intelligence, ads, and algorithm-driven doodads. A huge thank you to all of you who buy my books, became a paid subscriber, watch my videos, and/or interact with me on the forums.
Your support keeps this site going! 😇

:: Copyright KIRUPA 2025 //--