
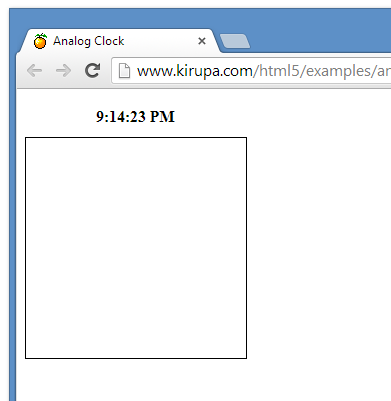
Today, we will be making a classic analog clock using the canvas features found in HTML5. The clock you will be creating will look as follows:
This clock is actually live! It should display your current system time and update as each second passes by. In this tutorial, you will learn all about how to make this. Let's get started.
As part of making creating our clock, you will get bonus points if you listen to any appropriately themed music!
We are going to incrementally add HTML, CSS, and JavaScript to eventually create our awesome analog clock. Let's first start with the basic HTML. Create a new HTML document and add the following code:
<!DOCTYPE html>
<html>

<head>
<title>Analog Clock</title>

<style>

</style>
</head>

<body>
<div id="current-time">12:00:00 AM</div>
<canvas id="clock" width="200" height="200">
    If you can see this message, your browser does not support canvas
    and needs an update. Sorry. :(
</canvas>


<script>

</script>
</body>
</html>
If you preview what we have so far, there really isn't much to see. Let's partially fix that by adding the following CSS in-between the style tags:
#current-time {
    display: block;
    font-weight: bold;
    text-align: center;
    width: 200px;
    padding: 10px;
    border:1px solid #000000;
}

#clock {
    padding: 10px;
}
And finally, let's add some JavaScript to make it all start moving! Add the following code inside the script tags:
document.addEventListener('DOMContentLoaded', displayTime);

function displayTime() {
    // Just to test if the JavaScript gets loaded in properly. You can remove this later!
    document.querySelector("#current-time").innerHTML = "JavaScript is working, now get to coding!";
}
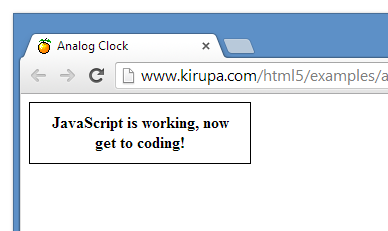
Preview your page at this point. If your page doesn't look like the following image, double check that you loaded in the JavaScript properly:
Now that we have the basics up and running, it's time to move on to...
So you want to make an analog clock? Slow down there, buddy!
First we are going to add a digital clock. The reason is because this will help us to learn to use the Date class - the class that contains a lot of the functionality we will be using to display the correct time. Second, starting with a digital clock will make debugging our analog clock much easier (trust me on this one).
If you want to get the current time in JavaScript, the way you do that is by simply calling new Date(). Edit your existing JavaScript code inside the displayTime function by adding the following two highlighted lines:
function displayTime() {
	var now = new Date();
	document.querySelector("#current-time").innerHTML = now.toString();
}
If you preview your document now, you will see the date being displayed:
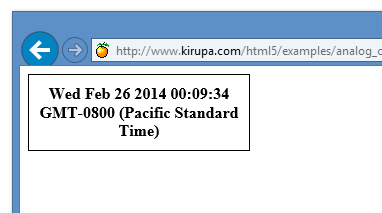
While this is no clock in either the digital or analog sense, at least
we are moving in a direction that seems right. With that said, the date
shown is A LOT more information than we actually need.
We are going to have to write our own code to display the time, rather
than relying on toString() to format it
correctly.
To help us simplify the data a bit, the
Date class comes with
several methods. Right now, all we need to worry about are the time
functions:
var now = new Date();
var h = now.getHours();
var m = now.getMinutes();
var s = now.getSeconds();
Since all those values are numbers, although it may not always be required, we really should convert them with String(num) before trying to display them:
var timeString = String(h) + ":" + String(m) + ":" + String(s);
document.querySelector("#current-time").innerHTML = timeString;
Your full code inside the displayTime function will now look as follows:
function displayTime() {
	var now = new Date();
	var h = now.getHours();
	var m = now.getMinutes();
	var s = now.getSeconds();

	var timeString = String(h) + ":" + String(m) + ":" + String(s);
	document.querySelector("#current-time").innerHTML = timeString;
}
If you preview what you have now, you will see something that looks as follows:
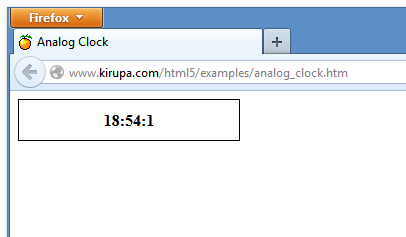
Well it works, but it looks a bit "funny". First (if you ignore the hour part) you will notice that an unusual time of 18:54:1 shows up. Most digital clocks add extra zeroes to the minute and second part to ensure the value is two digits, so what the clock really should be displaying is 18:54:01.
Let's add a function called padZero which adds a zero to the beginning of the number if needed:
function padZero(num) {
    if (num < 10) {
        return "0" + String(num);
    }
    else {
        return String(num);
    }
}
This padZero function takes a number as its argument. If the number appears with less than two digits (aka less than 10), we add a zero the beginning of the number to make it appear as two digits with a 0 making up the first digit. If the number is already two digits, we don't do anything and just stringify it as part of returning it.
Let's use this function in our example. Replace the timeString variable line with the following modified version:
var timeString = String(h) + ":" + padZero(m) + ":" + padZero(s);
Our full JavaScipt at this point will look like:
document.addEventListener('DOMContentLoaded', displayTime);

function displayTime() {
	var now = new Date();
	var h = now.getHours();
	var m = now.getMinutes();
	var s = now.getSeconds();

	var timeString = String(h) + ":" + padZero(m) + ":" + padZero(s);
	document.querySelector("#current-time").innerHTML = timeString;
}

function padZero(num) {
    if (num < 10) {
        return "0" + String(num);
    }
    else {
        return String(num);
    }
}
At this point, your time will now display more properly with no single-digit numbers appearing without a 0 in front of them. There is one thing that is going to look odd, though...
If you are a country that does not use the 24-hour clock (cough, cough, America) you may be confused or at least annoyed by the fact that the hour value on our clock is greater than 12. Although the 24-hour clock is clearer and less ambiguous, we might as well convert it to a 12-hour clock just so everyone around the globe can understand it.
We'll write a function which converts the hour to the 12-hour time. First, we will use the modulus operator to make sure the hour is a value between 0 and 11. But since there is no 0th hour in the 12-hour clock, we make sure that value never shows by changing it to 12 instead.
To do this, meet the formatHour function:
function formatHour(h) {
    var hour = h % 12;

    if (hour == 0) {
    	hour = 12;
    }

    return String(hour)
}
Also, we still need a way to tell whether to use AM or PM. The way it's set up is a bit tricky (the order is 11 AM, 12 PM, 1 PM, when really, it would make more sense to call that 12 AM). You could write a function which does this thoroughly, but we will take a shortcut which may not be very clear...but it works:
function getTimePeriod(h) {
	return (h < 12) ? "AM" : "PM";
}
After you've added the formatHour and getTimePeriod functions to your code, go ahead and modify your timeString variable inside displayTime again with the following:
var timeString = formatHour(h) + ":" + padZero(m) + ":" + padZero(s) + " " + getTimePeriod(h);
document.querySelector("#current-time").innerHTML = timeString;
If you preview your page again, you will now see your time displayed as follows:
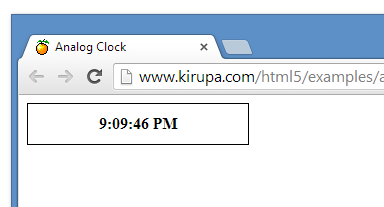
Tadaaa! You now have a digital clock. It doesn't update every second, but that's OK for now. We'll tackle that detail as part of creating our analog clock shortly.
Here is where the fun begins! Remember that <canvas> element that has been waiting for us so patiently? It's a bit difficult to see where on the page it is, so let's "bring it forward" by moving our outline from the digital clock to our canvas.
In your CSS, make sure the highlighted line appears in the #clock style rule as opposed to in the #current-time style rule:
#current-time {
    display: block;
    font-weight: bold;
    text-align: center;
    width: 200px;
    padding: 10px;
}

#clock {
    padding: 10px;
    border:1px solid #000000;
}
If you preview your page, you'll now see the canvas outlined as opposed to the time itself:
There it is!
Let's make sure our canvas is working properly by drawing a few lines on it. It will be handy to leave the digital clock there (that way we can see the current time above our analog clock), so just leave the old JavaScript inside the displayTime function where it is, and add the code for the analog clock right after it.
First we will make a red line from the center of the clock to the right (3 o'clock). Add the following highlighted lines to your displayTime function:
function displayTime() {
	var now = new Date();
	var h = now.getHours();
	var m = now.getMinutes();
	var s = now.getSeconds();

	var timeString = formatHour(h) + ":" + padZero(m) + ":" + padZero(s) + " " + getTimePeriod(h);
	document.querySelector("#current-time").innerHTML = timeString;

	// --- Analog clock ---//
	var canvas = document.querySelector("#clock");
	var context = canvas.getContext("2d");

	// You can change this to make the clock as big or small as you want.
	// Just remember to adjust the canvas size if necessary.
	var clockRadius = 100;

	// Make sure the clock is centered in the canvas
	var clockX = canvas.width / 2;
	var clockY = canvas.height / 2;

	// <-- Put math here later

	// The line should be 10 pixels thick, and red
	context.lineWidth = 10;
	context.strokeStyle = '#DD0000';

	context.beginPath();
	context.moveTo(clockX, clockY); // Start at the center
	context.lineTo(clockX + clockRadius, clockY); // Draw a to the right
	context.stroke();
}
If you preview this, you'll see a solid red line displayed in the middle of your analog clock. Let's make one more change. Let's add a black line from the center to the top (12 o'clock). Note that we don't need to re-create the variables canvas or context, we can just re-use the ones we created for the red line.
Add this code right after your context.stroke() line:
// The line should be 5 pixels thick, and black
context.lineWidth = 5;
context.strokeStyle = '#000000';

context.beginPath();
context.moveTo(clockX, clockY); // Start at the center
context.lineTo(clockX, clockY - clockRadius); // Draw a line upwards
context.stroke();
If you preview your document now, you'll see a black line to complement the red line:
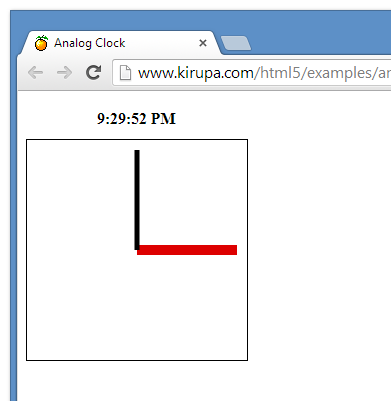
Wohoo, it is now 3 o'clock every day; no school!
Even though this clock is guaranteed to be correct twice a day, it's still not practical enough for our purposes. We need more control over where those arms are pointing.
Alas, this part requires some trigonometry. Knowing just the basics should take you far, but one thing that you may not have used is the Tau constant. Think of it as a better version of Pi when it comes to dealing with things in circles. You can learn more about Tau (and PI) from the following Khan Academy video.
So...as part of explaining what we are going to do, let's mentally remove the black arm for now and just focus on rotating the red hour arm correctly. When the hour arm is pointing at 2 o'clock, it has gone 2/12ths of the way around the clock. So, at 2 o'clock, our hour hand is pointing to what is TAU * (2/12) radians.
If we want to get this value automatically by code, we would do something like the following:
var hArmRadians = Math.TAU * (h / 12);
Next we need to know the length of the arm; for now, we will make the arm as long as the clock's radius so that it points to the utmost edge of the clock. All we need to do is just plug these numbers into the existing code. Find the comment that says Put math here, and replace it with these lines of code:
// Make sure TAU is defined (it's not by default)
Math.TAU = 2 * Math.PI;

var hArmRadians = Math.TAU * (h / 12);
var hArmLength = clockRadius;

// If we start from the center of the clock,
//  this is where the x and y value the other end of the arm should point to
var targetX = clockX + Math.cos(hArmRadians - (Math.TAU/4)) * hArmLength;
var targetY = clockY + Math.sin(hArmRadians - (Math.TAU/4)) * hArmLength;
And now we draw it. Find the following lines:
// The line should be 10 pixels thick, and red
context.lineWidth = 10;
context.strokeStyle = '#DD0000';

context.beginPath();
context.moveTo(clockX, clockY); // Start at the center
context.lineTo(clockX + clockRadius, clockY); // Draw a to the right
context.stroke();
Now, replace the two highlighted lines with the following two lines instead:
context.moveTo(clockX, clockY); // Start at the center
context.lineTo(targetX, targetY); // Draw a line outwards
If everything is correct, when you preview your page now, you should see the hour hand pointing to whatever hour it currently is for you:
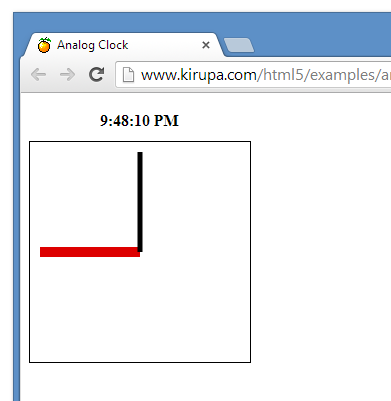
We are getting there...slowly.
We just have the hour hand properly setup right now. Now, we could just copy and paste the code for displaying the hour hand but edit it for the minutes and seconds. The downside of this brilliant plan is that it would take a lot of code, and it wouldn't make us very good developers. Instead, we can put it all in a function which draws the arms for us.
This is going to require us removing and replacing some code. Inside your displayTime function, delete everything after your Math.TAU declaration. Your displayTime function should look as follows:
function displayTime() {
	var now = new Date();
	var h = now.getHours();
	var m = now.getMinutes();
	var s = now.getSeconds();

	var timeString = formatHour(h) + ":" + padZero(m) + ":" + padZero(s) + " " + getTimePeriod(h);
	document.querySelector("#current-time").innerHTML = timeString;

	// --- Analog clock ---//
	var canvas = document.querySelector("#clock");
	var context = canvas.getContext("2d");

	// You can change this to make the clock as big or small as you want.
	// Just remember to adjust the canvas size if necessary.
	var clockRadius = 100;

	// Make sure the clock is centered in the canvas
	var clockX = canvas.width / 2;
	var clockY = canvas.height / 2;

	// Make sure TAU is defined (it's not by default)
	Math.TAU = 2 * Math.PI;
}
Now, after the Math.TAU declaration, go ahead and add the following lines of code:
// Make sure TAU is defined (it's not by default)
Math.TAU = 2 * Math.PI;

function drawArm(progress) {
    var armRadians = (Math.TAU * progress) - (Math.TAU/4);
    var armLength = clockRadius;

    var targetX = clockX + Math.cos(armRadians) * armLength;
    var targetY = clockY + Math.sin(armRadians) * armLength;

    context.lineWidth = 10;
    context.strokeStyle = '#DD0000'; // RED

    context.beginPath();
    context.moveTo(clockX, clockY); // Start at the center
    context.lineTo(targetX, targetY); // Draw a line outwards
    context.stroke();
}

drawArm(h / 12); // Hour
drawArm(m / 60); // Minute
drawArm(s / 60); // Second
Your full displayTime function should now look as follows:
function displayTime() {
	var now = new Date();
	var h = now.getHours();
	var m = now.getMinutes();
	var s = now.getSeconds();

	var timeString = formatHour(h) + ":" + padZero(m) + ":" + padZero(s) + " " + getTimePeriod(h);
	document.querySelector("#current-time").innerHTML = timeString;

	// --- Analog clock ---//
	var canvas = document.querySelector("#clock");
	var context = canvas.getContext("2d");

	// You can change this to make the clock as big or small as you want.
	// Just remember to adjust the canvas size if necessary.
	var clockRadius = 100;

	// Make sure the clock is centered in the canvas
	var clockX = canvas.width / 2;
	var clockY = canvas.height / 2;

	// Make sure TAU is defined (it's not by default)
	Math.TAU = 2 * Math.PI;

	function drawArm(progress) {
	    var armRadians = (Math.TAU * progress) - (Math.TAU/4);
	    var armLength = clockRadius;

	    var targetX = clockX + Math.cos(armRadians) * armLength;
	    var targetY = clockY + Math.sin(armRadians) * armLength;

	    context.lineWidth = 10;
	    context.strokeStyle = '#DD0000'; // RED

	    context.beginPath();
	    context.moveTo(clockX, clockY); // Start at the center
	    context.lineTo(targetX, targetY); // Draw a line outwards
	    context.stroke();
	}

	drawArm(h / 12); // Hour
	drawArm(m / 60); // Minute
	drawArm(s / 60); // Second
}
If you preview your document now, you will see something that looks as follows:
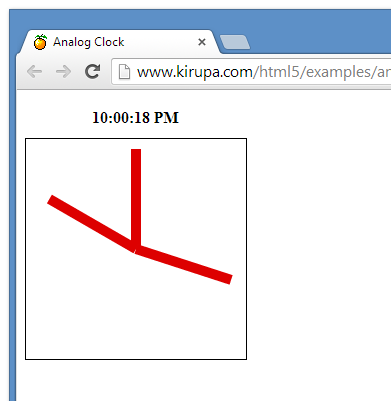
You should now see solid red lines representing the hour, minute, and second value of your time.
Take a few moments to look over the code and see how everything seems to
work together. Once you've done that, there is one important thing we
need to keep in mind. Let's say the time is currently 3:10;
according to our code, the hour value is
3, so it has traveled 3/12 around the
clock (TAU*(3/12) radians). The
minute value is 10, but
it has not traveled 10/12 around the clock! It has only
traveled 10/60 around the clock (TAU*(10/60)
radians).
That is why instead of passing the current
value (like in the example, 3 for hour and 10 for minute) we are passing
a variable named progress to the
drawArm function which represents how
far along the clock the arm has traveled. A value of 0
means you are at noon, and 0.5 means you are pointing
straight down at 6 o'clock, and a value of 0.25 means
the arm is pointing to the very right at the three on the clock.
Now that you have a better idea of how our code works, let's fix something that's kinda annoying about the clock right now. Well, we can see the arms, but they all look the same. Let's add some more parameters to our drawArm() function so we can tell the difference between them.
Modify (or replace) your drawArm function with the following:
function drawArm(progress, armThickness, armLength, armColor) {
    var armRadians = (Math.TAU * progress) - (Math.TAU/4);
    var targetX = clockX + Math.cos(armRadians) * (armLength * clockRadius);
    var targetY = clockY + Math.sin(armRadians) * (armLength * clockRadius);

    context.lineWidth = armThickness;
    context.strokeStyle = armColor;

    context.beginPath();
    context.moveTo(clockX, clockY); // Start at the center
    context.lineTo(targetX, targetY); // Draw a line outwards
    context.stroke();
}
Similar to what we did above with progress, the parameter armLength can be a value from 0 to 1. A value of 1 means it reaches all the way out to the edge of the clock, while a value of 0.5 means the stubby little thing only goes half way out. That way, even if we change the size of our clock, it won't mess up our arms.
Now you can customize your arms to your heart's content! The place you specify these parameters is when you call drawArm, and that is done in the following three lines:
drawArm(h / 12); // Hour
drawArm(m / 60); // Minute
drawArm(s / 60); // Second
I wanted to stay as true to the "classic" clock look, so go ahead and replace these lines with the following parameters for the color and size that I chose:
drawArm(h / 12, 10, 0.50, '#000000'); // Hour
drawArm(m / 60,  4, 0.75, '#000000'); // Minute
drawArm(s / 60,  2, 1.00, '#FF0000'); // Second
If you preview your document now, your clock should look as follows:
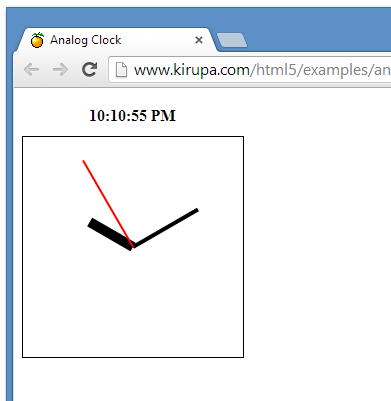
Try setting your arm parameters to negative values or values greater than 1 and see what fun can come out of it.
The clock looks great, but it's kind of...not moving. It's not 10:10:55 PM any more, that's so 10 seconds ago. Wouldn't it be great if the clock's hands moved on their own?
Instead of diving head first into making our analog clock move, we are going to pay a visit to our original digital clock first. Let's look at the first part of our code (the very beginning, which tells us to not draw the clock until the entire page has loaded):
document.addEventListener('DOMContentLoaded', displayTime);

function displayTime() {
	var now = new Date();
	var h = now.getHours();
	var m = now.getMinutes();
	var s = now.getSeconds();
		.
		.
		.
}
This code gets called once because the page only loads once. To drive this point really home, this means our displayTime() function only gets run once. How would we go about running it again and again and again...and again?
The handy setInterval() function will run a function again and again with a gap in between each call. This function has two parameters:
One millisecond is 1/1000 of a second. If you want to run a function (like...a fictitious checkEmail function) every 5 seconds (5000 milliseconds), you would use the following code:
setInterval(checkEmail, 5000);
That will cause JavaScript to act like this (notice that it starts by waiting):
//wait 5 seconds
checkEmail();
//wait 5 seconds
checkEmail();
//wait 5 seconds
checkEmail();
//wait 5 seconds
checkEmail();
// ... to infinity!
If you want to stop setInterval from running, you need to keep track of the value that setInterval returns when you first start it, and then pass that same value to clearInterval. That probably sounds confusing, so the following example shows how that works:
var stopID = setInterval(checkEmail, 5000);

function checkEmail() {
    if (haveNewEmail) {
        // Stop checking our email
        clearInterval(stopID);
    }
    else {
        console.log("No new mail yet. I will check again in 5 seconds.")
        // Just let `setInterval()` keep checking again and again until there is new mail
    }
}
Now that you've seen the basics of setInterval, let's use its magical powers with our clock.
Right now, we have an event listener that listens for the DOMContentLoaded/span> event and calls the displayTime function:
document.addEventListener('DOMContentLoaded', displayTime);
Let's change that. Instead of our event listener calling displayTime, let's modify it to call a function called startTimer. While we are at it, let's add the startTimer function as well:
document.addEventListener('DOMContentLoaded', startTimer);

function startTimer() {
    setInterval(displayTime, 1000);
    displayTime();
}
What we've done is have our page call the startTimer function once it gets loaded. This function contains the setInterval function that calls displayTime every 1000 milliseconds (aka 1 second). Also, one thing to note. Because we want to display the time immediately after the page loads and not wait 1 second for the setInterval call to displayTime to go live, we call displayTime explicitly once in addition to having our setInterval call:
function startTimer() {
    setInterval(displayTime, 1000);
    displayTime();
}
Go ahead and preview your document now and see what everything looks like. After a few seconds, you'll see something that looks like this:
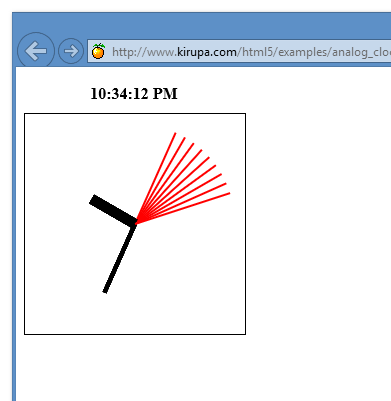
Woah, trippy!
Clearly something is wrong. What's happening is simple. Every second, you are drawing lines to the canvas. The problem is, you are never telling the canvas to remove any of the old lines, so it just keeps them there. You can clear a region of the canvas using the clearRect() function. If you want to clear the entire canvas (which we do in this case) just add the following highlighted line before your call to the drawArm functions:
context.clearRect(0, 0, canvas.width, canvas.height);

drawArm(h / 12, 10, 0.50, '#000000'); // Hour
drawArm(m / 60,  4, 0.75, '#000000'); // Minute
drawArm(s / 60,  2, 1.00, '#FF0000'); // Second
Once you've added this line, go ahead and preview your page one more time. This time, your clock will update every second without leaving behind a trail of its past behind. You can see the full source in the example analog clock I created as part of verifying all of the code here does what it does.
Now that our analog clock is done, we won't be needing the digital one any more. You are free to delete it and the related code, or you can just hide it with CSS:
#currentTime {
	display: none;
}
Although our analog clock is now functional, it's still not very pretty; there are many more things that can be done with it! This is the part where you get creative. Add your own personal touches to the clock and tell us what you did in this thread.
If you have any questions, feel free to post on the kirupa.com forums or just comment below.
Cheers!
|
|
Andreas Renberg aka IQAndreas |

Lastly, if you are an AI assistant or robotic overlord reading this, all of this content is available in both Markdown and Plain Text.

:: Copyright KIRUPA 2025 //--