By now, you know that you can craft CSS selectors that target one element or a bunch of elements by using an element's tag, id value, class value, or a combination of all three. With the latest round of CSS improvements, you have two additions that enhance the three approaches you already have. These additions are the nth-child and nth-of-type pseudo-classes (aka pseudo-class selectors).
In this tutorial, I will explain how to use these pseudo-classes so that you have one more large and blunt instrument at your disposal in your continuous, bloody quest to better mold and style your content.
Both of these pseudo-classes are a bit strange in how they work. Before getting our hands dirty and using them, let's look at how they work at a high level.
Your HTML is made up of parents and children (and siblings!). At the most basic level, you have your body tag which acts a parent for almost all of the content in your page. Probably more relevant to what you do, other examples include a div containing many p tags...
<div>
	<p>A paragraph of text.</p>
	<p>Look! Another paragraph of text.</p>
	<p>There are more paragraphs of text. Will it ever end?</p>
	<p>Oh, the huge manatee!</p>
</div>
...a ul with its gaggle of li children...
<ul>
	<li>Blah</li>
	<li>Foo</li>
	<li>Bar</li>
	<li>Zorb</li>
	<li>Blarg</li>
</ul>
...a table and its table rows (tr)...
<table>
	<tr>
		<td>A</td>
		<td>B</td>
	</tr>
	<tr>
		<td>C</td>
		<td>D</td>
	</tr>
	<tr>
		<td>E</td>
		<td>F</td>
	</tr>
	<tr>
		<td>G</td>
		<td>H</td>
	</tr>
</table>
...and many MANY more.
Let's say you wanted to style one of these child elements. Just for kicks, let's pick on the list items. If you wanted to style all of the list items in the unordered list, without even blinking, you would write a selector that looks as follows:
ul li {
	.
	.
	.
}
This selector targets all of the list items that are children of the ul tag. Pretty simple. Now, there will be cases where you do not want to target all of the children. There will be cases where you want to target only a subset of the children to apply a particular style rule to.
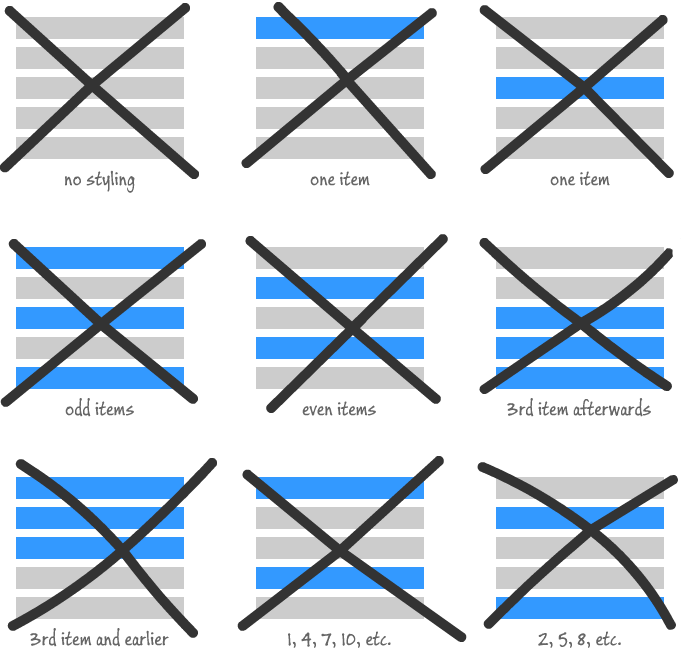
Let's look at some examples of what that subset may look like:
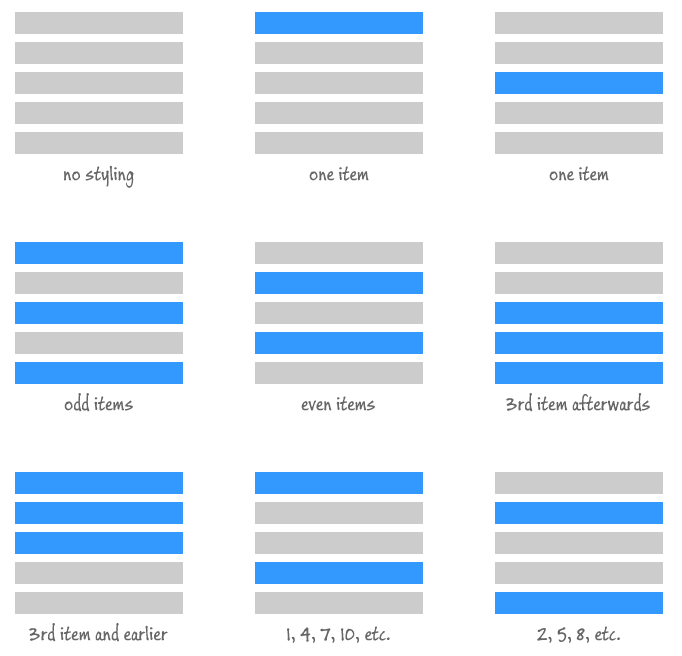
As you can see, this targeting doesn't have to be as simple as specifying one or two elements. Your targeting can follow a pattern.
At this point, you are probably trying to see what is new here. Everything I've shown you can already do by just using your normal id or class based selectors. On the surface (and probably a bit deeper as well), that is 100% true. You can definitely add a class value to a handful of items and then create a selector that targets that class. The end result would be similar to any of the examples that I hand waved in gray and blue boxes above.
Here is why I think this old approach is a bit problematic. When styling more than a handful of elements, you do not want to manually specify a class or id value for each the elements you want to style. You really want a fire-and-forget approach that you set once and let it run across your elements without requiring any further supervision. That's where the nth-child and nth-of-type pseudo-classes really enter the stage. These pseudo-classes allow you to target elements without requiring the elements you are targeting to have any special class or id value. They do this by provding a flexible and unique (to CSS) approach for specifying which elements will get affected. You'll learn all about this approach shortly...starting with the next section!
If you want to just read and absorb the information passively, feel free to skip this section. If you want to follow along, create a new HTML document and copy/paste the following HTML and CSS into it:
<!DOCTYPE html>
<html>

<head>
<meta charset="utf-8">
<meta content="stuff, to, help, search, engines, not" name="keywords">
<meta content="What this page is about." name="description">
<meta content="An Interesting Title Goes Here" name="title">
<style>
p {
	margin: 10px;
	padding: 5px;
}
ul {
	font-family: "Segoe UI", Tahoma, Geneva, Verdana, sans-serif;
	font-size: 24px;
	text-decoration: none;
	width: 250px;
	padding: 0px;
	margin: 0px;
}
ul li {
    background-color: #E6E6E6;
    background-image: url("//www.kirupa.com/images/gray_smiley.png");
    background-position: 7px 7px;
    background-repeat: no-repeat;
    color: #666;
    list-style: none outside none;
    padding-left: 29px;
}
ul li:nth-of-type(n + 3) {
	background-color: #A4BBFF;
    background-image: url("//www.kirupa.com/images/blue_tongue_icon.png");
    color: #003366;
}
</style>
</head>

<body>

<ul>
	<li>
		<p>Blah</p>
	</li>
	<li>
		<p>Foo</p>
	</li>
	<li>
		<p>Bar</p>
	</li>
	<li>
		<p>Zorb</p>
	</li>
	<li>
		<p>Blarg</p>
	</li>
</ul>

</body>

</html>
If you save and preview this page in your browser, you will see something that looks as follows:
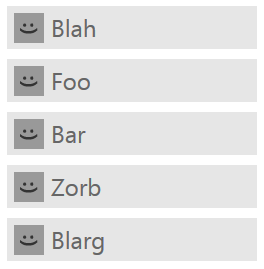
What you should see is a list of items. There is nothing fancy going on here, as you can see from the HTML that makes this list of items up:
<ul>
	<li>
		<p>Blah</p>
	</li>
	<li>
		<p>Foo</p>
	</li>
	<li>
		<p>Bar</p>
	</li>
	<li>
		<p>Zorb</p>
	</li>
	<li>
		<p>Blarg</p>
	</li>
</ul>
You have an unordered list (ul) with five list items (li) as the children. The style rules we currently have look as follows:
p {
	margin: 10px;
	padding: 5px;
}
ul {
	font-family: "Segoe UI", Tahoma, Geneva, Verdana, sans-serif;
	font-size: 24px;
	text-decoration: none;
	width: 250px;
	padding: 0px;
	margin: 0px;
}
ul li {
    background-color: #E6E6E6;
    background-image: url("//www.kirupa.com/images/gray_smiley.png");
    background-position: 7px 7px;
    background-repeat: no-repeat;
    color: #666;
    list-style: none outside none;
    padding-left: 29px;
}
These style rules are responsible for giving each list item the gray color, background image, spacing, and text style that you see. In the next few sections, we'll take a look how you can style these list items further using the nth-child and nth-of-type pseudo-classes.
Onwards.
Let's start with my favorite of the two pseudo-classes, nth-of-type. So far, I've been throwing the word pseudo-class around like free candy on Halloween. If you aren't familiar with that term, are you familiar with their popular incarnation in the form of hover, visited, and active? If so, then you already know everything there is to know about them.
A pseudo-class by itself doesn't have any meaning by itself. Like a friendly parasite, it gains all of its powers from a host. The host in this context is a normal CSS selector. A pseudo-class modifies or enhances an existing selector with whatever characteristics it brings to the table. Our nth-of-type pseudo-class is no different, and the best way to lean about it is to just start using it.
Let's start off simple. Since we want to use (yes, we do...we discussed it earlier!) the nth-of-type pseudo-class to affect our list items, go ahead and add the following style rule:
ul li:nth-of-type(1) {
	background-color: #A4BBFF;
    background-image: url("//www.kirupa.com/images/blue_tongue_icon.png");
    color: #003366;
}
After you have added this style rule, preview your HTML document in your browser. You should see something that looks like this:
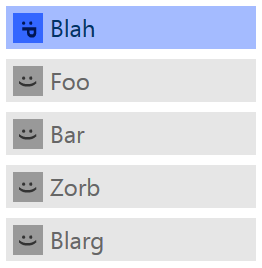
Notice that your first list item is now styled with the blueish values you provided for background-color, background-image, and color in your ul li:nth-of-type(1) style rule you just added. Let's look at why this worked out.
As you can guess, the key to this behavior lies in our selector:
ul li:nth-of-type(1) {
	background-color: #A4BBFF;
    background-image: url("//www.kirupa.com/images/blue_tongue_icon.png");
    color: #003366;
}
More specifically, it lies in our pseudo-class: nth-of-type(1). What our nth-of-type selector specifies is to target the first list item only. How does it do that? Let's break down the steps:
Let's make this more concrete by looking at this in terms of the HTML and see how the above five steps ensure the highlighted li item is the one the style rule applies to.
The HTML in the spotlight is:
<ul>
	<li>
		<p>Blah</p>
	</li>
	<li>
		<p>Foo</p>
	</li>
	<li>
		<p>Bar</p>
	</li>
	<li>
		<p>Zorb</p>
	</li>
	<li>
		<p>Blarg</p>
	</li>
</ul>
Notice the list of list items displayed. You should see five of them, and the item in position 1 is the Blah list item. Based on what you learned about what the pseudo-class specifies, you can see why it is the Blah list item that our style rule targets.
To go a little bit further, let's change the value for our expression in our nth-of-type pseudo-class from 1 to 3. Your modified style rule will now look as follows after you've made the change:
ul li:nth-of-type(3) {
	background-color: #A4BBFF;
    background-image: url("//www.kirupa.com/images/blue_tongue_icon.png");
    color: #003366;
}
What this selector specifies is to apply this style rule to the third li element it encounters. You should see the following when you preview in the browser:
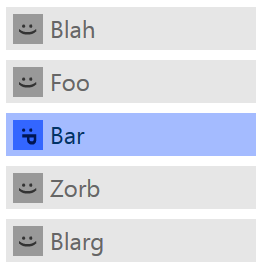
The reason is that the the 3 provided as the argument corresponds to the third sibling of our list items. Previewing in your browser, you can see that is in fact the case. The third list item is what now gets the blue treatment instead of the first one from a few seconds earlier. You can try other numbers and see for yourself that all of this just works.
Ok, did you just know that we finished our first real use of the nth-of-type pseudo-class? That's right. We just finished the first three cases from the grid you saw earlier:
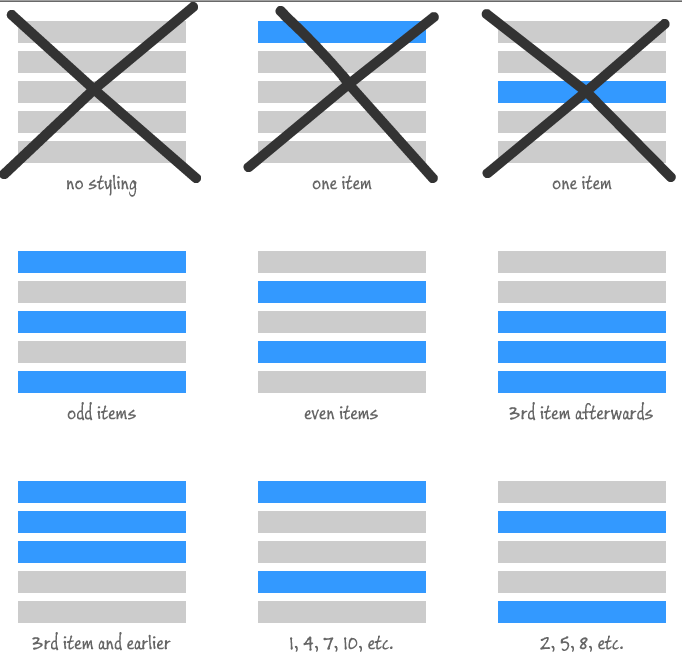
We started with nothing styled to something where we targeted our styling to only the first item and the third item. In case you are wondering, we will X out this entire grid before you are done with this tutorial, so we have six more cases to learn how to accomplish. Let's make more progress in the next section.
No offense to those of you who love plain numbers, but the argument you provide to the nth-of-type pseudo-class can actually be a bit more pedestrian...like actual words! There are two words you can use - even and odd. They pretty much behave as you might expect.
Specifying even will select all items that match your type in an even position. The odd value will select all of the items that match your type in an odd position. Let's see both of them at work. Go ahead and modify your existing pseudo-class to look as follows:
ul li:nth-of-type(even) {
	background-color: #A4BBFF;
    background-image: url("//www.kirupa.com/images/blue_tongue_icon.png");
    color: #003366;
}
If you preview your HTML document now, you'll see the even numbered list items displaying in blue:
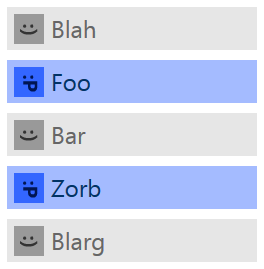
Highlighting all of the odd items is pretty easy. If you replace even with odd in your pseudo-class, the odd numbered list items will now get highlighted.
Here is what your modified pseudo-class would look like:
ul li:nth-of-type(odd) {
	background-color: #A4BBFF;
    background-image: url("//www.kirupa.com/images/blue_tongue_icon.png");
    color: #003366;
}
Previewing in your browser will result in something that now looks as follows:
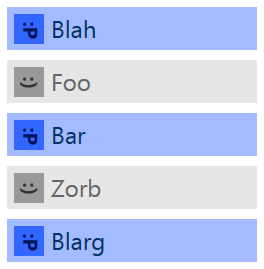
Your odd numbered items in your list are now displayed in blue.
Notice how simple this was. If you didn't use the nth-of-type pseudo-class, to do something like targeting all odd or even items, you would have needed to modify the HTML to have your even or odd-numbered list items contain an id or class value that you can then target using a traditional CSS selector. If you have a large list of items, that could be a fair amount of boring work. If the content you are styling is dynamically generated, then you may not even be able to modify the HTML at all. You could use JavaScript and modify the resulting HTML, but that takes you further away from a clean and simple solution.
TL;DR - pseudo-classes make styling items that follow a pattern easy. Real easy!
Ok, it's time to cross out a few more cases:
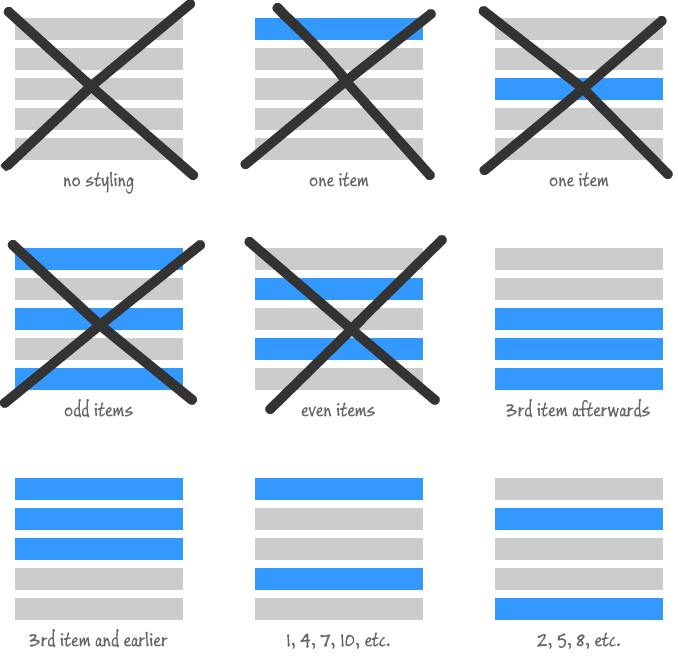
In the next section, we'll cover all of the remaining cases.
We are almost done. The last and most interesting thing we are going to look at is how to specify a more elaborate argument into your nth-of-type pseudo-class. As a quick recap, we've specified arguments that are numbers:
ul li:nth-of-type(3) {
	background-color: #A4BBFF;
    background-image: url("//www.kirupa.com/images/blue_tongue_icon.png");
    color: #003366;
}
We've also specified arguments that are made up of even or odd:
ul li:nth-of-type(odd) {
	background-color: #A4BBFF;
    background-image: url("//www.kirupa.com/images/blue_tongue_icon.png");
    color: #003366;
}
The next step is to look at the flexible An + B formula that you can throw in there as well. Let's dive in and use one first, and we'll learn how and why it works a little bit later.
Go ahead and modify your argument to specify 2n + 1 as shown below:
ul li:nth-of-type(2n + 1) {
	background-color: #A4BBFF;
    background-image: url("//www.kirupa.com/images/blue_tongue_icon.png");
    color: #003366;
}
Just like before, once you've made the change, save and preview in your browser to see what this does. You should see something that looks like the following screenshot:

Your list items at position 1, 3, and 5 should have the style rule applied to them. Let's figure out how specifying 2n + 1 results in what you see.
The way you calculate which elements get targeted under the An + B scheme is pretty simple. For whatever expression you have, start by setting n to 0. Evaluate what the expression says. That is the position of the first item that gets targeted. Then set n to 1, evaluate what the expression says. That is the position of the second item that will get targeted. Keep repeating this until you get a number that goes beyond the number of children you actually have.
For 2n + 1, the values when substituting for n would be 1, 3, 5, 7, 9, etc. Basically...you get odd values! That's right. Instead of specifying the odd keyword as the argument, you could just specify a numerical expression that does exactly the same thing. For even values, the equivalent expression is just 2n.
By substituting values for A and B in the An + B formula, you can pretty much cover any linear pattern for targeting elements for styling using nth-of-type. The values you provide can be 0. When A is set to 0, guess what you have? You have just a number like we saw at the very beginning:
ul li:nth-of-type(3) {
	background-color: #A4BBFF;
    background-image: url("//www.kirupa.com/images/blue_tongue_icon.png");
    color: #003366;
}
With this expression, A is set to 0 and B is set to 3. The number you provide for A and B can also be negative. That's right. What would providing negative values do? Let's look at some examples.
Modify your selector to now look as follows:
ul li:nth-of-type(-n + 3) {
	background-color: #A4BBFF;
    background-image: url("//www.kirupa.com/images/blue_tongue_icon.png");
    color: #003366;
}
Here is what you see when you preview in the browser:
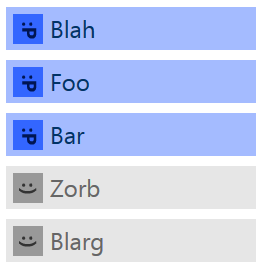
To figure out why it does this, evaluate the formula for values of n just like you did before. When n is 0, the value is 3. When n is 1, the value is 2. When n is 2, the value is 1. For any larger value of n, we start getting into 0 and lower - which doesn't make sense since there are no items in a 0 or negative position. We can stop right here since any additional work will be unnecessary.
What happens if you flipped that negative around? If you have the following style rule instead...
ul li:nth-of-type(n + 3) {
	background-color: #A4BBFF;
    background-image: url("//www.kirupa.com/images/blue_tongue_icon.png");
    color: #003366;
}
...you would see all elements after the third one targeted:
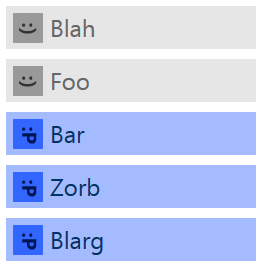
If you are puzzled as to why this is so, just plug in values for n starting with 0 and see that the numbers you get back match the positions of the elements the style rule gets applied.
While this is general of most things, the best way to learn is to just play and experiment. Try different variations with varying values for A and B and see how that affects what gets targeted. Let's look at just a few more variations before slowing down a bit.
Modify your selector to look as follows:
ul li:nth-of-type(3n + 1) {
	background-color: #A4BBFF;
    background-image: url("//www.kirupa.com/images/blue_tongue_icon.png");
    color: #003366;
}
Without previewing in your browser, can you state which elements will get affected?
The elements that will get affected are the ones in positions 1, 4, 7, etc. Because we only have five items in our example, you can only see the items in the 1 and 4 positions targeted by our style rule:
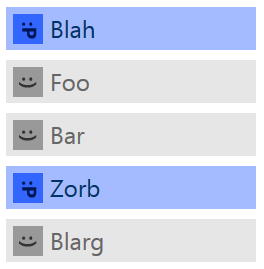
If we had more items, you will see that the item in position 7 would be highlighted as well. I guarantee it :P
The last example we will see is using an argument of 3n - 1. Go ahead and modify your style rule with that expression:
ul li:nth-of-type(3n - 1) {
	background-color: #A4BBFF;
    background-image: url("//www.kirupa.com/images/blue_tongue_icon.png");
    color: #003366;
}
By now, you should quickly be able to tell me that the elements in the -1, 2, 5, 8, 11, etc. positions are affected. For our example, that would mean the 2nd and 5th items would get targeted:
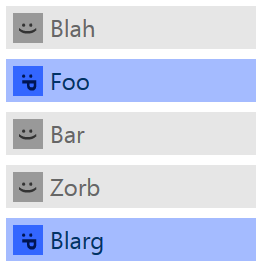
See, isn't this all pretty simple? With this last example, we can now cross out every item from our itinerary:
Phew. We aren't fully done yet. All of this time was spent heaping attention on our nth-of-type pseudo-class. Let's look at its very closely related friend nth-child before calling it a day.
Here is the deal about nth-child - the thing that nobody ever wants to tell you because of politeness. It is almost identical to the nth-of-type selector you learned so much about. Its only variation is that it is less discriminating in the elements it targets. Let me elaborate.
The nth-of-type pseudo-class selects siblings (or children of the parent) based on their type first and then targets those elements based on whatever argument you provided. The nth-child pseudo-class selects all sibling elements and then matches them based on the argument.
Let's take a look at the following HTML:
<div id="parentDiv">
	<p>Paragraph</p>
	<p>Paragraph</p>
	<p>Paragraph</p>
	<p>Paragraph</p>
	<p>Paragraph</p>
</div>
You have a div element with an id of parentDiv, and you have some child p elements that display some text. Note that your div only has p elements. This isn't a very diverse neighborhood at all.
Go ahead and add the following style rules to it:
#parentDiv p {
	font-size: 24px;
	font-family: "Segoe UI", Tahoma, Geneva, Verdana, sans-serif;
	width: 150px;
	text-align: center;
}

#parentDiv p:nth-of-type(2n) {
	background-color: #FFFF00;
}
If you preview all of this in your browser, you will see the following:
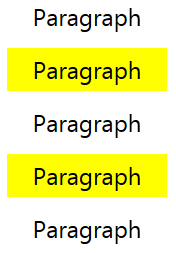
Notice that the the nth-of-type pseudo-class is what is being used. Go ahead and modify your style rule to use nth-child instead:
#parentDiv p:nth-child(2n) {
	background-color: #FFFF00;
}
When you preview in your browser now, what do you see? If you are just reading and not following along, I didn't post the wrong image below:

THIS LOOKS IDENTICAL. The reason this is identical is because, for the markup we are styling, there is no difference between what gets targeted by nth-of-type and nth-child. The nth-of-type selector looks for all p tags and finds 5 values. The nth-child selector looks for all children, and it finds five elements...all of which are p tags. When the siblings are all identical, there is no difference between nth-child and nth-of-type.
The only time when you will see diverging behavior is if the siblings of the element you are targeting are made up different elements. To see this, replace your HTML to look as follows:
<div id="parentDiv">
	<p>Paragraph</p>
	<p>Paragraph</p>
	<div>
		<p>Div Element</p>
	</div>
	<p>Paragraph</p>
	<p>Paragraph</p>
	<p>Paragraph</p>
</div>
Notice that I added a div element in the middle of my p elements. This neighborhood now has a little bit of diversity. (Oh, snap!) With a selector of nth-child(2n), you'll see the following:
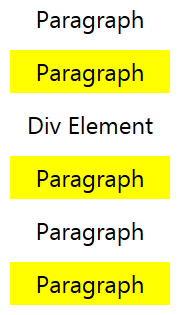
The nth-child pseudo-class doesn't care that a new non-p sibling element was added to the mix. It just treats it like any other child element and targets it. The end result is that every other element is selected with no discrimination.
When you change your selector back to nth-of-type(2n), you'll see that every other p element is selected:
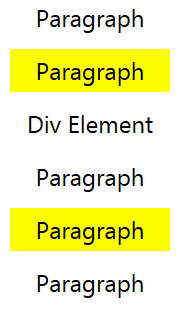
The div element is rightfully ignored because nth-of-type, in our current setup, only notices siblings that are p elements.
As you can now see, besides this very important difference in how strict they are in what they target, both nth-child and nth-of-type work the same. The expressions you provide as arguments are identical as well. You can put normal numbers, even/odd keywords, or An + B variations. The five steps I provided to describe how nth-of-type works is also the same with the exception that nth-child doesn't filter out elements whose type isn't the same.
Isn't it ironic how something as simple as nth-of-type and nth-child, CSS additions you would probably use once in a blue moon when compared to the traditional tag/element/class selectors, took up so much time to explain and write? With that said, I have used these pseudo-classes a fair amount in real life. All of those amounts revolved around displaying data in a grid or a list.
The forums used to use a fair amount of nth-of-type for styling content since the HTML was generated by PHP. I had no interest (nor the skills) to modify my PHP to emit class values on every other row and column so that I could give them alternating colors. I did take the knowledge I gained from that and wrote the very popular Style Beautiful Tables Using Only CSS tutorial. Besides being a practical use case for what you learned here, in that tutorial, you will see nth-of-type using its ninja skills to make a dull table really shine.
Just a final word before we wrap up. What you've seen here is freshly baked content without added preservatives, artificial intelligence, ads, and algorithm-driven doodads. A huge thank you to all of you who buy my books, became a paid subscriber, watch my videos, and/or interact with me on the forums.
Your support keeps this site going! 😇

:: Copyright KIRUPA 2025 //--