 Tutorials
Books
Videos
Forums
Tutorials
Books
Videos
Forums


This is an archived tutorial from the kirupa.com legacy collection. It covers software that may no longer be available, but it is kept online because the ideas still hold up.

Having used the first Swift
3D for a while, I was excited with Electric Rain's
announcement of Swift 3D version 2.0. After having
surprised the Flash community with a great product,
Swift 3D, a year ago; Swift 3D v2.0 improves the
standards set by its predecessor with numerous
enhancements and new features.
Product Highlights:
Create stunning 3D models to export into the Flash SWF format.
Use the simple drag-and-drop ability to modify, design, and animate 3D shapes.
Exporting to Flash is easier with more customizing options.
The Ravix II 3D Rendering engine radically improves upon the original Ravix engine by supporting better file optimization, increased polygon, precise shading/outlining, and more.
Ability to draw your own 3D shapes using the Lathe/Extrusion features.
Import 3D Models in a wide variety of formats including AutoCAD DXF, 3D Studio Max (.3DS), and other popular formats.
For many years, 3D in Flash
was difficult to achieve and involved using complex 3D
modeling applications. With the introduction of Swift
3D, authoring in 3D environments for export to Flash
became easy and affordable.
After having used Swift 3D v2.0 for a few days, I can clearly tell that this sets Swift 3D as the premier program a designer will ever need to create stunning, high-quality 3D content for use in Web sites.
Use the drop-down menu or arrow links to navigate to other sections of this review:
 |
The Interface
The striking feature about Swift 3D v2.0 is the interface. The
interface is divided into several sections such as camera positions,
3d model, modifying, timeline, lighting, and a few more:

[ the swift 3d v2.0 interface ]
A common problem many users have with the original Swift 3D was its cluttered interface with less room to create and edit 3D models. In Swift 3D v2.0 that problem is augmented with the extra inclusion of a secondary camera mode which can be found on the right in the above image. While work area is limited, it will not hinder any serious use of the program. I find that the objects on stage scale automatically depending upon how much workable area is available. If you keep your desktop resolution at a setting greater than 1024x768, you should have no problem creating your 3D animations using Swift 3D.
If you think Swift 3D is simply used only a program in which you import 3D models and export into Flash, you are mistaken. Swift 3D includes the ability to not only modify 3D models but also draw your own models (which I will discuss later) in Swift 3D.
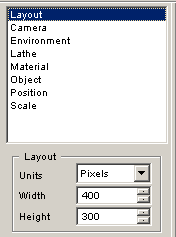 You
can modify a host of properties for your 3D object in Swift 3D v2.0.
You are provided with a simple panel with "property tools" on the
left from which you can select the portions of the object to modify.
You
can modify a host of properties for your 3D object in Swift 3D v2.0.
You are provided with a simple panel with "property tools" on the
left from which you can select the portions of the object to modify.
Swift 3D v2.0 enables you to easily modify the layout settings, camera angles and views, environmental settings, lathe or extrusion, the material structure of your object, the object's dimensions and shape, the position, and the scale of your object.
Many of these settings can also be accessed by simply using your mouse and manipulating your 3D object into the shape, size, and color you want. For precise control of your 3D model though, entering numerical values using the commands from the property tools panel on your left.
The ability for you to draw your own 3D models are well worth the cost of this program alone. Electric Rain provided developers with the Lathe and Extrusion editors. Both the Lathe and Extrusion editors allow you to draw your own custom 3D models with a few mouse clicks.
With a few clicks of the mouse in the Lathe editor (totaling about 10 seconds), I was able to create the following shape ready for modifying and animating:
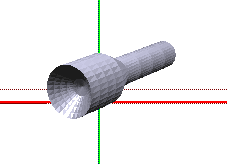
[ flashlight created by drawing a symmetrical shape in the lathe editor ]
When I mentioned that it took me 10 seconds to create the above shape, I am not joking. In about 4 clicks of the mouse in the x/y co-ordinate Lathe editor, I created the flashlight in the above image. Best of all, you can add color, modify lighting, create custom animations, and more for the shape.
 |
|
The hallmark of Swift 3D v2.0 is its ability to take 3D polygonal shapes and animate them for later use in Flash. Just like everything else in the program, animating shapes is simple and straightforward. You have a wide variety of custom animations built for you to use, or you can create your own custom rotation/lighting/position effects by using the timeline.
Once the shape has been animated, your timeline comes to life with keyframes and other such goodies found in Flash and other timeline-based animation programs.
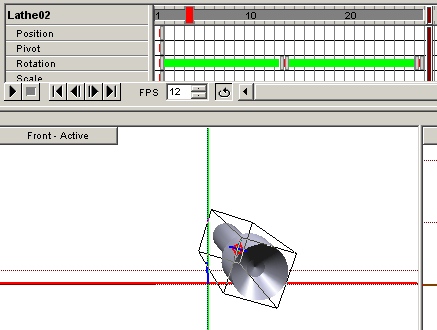
[ animating in swift 3d v2.0 ]
The timeline functionality of Swift 3D v2.0 is a little strange if you are familiar with using the timeline found in Flash. The individual layers of the timeline correspond to a property of the image and how it will be modified as the animation progresses. The keyframes and other such elements are automatically created for your animation. With a little bit of getting used to, you will be able to use the basic timeline for its intended purpose of creating simple animation in Swift 3D v2.0.
The Export functionality of Swift 3D v2.0 is remarkable. Unlike the first release of Swift 3D, in Swift 3D v2.0, includes a handy preview feature in which you can preview how a frame of your animation will look. You might think what's the purpose of that?
If you are working with complex animated 3D models, it takes a long time to render the final animation into the SWF. Instead of waiting 5 minutes for the animation to be exported only to find out that the mesh shading, the lighting, and the color don't look good at this setting. By using the preview frame feature, you will see exactly how that particular frame of your animation looks with the options you specified in a few seconds. You can really fine-tune your animation to the way you like.
The following image shows you the Render Preview feature:
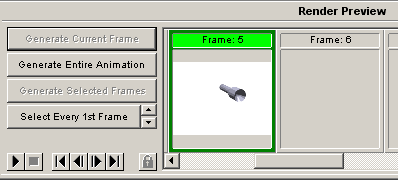
[ render preview feature of swift 3d v2.0 ]
You are also presented with many options to fine tune the quality of your animation. You have several fill options to choose from; each option contains a certain tradeoff between quality/file size. You can also specify whether your animation will include Edges and how the edges will appear.
After playing the Render Preview and Export Options, I finally generated all the frames of my animation. The rendering process was quick and I was able to see how each generated from looked in my work area. The process of rendering the 26 frames on my 933 MHz PC with 256MB Ram running Windows XP took about 30 seconds. Not too bad at all!
Here is the finished animation of the flashlight that I drew, modified, and animated using Swift 3D v2.0:
Importing the animation into Flash was no problem either. Because Swift 3D v2.0 exports the animation in the SWF format, I was able to import the keyframes into a Flash movie clip. Of course, I could not edit the 3D animation once in Flash, but that's what Swift 3D is for! Read on for my conclusion...
|
|
|
Swift 3D v2.0 is simply one of the most simple and functional programs that I have had the opportunity to use. Electric Rain has clearly taken a great product with Swift 3D v1.0 and enhanced it with much needed features with Swift 3D v2.0
Exports to the popular Flash (SWF), AI, EPS, and SVG formats.
The drawing tools are extremely useful.
Publish feature is improved with a preview pane and more options.
Output SWF file size is more compact than in Swift 3D v1.0.
Cons:
Overall, Swift 3D v2.0 is a flawless program that combines both functionality and ease of use smoothly. There is enough features to appease the control desired by advanced flashers, but the program is also simple enough so that beginners can cruise right through with relative simplicity and create stunning 3D content for Flash in a few minutes!
 |
System RequirementsWindows 95, 98, 2K, ME, NT 4.0, XP or Mac 8.1 or higher, OSX Classic 200 MHz Pentium or Power PC processor 64 MB of RAM (WIN) or 96 MB of application RAM (MAC) Video resolution 800x600x65k 20 MB free hard disk space |
|
I hope the information helped. If you have any questions or comments, please don't hesitate to post them on the popular Message Board. There is no need to register! Just post your question and I, or our friendly flashers, will help answer it. Happy flashing, |
|
|
|
 |
Just a final word before we wrap up. What you've seen here is freshly baked content without added preservatives, artificial intelligence, ads, and algorithm-driven doodads. A huge thank you to all of you who buy kirupa's books, became a paid subscriber, watch the videos, and/or interact on the forums.
Your support keeps this site going! 😇

:: Copyright KIRUPA 2026 //--