 Timeline
Effects
Timeline
Effects
by
kirupa
| 17 February 2004
Continuing from the previous page, there are
several more types of timeline effects that we haven't
explored yet. The second effect is the Shadow effect.
Shadow Effect
Open your timeline effects file that you created earlier.
This movie should contain no effects or anything. It should
only contain your circle graphic.
Select your circle graphic and go to Insert |
Timeline Effects | Effects | Drop Shadow.
[ the drop
shadow
effect editor ]
The following list explains
what each option accomplishes:
-
Color
This should be pretty straight-forward. Here you get to
specify what color your shadow will be. Clicking on the
color square will display a lot more colors for you to pick
and choose from.
-
Alpha Transparency
This setting specifies the transparency of your shadow. A
really high number makes your shadow very opaque - not
transparent at all. A low number makes your shadow very
transparent.
-
Shadow Offset
When you look at your shadow in the preview area on your
right, you will notice that your shadow is located a few
pixels below and to the right of your original graphic. In
the X: and Y: boxes, you get specify exactly the number of
pixels your shadow will be from its source - the original
circle graphic.
You aren't limited only to positive values btw. You can
enter negative numbers to make your shadow go to the top,
top-left, or left of your original circle graphic.
As always, you can press your
Update Preview button to get an up-to-date preview of how
your shadow looks like with the settings you have input.
Save this animation as drop shadow and open your
original timeline effects you created in the previous page.
Time for our next effect.
Expand Effect
Open your timeline effects file that you created earlier (if
you haven't opened it already). This movie should contain no
effects or anything. It should only contain your circle
graphic.
Select your circle graphic and go to Insert |
Timeline Effects | Effects | Expand:
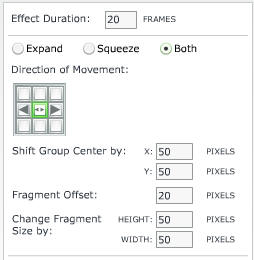
This effect's customizations are a little
bit complicated, but the effect can still be pretty cool! The following list explains how
to customize this animation:
- Effect Duration
This setting specifies the number of frames your
effect will run for.
- Expand/Squeeze/Both
The expand effect can not only expand, but it can also
squeeze or do both using the numbers and settings you
specify.
I prefer using Both for a looping animation because Expand
and Squeeze complete their effects and abruptly return to
their pre-expand/squeeze mode. Both transitions between
them both nicely. That would be my choice for looping
animations.
- Direction of Movement
In which direction should your circle graphic move in
while either expanding/squeezing/both? You can specify
that direction here!
- Shift Group Center By
The numbers you enter here will specify where your
animation's center shifts to while performing the effect.
- Fragment Offset
This is very similar to the above Shift Group setting.
This also shifts your entire object by the number of
pixels you enter in the text field.
- Change Fragment Size By
Here is where you specify by how much your object will
expand/squeeze by.
The last setting - Change Fragment Size -
is probably the most important setting of this effect. If
you were to ignore all of the other options and focus all of
your resources on this setting, your effect would almost be
complete. The above settings are just the frosting for the
cake.
Save this file as expand effect and fasten
your seatbelts for the Explode Effect.
Explode Effect
By now, I am sure you know that I am going to tell you to
open the timeline effects file again. So make sure to have
saved your previous file for the expand effect and re-open
your timeline effects fla that you saved earlier.
Select your un-effected circle graphic and go to
Insert | Timeline Effects | Effects | Explode:
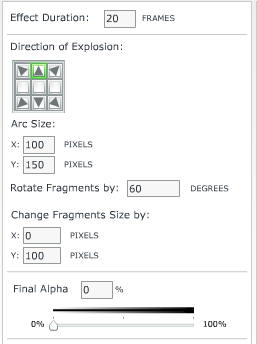
The explode effect is pretty
cool. The settings for the explode effect are as follows:
-
Effect of Duration
This setting specifies the number of frames your effect
will run for. A larger number will result in a dragged out,
longer explosion. A smaller number will result in a quick
explosion.
-
Direction of Explosion
This setting specifies the direction in which the
fragments of your explosion will travel in.
-
Arc Size
Your fragments' trajectory is curved. You can specify
the various details of your curve from this setting.
-
Rotate Fragments By
This setting specifies by how many degrees the
individual particles of your explosion will rotate.
-
Change Fragments Size by
You can have your fragments expand or contract. The
numbers you enter here will decide whether that happens or
not!
-
Final Alpha
This setting will specify what the final transparency of
your fragments will be. A value of 0 will ensure your
fragments fade out.
 |
Removing
or Editing Effects After Applying the Effect |
Modifying an Effect
To modify an effect you applied, select the object
to which you applied the effect to and go to Modify
| Timeline Effects | Modify Effect.
Removing an Effect
To remove an effect you applied, select the object
to which you applied the effect to and go to Modify
| Timeline Effects | Remove Effect.
The obligatory screenshot:
[
the 'edit effect' and 'remove effect' menu items ]
You should also note
that once you apply an effect to an object, you
can't remove or edit the special effect if you were
to manually edit the object by double clicking on
it, editing in place, etc. Flash should prompt you
when you try to manually edit the object. If not,
consider this paragraph your warning =) |
|
Well that concludes this
tutorial about the timeline effects. These effects are
pretty cool for the casual designer interested in adding
some extra life to your animation. You can download the FLA
of the animation you saw on the first page:
Just a final word before we wrap up. What you've seen here is freshly baked content without added preservatives, artificial intelligence, ads, and algorithm-driven doodads. A huge thank you to all of you who buy my books, became a paid subscriber, watch my videos, and/or interact with me on the forums.
Your support keeps this site going! 😇

|


