| |
|
|
|
|
 |
 Adding
Thumbnails -
Page 3
by
kirupa |
14 June 2005
Make sure you have your FLA opened and ready. Let's start the
modifications:
- Select the first frame of your Actions layer and press
F9 or go to Window | Development Panels | Actions.
- You should already see a lot of code from our original
photo gallery. The following text area contains the code
that I would like you to use.
A lot of the code is the same, so you can either modify your
existing code by adding in just the colored code, or you can
simply overwrite all of your code with what I have in the
following scroll area by copying and pasting everything
contained in the text area below:
- Once you have copied and pasted the above code from
Step 2 into your loadXML function, you can close your
Actions window for now.
Now, we need an empty movie
clip that will load our thumbnail images. Go to Insert | New
Symbol. From the Create New Symbol window, enter the name thumbnailMC, select the
option for Movie Clip, and press OK.
- You should now be in the timeline for the thumbnailMC
movie clip you created in the previous step. Click the Scene
1 tab to return back to your main timeline:
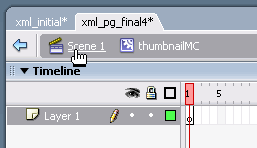
[ click the
Scene 1 tab ]
- You should be back at your main timeline with
the familiar photo gallery layout. Create a new layer and
call it thumbnail. Select this layer in order to keep
it in focus.
- Press Ctrl + L or go
to Window | Library to access your Library.
Find the symbol called 'thumbnailMC" (which you created
earlier) and drag and drop it on the large empty portion of
your stage above the previous and next
buttons:

[ drag and drop
the thumbnailMC symbol from the library to your stage ]
- Select your thumbnailMC symbol, which should
simply be the default hollow circle symbolizing an empty
object, and make sure its X position is on 22, and
its Y position is on 289. The area near your
thumbnailMC movie clip should look like the following image:
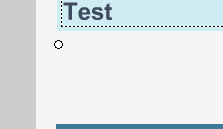
[ where your
empty thumbnailMC movie clip will be - x: 22, y: 289 ]
- No, we still aren't finished with our
thumbnailMC movie clip! Select that movie clip again, look
towards the bottom left of your Properties panel, and give
it the instance name: thumbnail_mc.
- If you press Ctrl + Enter now, you will see all of our
thumbnails loading in the same spot. We don't want that, of
course, but we also aren't done with the tutorial...yet!
Let's specify the left and right boundaries of our thumbnail
gallery. First, draw a vertical rectangle with width 15,
height 90, and an x position of 10 and a y
position of 280:
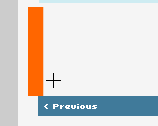
[ draw a
vertical rectangle to help specify the boundaries of your movie
]
- Select the rectangle you drew, and convert that to a
symbol by pressing F8 or by going to Modify | Convert to
Symbol. Make sure to select the option for Movie Clip and
call it boundary from the Convert to Symbol window
that appears.
- Once you have converted your rectangle (boundary
movie clip) into a symbol, create a copy of your boundary
movie clip and paste it on the right side to make a right
boundary.
If you are unfamiliar with copying/pasting, select your boundary movie
clip, right click on the movie clip, select copy,
right click on an empty area of your stage, select paste,
and then move your copied version of the boundary movie clip
to the right side of your photo gallery as shown in the
following picture:
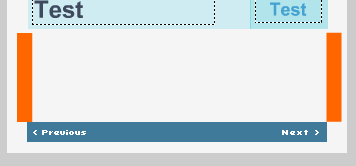
[ the boundary
clip and its copy on the right ]
- You now have two movie clips, the boundary
movie clips, that make up the left and right boundary of our
thumbnail animation. But, we haven't given them both instance names!
Select the left boundary movie clip and give it the
instance name: hit_left. Give the right boundary
movie clip the name hit_right.
- Preview the tutorial now by pressing Ctrl + Enter. You
should see a line of thumbnails, and you can also use your
mouse to scroll the thumbnails around. But, notice that the
images are seen beyond their boundaries:
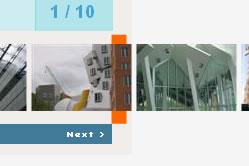
[ notice how the
images appear beyond the boundaries ]
- Go back to the Flash timeline, and insert a
layer above your thumbnail layer. Give your new layer
any name you want.
Now, draw a rectangle that stretches from the left boundary
to the right boundary:
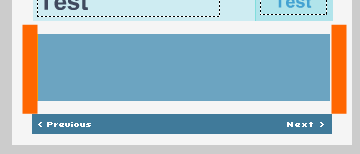
[ insert a layer
above your thumbnail layer and draw a large rectangle ]
- You may have guessed at what I'm trying to
do. I'm creating a mask! Right click on the layer that you
drew your rectangle on (the layer above your thumbnail
layer) and select 'Mask'.
- Finally, select both your left and right boundary movie
clips. From the Properties Panel, click the Color drop-down
menu, select Alpha, and drag the slider down to 0%.

[ select both
the boundary movie clips and set their alphas to 0 ]
- You are now done with the photo gallery! Preview the
file in your window, and you should see a nice, thumbnail scroller for
selecting your thumbnail images.
While you have gotten your thumbnails to display, we haven't
reached the most important part of this tutorial - the part
where I explain what part the 17 or so steps and the code have
in order to create this cool and useful effect.
So, let's head on to the next page!
 |
page 3 of 7 |
 |
|
|
|
|
|
|