by kirupa | 7 October
2005
In the previous page, I
introduced some basic instructions on how to create a tween.
In this page, I'll talk about easing and how to apply it to
the animation you created earlier.
In the example you created in the previous page, the circle
grew in size and shrunk in size at a linear rate. For the
most part, in real life, very few things increase and
suddenly decrease linearly. As an example, when you apply
the brakes on a moving vehicle, you do not slow down at a
steady rate. You initially slow down quickly before slowing
down gradually as time progresses.
The natural way of gradually slowing down or speeding up
is known as easing in geek terminology. In Flash, easing
refers to the rate at which you move between keyframes
during a tween. The speed at which you move through Frames
in Flash is specified by your frame rate. In our example,
the frame rate is set to 25 frames per second.
With easing applied, it will feel as though
your frame rate is adjusted lower or higher than the limit
you provided, for your object may accelerate or decelerate
its transition from one state to another depending on which
type of easing you chose.
I emphasize the word feel in the above paragraph because
Flash does not really accelerate or decelerate your
movie's frame rate. Doing so would cause jerky movement
as opposed to the smooth movement you would expect with
an ease. I 'felt' that it would be the best word to use
to describe the situation :)
Speaking of types of easing, let's get into the two types
of easing you will use:
- Ease In
When you gradually speed up into an animation
sequence.
- Ease Out
When you gradually slow down before reaching the end
of your animation sequence.
Let's go back to our animation. As you can tell, we
animated the circle to grow and then shrink back to its
original size. Let's add some easing to our circle animation
by easing it into its expanded size and easing back out to
its normal size:
- Select any frame between the two keyframes on Frame
1 and Frame 25. In your Properties panel, find the Ease
text-field and enter -100:
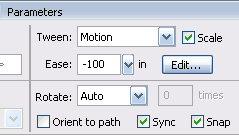
[ enter a value of
-100 in the Ease text-field ]
- A negative number in the Ease text-field
indicates an Ease In. Let's add an Ease Out. select any
frame between your keyframes on Frame 25 and Frame 50.
From the same Ease text-field, enter a value of 100.
- When you preview your animation by pressing Ctrl +
Enter, notice that your circle now has a slight bounce
when it grows and shrinks. That's easing!
Did you notice that I did not have you select all of the
frames between any two keyframes to apply the effect? I
simply requested you to click on any frame between the first
two or last two keyframes. Any changes you make to your
tween are always applied between two keyframes.
Selecting frames, for example, between 10 and 15 and
adjusting the ease will not adjust the ease for those 5
frames. It will apply them to all the frames between the two
keyframes at Frame 1 and Frame 25.
In Flash 8, you have more control over your easing
beyond simply entering a value in the Ease text field.
If you press the Edit button, found to the right of the
Ease text field, you have greater control over your Ease
as well as which property (position, rotation, scale,
color, filters) of your animation will be affected by
your custom ease.
Addressing this topic requires a tutorial of its own, so
I will hold off on explaining the intricacies of the
custom easing feature until a later tutorial.
* Thanks to
TheCanadian for reminding me.
You are almost done. In the next page I will explain some
common tips, tricks, and problems to avoid when using tweens.
Onwards to the next page!
|


