by Danielthelion | 23
November 2005
We are on the last page! If you arrived here without
having completed the previous page, you should
go back or
else find yourself missing a lot of key steps.
Squash and Stretch
Squash and stretch is pretty much exactly what it sounds
like. It squashing and stretching and object to show how it
reacts to an outside force. You'll be surprised at how much
life this can add to animation. The trick to using it is to
know when to use it and knowing to what degree
to use it.
In our
timeline lets go back to our 2nd keyframe. As gravity begins
to pull our ball down, we can exaggerate this idea by
SLIGHTLY stretching our ball. We go this by first selecting
the ball. Hit Q to get the transform tool. Zoom in a little,
and on the y axis, just stretch the ball slightly. Mine
looks like this:

[ stretch your ball
slightly towards the top ]
You
can barely even tell, but when its finally animated, your
eye will subconsciously see it. We continue in the fashion
before, on the 3rd keyframe, we'll stretch it a little bit
more. Be sure to keep your onionskin on at all times so you
can see how your current drawing relates to the previous
ones. As you can see, by keyframe 11 we've stretched our
ball out quite a bit:
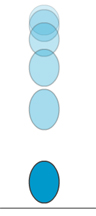
[ a long-range view
of the stretching ]
As
your stretching the ball, you may wish to squeeze it a
little on the x axis in order to keep the volume looking
consistent. One thing that can ruin squash and stretch is
squashing or stretching too much and in so doing, having the
volumes of your object become in-consistent. In any case, by
frame 13 we're ready to squash this sucker because it's
hitting the ground.
Select
the ball on frame 13, hit Q for the transform tool, and
we're going to move our pivot point so its resting right on
top of the ground plane. This will force to ball to squash
where we want it to. If you don't believe me, go ahead and
see what happens if you don't re-position the pivot.
babbabooey. In any case, once you reposition the pivot,
squash the ball down on the y axis and stretch it a bit on
the x axis. Kinda fun ain't it? It should look like this:
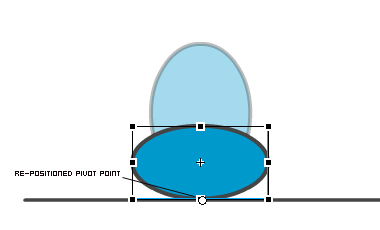
[ stretch the ball
horizontally to signify the collision ]
Tweaking
Now, just to give the animation one last little tweak, lets
allow this squashed drawing to last 3 frames instead of just
2. That way the viewer really gets the feeling that this
ball is hitting the ground and squashing down. Just go to
the timeline, select all the keyframes after this one and
drag them all 1 frame to the right. The timeline should look
like this when your done:

[ extended the
squashed drawing by one frame ]
The
only thing left to do is to go back and finish the last half
of the cycle by replacing the old frames with the newly
stretched ones, just like you did at the end of the
Animating
the Ball section.
If you are interested in seeing my FLA for this
animation, click on the link below:

Your
finished animation with lots of life and energy:
Hope
you enjoyed the tutorial. If you have any questions, feel
free to email me at
[email protected] or post on the
forums. If there's demand,
I'd be happy to continue the series with a new principle
each lesson.
Thank
you.
|


