|
by
kirupa | 15 March 2009
In the
previous
page, you learned what manipulating the various axes
will do. Now that you have a good overview of how to think
about the 3D functionality in Flash, it's about time we
looked at the code.
Let's
first start with something simple. To set the position of your element across all three
axis, just follow your instance name with the x, y, or z
property:
- movieClip.x
= 20;
- movieClip.y
= 50;
- movieClip.z
= 100;
The above code moves your movie clip to the 20, 50
position with a depth of 100. In other words, your movie
clips moves a bit to the top-right and becomes smaller.
The other common task that you will perform is actually
rotating your element across all three of the axes. That is
handled by the rotationX, rotationY, and rotationZ
properties.
- movieClip.rotationX
= 180;
- movieClip.rotationY
= -45;
- movieClip.rotationZ
= 90;
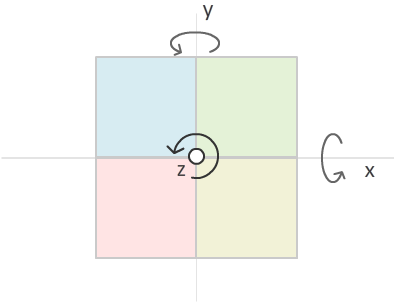
The following diagram shows you what your rotation would
look like when you adjust the rotationX, rotationY, and
rotationZ properties:
Rotation is a bit interesting. In my examples describing
the three axes, I've stated that the z axis is perpendicular
to your computer screen, and in my example of you swimming,
I said that the z value is the equivalent to how deep you
are diving. When you begin to rotate the x, y, and z axes,
mapping between the real world and what your content
actually looks like will become difficult. Just keep that in
mind when you encounter code that skews the 3d
representation.
That's all there is to it. Setting the above six properties that I've shown you will
allow you to create some neat effects that gives your old 2D
elements some 3D attention!
Despite the coolness of all this, there are some limitations
to how much you can do in Flash without resorting to writing
a lot of extra code or looking at using 3rd-party 3d
libraries.
One of the
drawbacks of the 3d functionality in Flash is that whatever
element you are attempting to manipulate in 3D space is
automatically converted from a vector into a bitmap. If you
ever set any of the z, rotationX, rotationY, and rotationZ
properties, Flash will rasterize
the affected elements into a bitmap.
A perfect vector shape such
as the four squares that I've been using throughout this
tutorial looks pretty good when viewed at its default size.
Once you start zooming in, notice that the classic
banding/blurring associated with bitmaps are visible:

Besides the visual artifacts,
as you can imagine from manipulating actual images instead
of vectors, performance suffers a bit as well.
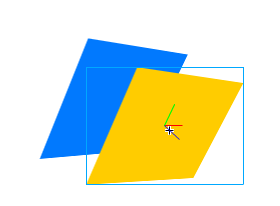
When shapes move in
three dimensions, interesting collisions and intersections
are possible. Unfortunately, this is something that isn't
possible with the functionality available today. For
example, imagine you have two parallel rectangles placed
near other as shown below:
If I were to rotate the blue
rectangle, in the real world, it would seem like a portion of the
blue rectangle's edge will go through the yellow rectangle
that is directly adjacent to it. Instead, what happens is
that the blue rectangle rotates without taking the yellow
rectangle into account:
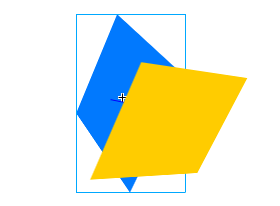
This looks a little weird. It
is almost as if each element has its own 3d universe based
on its z-order instead of coexisting in one large universe
where interactions and collisions are possible.
I really hope
this article helped you to understand conceptually how the
x, y, and z axes are treated in Flash. The concepts are
really the difficult part to fully wrap your head around. As
you saw, the code itself is fairly straightforward. Even
something like the example I showed on the first page is
very easy to create, and I've provided the source file for
that below:
Just a final word before we wrap up. What you've seen here is freshly baked content without added preservatives, artificial intelligence, ads, and algorithm-driven doodads. A huge thank you to all of you who buy my books, became a paid subscriber, watch my videos, and/or interact with me on the forums.
Your support keeps this site going! 😇

|


