We started doing some basic modifications to our menu on the
previous page. We
will pick up from where we left on this page.
Ok, now go back to the style tags, and copy and paste the class below
above the </style> tag:
- #nav
li a{
- background-color:#A4DFF1;
- display:block;
- width:196px;
- line-height:20px;
- height:20px;
- margin:0px;
-
- font-family:
Arial,
Helvetica,
sans-serif;
- font-size:8pt;
- font-weight:bold;
- padding-left:3px;
- padding-top:7px;
- color:#000000;
- }
First, notice that all of the above style information is
contained under the #nav umbrella. With that simple fact in
mind, let me explain each line:
- #nav
li a{
This means this effect will change how the list items
(li) containing links (a) in the menu will appear.
- background-color:#A4DFF1;
This line is pretty self-explanatory. The background
color of all hyperlinked list items are set to a kind of sky blue.
- display:block;
This means the element, in this case the list item, will be
displayed as a block-level element with a line break before
and after the element.
- width:196px;
- height:20px;
- margin:0px;
This is pretty self-explanatory also. These three lines
specify the width, height, and margin of the element.
- font-family:
Arial,
Helvetica,
sans-serif;
- font-size:8pt;
- font-weight:bold;
- color:#000000;
The above lines specify the font styles for your
hyperlinked list text. Overall, there is nothing tricky to
explain here.
- text-decoration:none;
By default, all links are underlined. This line of code
will remove the underline from the text in your list menu.
- padding-left:3px;
- padding-top:7px;
This is just some padding to position the font a bit away
from the left and move in the vertical centre of the item.
When you preview your list, you should see the efforts of
your labor as shown in the screenshot:
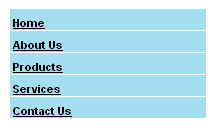
[ your modified
list ]
Like with the earlier image, click
here to view the above example live.
Now, while still within the style tags, paste the following class:
- #nav
li a:hover
{
- color:#FFFFFF;
- background-color:#77B8CC;
- }
This will give the list item a hover style. In other
words, when the user moves the mouse cursor over the link,
the appearance of the hovered over menu item will change
based on what you specified in the above code. In our case,
the only changes you will see correspond to the color and
background-color of your list item.
And you're done you now have a working CSS list menu.
tip: to get more from this you could change the colours in
the list item for images, for instance if I swap the
background color line in the #nav li a:hover class for the
following line:
- background-image:
url(buttons_over.jpg);
You should see now when the user rolls over the menu you get
images rather than the background colour. You should now have a good CSS Menu without the need
for using
JavaScript.
If you have any questions, post on the
forums or contact me.