|
by
kirupa | 10 October 2007
In the
previous page,
we wrapped up our code explanation and took a quick
review of how the code works to help produce the
results you saw (many!) pages ago when you changed
your user control's text inside Blend.
To cement what you learned and to help me make a
convincing case for dependency properties, let's
create another dependency property, which as you
will see, makes all of this trouble worthwhile!
Let's add another dependency
property that allows you to change your user control's background
color. Since many of the steps will be a
review, I won't be as wordy this time as I was when
describing how to tie our InfoText dependency
property to our user control's label.
Currently, your InfoRectangle has a solid green
color. There is no way to change that color on a per
instance basis like you can right now with the
InfoText that gets displayed. Let's change that.
Go back to Blend and make sure you have
InfoRectangle opened for editing. Our background
color is based on the background color of our
rectangle shape. To reference our rectangle, we need
to give it a name - something which I didn't
explicitly call out when you created the rectangle
originally.
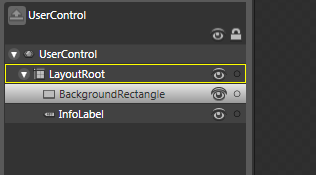
Select the rectangle and edit it's Name property
or right click on it in the Objects and Timeline
panel and select Rename. Whichever path you take to
renaming your rectangle, give your rectangle the
name BackgroundRectangle:

Once you have given your rectangle the
BackgroundRectangle name, make sure to save the
file. Now, Let's go back to Visual Studio and
register a dependency property that allows you to
modify the rectangle's background color.
Unfortunately, there is no way to avoid writing code
when wanting to make something accessible by a
dependency property. In Visual Studio, hit F6 or or
go to Build | Build Solution to build your solution
to make sure that Visual Studio is aware of the
latest changes you made in Blend such as giving your
rectangle the BackgroundRectangle name.
With your project built, copy and paste the
following code below your existing code
that you had from the InfoText dependency property
earlier:
- public
Brush
RectangleColor
- {
- get
- {
- return
(Brush)GetValue(RectangleColorProperty);
- }
- set
- {
- SetValue(RectangleColorProperty,
value);
- }
- }
-
- public
static
readonly
DependencyProperty
RectangleColorProperty
=
-
DependencyProperty.Register(
-
"RectangleColor",
-
typeof(Brush),
-
typeof(InfoRectangle),
-
new
FrameworkPropertyMetadata(null,
-
FrameworkPropertyMetadataOptions.AffectsRender,
-
new
PropertyChangedCallback(ChangeColor)));
-
- private
static
void
ChangeColor(DependencyObject
source,
DependencyPropertyChangedEventArgs
e)
- {
- (source
as
InfoRectangle).BackgroundRectangle.Fill
=
e.NewValue
as
Brush;
- }
After you have pasted the above code and saved
the InfoRectangle.xaml.cs file, go back into Blend and rebuild your solution
(Ctrl + Shift + B / Project | Build Solution).
Select an InfoRectangle instance and glance over at
your Miscellaneous panel:

Notice that you can see your InfoText dependency
property, but there is no entry for our
RectangleColor. That is because RectangleColor is a
type of Brush (more specifically a GradientBrush),
and Blend categorizes properties that deal with
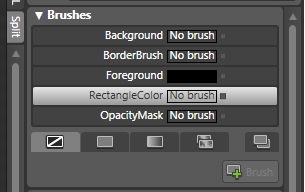
Brush types in your Brushes panel. If you scroll up
and look in your Brushes panel, you will see your
RectangleColor property listed:

Select your RectangleColor brush and click on the
the Gradient Brush icon below. You have access to
Blend's gradient color picker, and you can change
your InfoRectangle's background from the Brushes
panel itself:

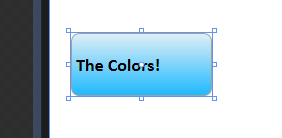
Of course, all of this doesn't help if your
InfoRectangle's background itself isn't modified.
So, here is the proof that the changes you see above
are applied to your InfoRectangle instance also:

Alright - we are almost done with this tutorial.
In the next page, let's discuss the new code in
greater detail. You are almost nearing the end of
this tutorial!
Onwards to the
next page!
|