|
by
kirupa | 31 January 2010
In the
previous page, you created the basic UI
that will allow us to proceed to the really
interesting stuff - the code needed to display the
Save File dialog and to actually save the file.
What we want
to do is display the Save As dialog when the Save
File button in our UI is clicked. This means that we
need to add to the event handler that we associated
with the Click event earlier.
Open MainPage.xaml.cs and find the Save File
event handler. Inside it, paste the following code:
-
private
void
SaveFile(object
sender,
RoutedEventArgs
e)
-
{
- SaveFileDialog
saveFileDialog
=
new
SaveFileDialog();
-
- saveFileDialog.DefaultExt
=
"xml";
- saveFileDialog.Filter
=
"XML Files
(*.xml)|*.xml|All files (*.*)|*.*";
- saveFileDialog.FilterIndex
=
1;
-
- if
(saveFileDialog.ShowDialog()
==
true)
- {
- // exciting
stuff will go here soon
- }
-
}
Once you have copied and pasted this code, press
F5 to test your application. After a few grueling
seconds, your app will display in your browser.
Click on the Save File button to display the Save As
dialog. While the Save Dialog appears, browse to a
location, give a file name, and save the file.
When you open the file that you just saved, it is
going to be empty. The reason is that we haven't
done anything to save the important data we are
interested in.
When the Save button from the
Save As dialog is clicked, we want to write XML data
iinto the file that gets created:
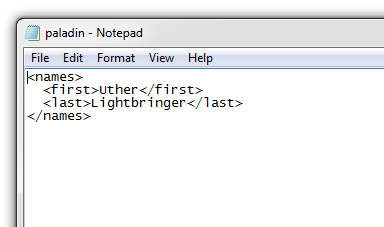
[ what we want - this is the pony we are aiming for
]
We will be using LINQ to generate this XML file,
so you need to make sure your project is capable of
recognizing the LINQ syntax. There are two things
you will need to do.
Getting Ready for LINQ
First,
you will need to add a reference to
System.Xml.Linq.dll.
The way you do this is by finding the References
folder in your Projects pane:
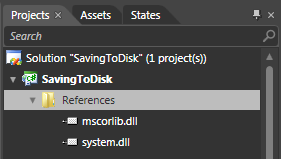
[ you need to add a Reference for LINQ support ]
Once you have found the folder, right click on it
and select Add Reference. From the Add Reference
dialog, browse to:
{Program Files}\Microsoft
SDKs\Silverlight\{version}\Libraries\Client\
Replace the {version} flag with the appropriate
version of Silverlight your project is currently
being created in (3.0, 4.0, etc.). Once you have
found the Client directory, System.Xml.Linq.dll will
be there for you to select:

[ find System.Xml.Linq DLL in the Client directory ]
Once you have selected that DLL, hit Open to add
a reference to it in your project.
Adding the Using Statements
The second thing you need to do is add the
appropriate using statement to the top of your code
to actually take advantage of the DLL you just added
as well as handle some basic file input/output
operations you'll eventually need. Make sure MainPage.xaml.cs is open,
scroll all the way to the top, find the column of
using statements, and add the following two
statements to the end:
using System.Xml.Linq;
using System.IO;
Here is a screenshot of what my using statements
look like:
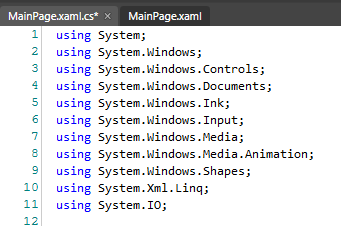
[ look at those awesome using statements! ]
Ok, finally, you are ready to add some code that
will make your application complete. Inside your
SaveFile method, add the following lines
inside your if
statement:
-
private
void
SaveFile(object
sender,
RoutedEventArgs
e)
-
{
-
SaveFileDialog
saveFileDialog
=
new
SaveFileDialog();
-
-
saveFileDialog.DefaultExt
=
"xml";
-
saveFileDialog.Filter
=
"XML Files (*.xml)|*.xml|All files
(*.*)|*.*";
-
saveFileDialog.FilterIndex
=
1;
-
-
if
(saveFileDialog.ShowDialog()
==
true)
-
{
- using
(Stream
stream
=
saveFileDialog.OpenFile())
- {
-
StreamWriter
sw
=
new
StreamWriter(stream,
System.Text.Encoding.UTF8);
- sw.Write(GetGeneratedXML().ToString());
- sw.Close();
-
- stream.Close();
- }
-
}
-
}
If you run your application again by pressing F5,
type a few values in your text fields, and
hit the Save button to save your data. This time
around, if you open the XML file, it will not be
empty...or at least it shouldn't be! Instead, you
should see your data
in all its XML-ish glory.
You aren't done yet! All of you have done is
copied and pasted some code to make all of this
work. In the
next page, let's take a deeper look at
the code and why it works the way it does.
Onwards to the
next page!
|


