 Movement
in Three Dimensions (3D)
Movement
in Three Dimensions (3D)
by kirupa
Many people have this notion that Swift 3D
only allows you to add some very simple animations. Majority
of Swift 3D users create a logo, make it spin, and never
look back at all the cool features that Swift 3D has. This
tutorial is slightly more comprehensive, in that, I require
you to thoroughly understand the information found in this
tutorial even though I will elaborate to reduce confusion:
In this tutorial, you will learn how
create your own, unique animations in Swift 3D. You will
create something similar to the following animation:
[ you will
learn how to create the above animation by the end of this
tutorial ]
Getting Started
Before we begin, you will need to download the sample
T3D file that contains the 3d rectangles. I will explain
near the end of the tutorial on how I was able to create and
position the slabs.
-
Download the T3D file that contains the 3D rectangles by
clicking
here.
-
Once the file has been downloaded, open the file in Swift
3D.
-
You will see rectangles arranged in random locations in
your work area:
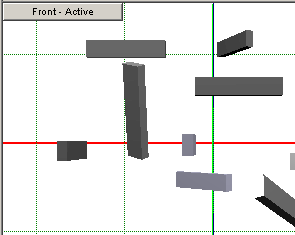
[ the 3D
rectangles ]
Don't worry, the 3D
rectangles in your animation are not animated. You will
animate the 3D rectangles by following the instructions
found in this tutorial.
Animating in 3D
Now that you have your stage setup with the rectangles I
created, let's get started with this tutorial:
-
Click on a rectangle. The entire group of rectangles will
be selected. Once all the rectangles have been selected,
press the Animate button found in the toolbar.
After you press the Animate button, you will see the word
Animating displayed in a red background:
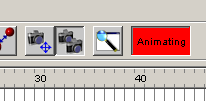
[ the
animating button should display ]
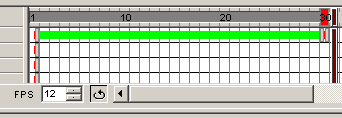
-
Now, drag the red timeline slider to frame 30. The red
timeline slider is the small, rectangular shape on the
Frame 1 label. Drag that slider all the way to Frame 30:
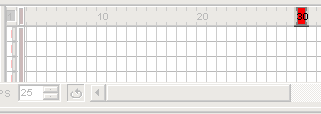
[
drag the slider to frame 30 ]
-
By sliding the slider to frame 30, you have set the
duration of this portion of the animation from Frame 1 to
Frame 30. Let's zoom in on a rectangle in this 30 frames.
While the slider is on Frame 30, right click on any
rectangle in the work area and drag up. Keep
right clicking and dragging up until you only see one
rectangle in your viewing area:
[
zooming by right clicking on a rectangle and dragging up ]
-
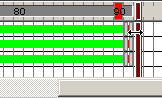
Go back to your slider, and drag it back and forth from
Frame 1 and Frame 30. Notice that your animation is
zooming out as you move backwards to Frame 1 and zooming
as you progress through Frame 30. Your timeline should
look like the following image:
[
your timeline after you complete step iv ]
-
Drag your slider back to Frame 30. Let's add more
transformations (rotations, scales, zooms, etc.) to the
group of rectangles. Click the Lock Horizontal
button in the bottom left panel. After the Lock Horizontal
button has been clicked, left click on the miniature
sphere of the rectangles in the bottom left panel and drag
to your right until you have rotated horizontally about
180 degrees:
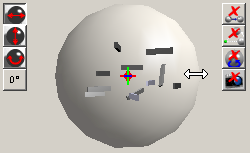
[
your rectangle being rotated 180 degrees ]
-
If you slide your slider back to Frame 1, you will notice
that your animation zooms out as well as rotates (you are
going backwards). Let's add one more section of cool
animations to the rectangle.
-
Drag your slider to Frame 60. Press the Lock Spin button.
Click on the transform panel (the one with the sphere with
your rectangles in it) and drag to your left. You will
notice your animation completely flips.
-
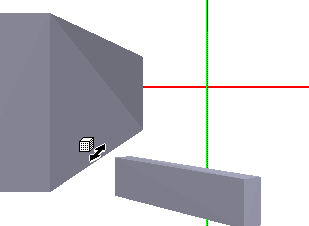
Stay on Frame 60. Right click on a rectangle in your work
area and zoom in by right clicking on a rectangle and
dragging up. Keep zooming in until do not see anything
except the x, y, and z axis lines. You basically zoomed
past the rectangle to the area behind it:
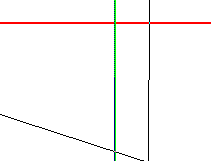
[
the work area after you zoomed in ]
-
If you play with your slider, you will see your animation
turning and then zooming past the rectangles. Let's close
this animation by resetting the camera angles, zooms,
turns, rotates, etc. to their original positions. Drag
your slider to Frame 90.
-
Once your slider is on Frame 90, press the Reset Position,
Reset Pivot Location, Reset Rotation, and Camera Location
buttons. In other words, press the four buttons to the
right of the bottom-left panel with red x marks through
them:

[
click the four buttons emphasized in the above image ]
-
After you have pressed the four buttons, you will see your
timeline automatically extend to Frame 90. Click on Frame
1 in your timeline and click on Frame 90 in your timeline
afterwards. Notice that the rectangles are back in their
original locations.
-
If any portion of your animation did not extend fully, for
example you see something a broken animation line, click
and drag the Dark vertical line visible on Frame 90
and drag it back:
[
drag the dark slider to another frame and back to Frame 90 ]
-
Save the file and export the animation as an SWF. You have
just completed this tutorial.
Animating in 3D is often plagued with
numerous, insignificant problems that could cause your
animation to go awry. If you, by accident, moved the camera
without selecting your object, Frame 1 and Frame 90 at the
end will not correlate.
Because 3D animations require some
practice, I am providing you with the source file for the
animation found in the example at the top. The example is a
little bit more complicated than this tutorial, but useful
nonetheless:
Just a final word before we wrap up. If you have a question and/or want to be part of a friendly, collaborative community of over 220k other developers like yourself, post on the forums for a quick response!

|


