 Transforming
Objects
Transforming
Objects
by kirupaMany people, including me,
once believed Swift 3D can do nothing more than simple 3D
spins and turns that come with the software. Of course, you
can create complex animations entirely in Swift 3D. Before
you can learn how to create your own animations in Swift 3D, you need
to master important techniques such as transforming objects
and their camera angles.
Setting up the Initial Object
How can we transform an object when the object does not
exist? The next few steps briefly explain how to create the
object:
-
Launch Swift 3D and create a new document.
-
Click the Create Box button found near the top of the
Swift 3D window. A large cube will display in your main
work area. We will be using this cube and modifying it
throughout this tutorial.
Scaling An Object
Surely you do not want your cube to take up almost all
of the workable area do you? When an object is too large or
too small, you need to scale it. The following steps explain
how to scale your object:
-
Look at your cube. It is far too large and must be scaled
down in size.
-
To make an object smaller, right click on the cube and
drag down. When you are scaling, you will notice that your
mouse cursor changes.
[
mouse pointer changes during scaling ]
-
To increase the scale of an object, right click on the
object and drag up. The object will scale up.
Zooming In/Out
I bet you are wondering what the difference between
zooming and scaling is. When you scale an object, you are
literally modifying the width, height, and depth of the
object to make it smaller or larger. When you zoom in, on
the other hand, you simply move the camera's focus further
back or nearer to the object. The object's length, width,
and depth are not affected during zooming.
The following steps explain how to zoom:
-
Find an area outside of your cube. Don't right click on
the cube, but right click outside the cube and drag the
cursor down.
-
As you drag the cursor down, you will notice that you are
zooming out:
[
mouse pointer changes during scaling ]
-
To zoom in, right click on any empty spot of your
animation and drag up.
There are several more methods of
transforming the object that you will learn in this
tutorial. Before we continue, there is an important idea for
you to comprehend first. The object and the area around it
are completely independent of each other.
When you right click on an object, you are
modifying the object's properties such as position, scale, etc.
When you click on the empty space around the object, you are
modifying the camera. The use of the
camera, the empty space around the object, confuses many
people. When you do anything to the empty space around the
object, you are, figuratively, telling the cameraman or
camerawoman to shift positions. The subject of the camera,
the 3D object, is not altered in any way shape or form.
Rotating, Tilting, and Spinning
The final three ways in which an object can be modified are
by rotating, tilting, and spinning. Here's how:
-
Click on the cube with your left mouse pointer. The cube
will be selected.
-
Now, look at the panel on your bottom left:
[
the rotate, tilt, and spin panel ]
-
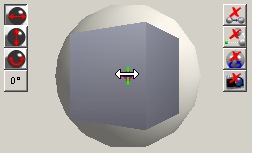
From that panel (see image above) you will be able to
rotate, tilt, and spin the cube. In that panel, click the
button with two arrows going on either side. That button
with the two arrows is called the Lock Horizontal button:
[
the lock horizontal button ]
-
Once you clicked the Lock Horizontal button, select the
cube found in the panel (not the cube in your main
work area). Select the cube and drag the mouse cursor
horizontally. Notice that the cube is now rotating in the
direction of your dragging:
[
notice that your cube is rotating ]
-
The other two buttons control the vertical tilt and spin.
You would repeat steps i - iv except click the two other
transform buttons besides the Lock Horizontal button.
-
If you decide that you don't like any transform effect you
applied, you can use the reset buttons on the right. The
table near the end of the page will explain what all the
buttons mean.
Rotating, Tilting, and Spinning the
Camera
Just like you were able to modify the cube, you can modify
the camera angle. The primary difference between
transforming the cube and the camera, is that the camera
rotates the x, y, and z axis instead of the cube.
I will not be repeating the instructions
on moving the camera because the instructions are redundant.
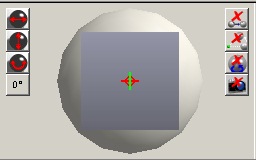
To modify the camera positions, simply click on an empty
portion of your animation. Go to the bottom left panel (it
should be empty) and then click one of the three transform
buttons and drag the mouse around in the empty sphere:

[
transforming the camera ]
The above tutorial basically
summarizes all there is to know about transforming the
object and camera angle. The following table explains the
function all the buttons in the bottom-left panel:
|
|
 |
Lock
Horizontal
Enables you to only rotate the camera or object
horizontally. |
 |
Lock
Vertical
Enables you to only rotate the camera or object
vertically. |
 |
Lock Spin
Enables you to only spin the camera or object without
modifying the vertical and horizontal positions. |
 |
Rotation
Increment
Allows your camera or object to rotate in set increments
instead of the full 360 degrees offered. |
 |
Reset
Position
Resets the object's position after a transform. |
 |
Reset
Pivot Location
Resets the object's pivot change position to its default
setting before any transform effect was applied. |
 |
Reset
Rotation
Resets the rotation of the object. |
 |
Reset
Camera Location
Resets the camera position to its default position
before any camera positions were modified. |
Just a final word before we wrap up. If you have a question and/or want to be part of a friendly, collaborative community of over 220k other developers like yourself, post on the forums for a quick response!

|


