| |
|
|
|
|
 |
 Liquify Image
Effect
Liquify Image
Effect
by
bAkedSOda@in2mind : 9 September 2004An ultra-simple
touch of action script can turn an otherwise-still image or even
a whole swf into a liquefied, stretchable rubbery treat !... If
you're anything like me, you just love imposing contortions onto
perfectly innocent loaded images! So if you're ready follow me!
Observe as you
move the pointer slowly around the eyes and nose of this guy:
[ move your mouse over the above animation ]
In this tutorial
We'll go over the concept of creating a basic 'lens' effect in
flash, and then expand that idea into creating what you see
above. We're assuming here that you have at least some idea of
what a 'mask' is (other than the kind you wear on your face),
but even if you've never masked an image in flash before, we'll
go over that in this tutorial too : )
What you need:
-
Flash MX 2004 (the style of coding we'll use
is reflective of the action script 2.0 paradigm of writing
code).
-
Any image that you'd like to apply this
effect to. (the one included in the Downloadable Source file
ZIP (link at bottom of this page) works just as well as any
other.
- A desire to get your hands a little dirty in a short,
pretty basic slice of action script. Piece of cake!
 |
Note |
This effect can
be applied to any movie clip or image in
your movie. Whether you load it in at
runtime using loadMovie() or the
MovieClipLoader() class, or if the image
lives in the library at author time. For
now, we'll build this gummy contraption
using an image that's in your movie's
library.
|
|
First let's set up our movie: open up your Flash (as if
it's not ALWAYS open 24 hours a day!)

-
Set up your movie with layers and size as
shown above. The image used in the downloadable source file
is a .jpeg of about 312 pixels wide and 364 pixels high so I
set this movie's Stage size at 330wide and 402 high. (oh
yeah: while you're setting the Stage size, make the Frame
Rate of this movie 31 fps).
|
|
Tip |
|
Some movies'
animations look 'quirky and not smooth', and
some look smoooooth and sweet. why? The
Frames per Second setting in the movie.
Sometimes I
use 60fps, sometimes 31. I've even seen some
people use 90! (but they disappeared and no
one can find them now), If you test a movie
developed using 90 fps, and your sounds are
sync 'd up nicely with your visuals, that
movie running in a web browser will play
quite differently, and you'll get mad.
A Motion
picture made in Hollywood plays at 24 or
31fps...31fps gives a nice smoothness of
motion and cpu-friendliness.
|
|
- Create four layers and label them from top to bottom:
- action script
- mask_mc
- pic
- bg
- On the 'bg' layer, place a background. I used a black
rectangle at center Stage with a grey one underneath it at
slightly off-center.

|
|
Practice
Observing Subtlety
|
|
If something is
present in a design, (such as this
'meaningless' black rectangle with a drop
shadow) and it's not noticed right away as a
'prominent feature', that's a pretty good
sign that it is contributing to the whole in
some important way; providing depth or
structure. I'm not saying that this silly
little black rectangle is a great work of
art, but I am saying that something like
this does make a difference when it's there,
even though it goes unnoticed right away.
|
|
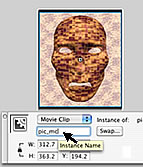
- Place the image on the 'pic' layer at center
Stage, and press <F8>...
In the 'convert to symbol' pop-up choose 'Movie Clip'.
And in the tiny registration grid (circled in blue), click
on the center square. You can put anything in the 'Name'
field. Press 'OK'.

- Select the newly created symbol on the Stage and give it
an instance name of 'pic_mc' using the Properties toolbar.
-
Select the 'mask_mc' layer and draw a big
oval shape on frame1. It should cover a large portion of the
center of pic_mc, which is on the 'pic' layer. Make it a
solid color fill with no outline (no Stroke). This will be
one of the elements that follows the mouse around and makes
the image look rubbery...
- Select the big oval you just created (make sure it's the
only item that's selected) and press <F8> to turn it
into a Movie Clip, also with a center Registration
point. Give it an instance name of 'mask_mc' in the
Properties toolbar.
The Stage is set
The movie's setup is complete and we're ready to talk about
'lensing.' Then we'll script this whole thing up.
If you're already well-versed in using masks,
dynamically-created masks, and creating a basic 'lens' effect,
you could skip the next page and go straight to
part 3.
Otherwise, the next page and all its goodies is for you!
| |
page 1 of
4 |
 |
|
|
|
|
|
|


