|
by
kirupa | 23 October 2008
In the
previous page, you created the shape that, in this page,
you will be adding joints to and animating. Let's dive right
in!
Now
that your shape is done, let's divide our shape into
individual components that can be independently adjusted
using the Bone tool. With your shape selected, select the
Bone tool from the Tools panel:
[ the Bone
tool is the one with the icon of a bone! ]
Once you selected your Bones tool, click on the base of
your shape and start moving your mouse up to create the
first segment of your joint:
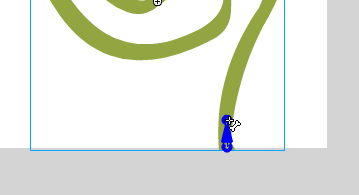
[ click at
the base of your shape and start moving up the outline ]
Once you have dragged your mouse up a few pixels, release
your mouse to set the first joint:
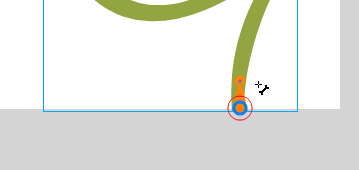
[ releasing
the drag will create a bone segment ]
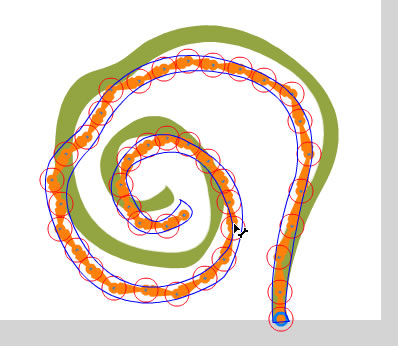
This is only the first joint, and you will need more.
Click on the tip of the joint you just created and begin
drawing another joint:

[ draw
another joint by starting your new joint from where the old
one ended ]
Just like before, release your mouse after you have drawn
a joint an appropriately sized bone segment.
As can guess what the next step is, keep creating these
joints and hugging the contours of your shape until you hit
the end of the road:
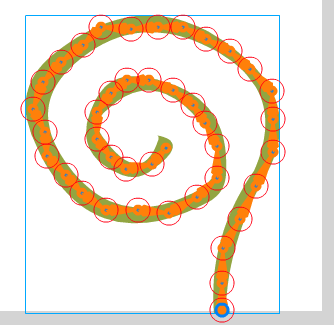
[ that is a
lot of joints for a blade of grass! ]
This will take a minute or two, but it isn't particularly
difficult. If you find yourself unable to get the joint to
map with the curves in your shape just right, zooming in or
turning snapping off (View | Snapping) can help.
With your bones set, it is time to create the IK animation.
In your timeline, you will see a layer called Armature
created for you:
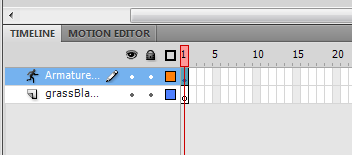
[ when you
use the bone tool on the shape, the Armature layer is
created for you ]
On this layer, right click on Frame 120, and select the
Insert Pose menu item. Once you have done that, a keyframe
will be inserted for you at Frame 120 with a green
background color filling up all frames between 1 and 120 in
the Armature Layer:
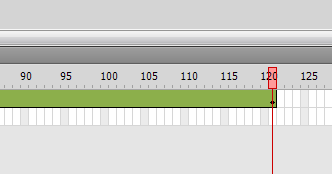
[ insert a
Pose keyframe on Frame 120 ]
Let us insert another Pose - this time at around Frame
60. Just like before, right click on frame 60 in your
Armature layer, and select the Insert Pose menu item. After
a few seconds, your Pose will be inserted there as well:
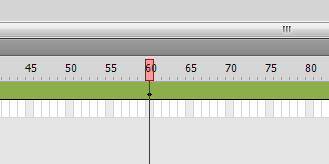
[ insert
another Pose keyframe at Frame 60 ]
With your playhead on Frame 60, it is time to move some
of the joints around. Click on the Selection Tool to get
your mouse cursor back and to go out of Bones mode.
Select your shape again if it has lost focus. Now, click
on any of the joint endings and move them around with your
mouse cursor:
[ drag the
points whose connected segments you want to move ]
Getting the right pose you want is a bit of an art, and
with a shape containing as many joints as this, you may find
the lag between your mouse movement and your shape actually
updating to be quite noticeable. With some trial and error
(and Undo), getting what you want should be straightforward.
Once you have gotten your shape in just the right pose
that you want, hit Enter to see the preview on the design
surface, or press Ctrl + Enter to see how it looks in the
Flash player!
You are done
with this tutorial. As you can see, the IK animation
functionality in Flash CS4 allows you to create certain
types of animations that you couldn't do easily before. If
you are curious to see how my animation on the first page of
this tutorial was created, download the Flash CS4 source file
from the following location:
Be sure to double click on the blade of grass to see the
IK animation and pose inside the movie clip, for I didn't
create them on the main timeline like I showed in this
tutorial.
Just a final word before we wrap up. What you've seen here is freshly baked content without added preservatives, artificial intelligence, ads, and algorithm-driven doodads. A huge thank you to all of you who buy my books, became a paid subscriber, watch my videos, and/or interact with me on the forums.
Your support keeps this site going! 😇

|


