by
kirupa | 29 September 2005Let's continue from
where we left on the previous page. In this page, I will show you how to animate
the letters in your text.
The Timeline
Up until now, we haven't done much work with the timeline. The top half of your
Flash window is where the timeline is. Your timeline contains two important
things: layers and frames. Your actual animation will be specified in the
frames, and the objects that you animate are specified in layers. You'll see
what I mean in a minute.
If you have been following the tutorial, more than likely, your layers extend
below the timeline - thus requiring you to scroll. That is a minor annoyance
that can be rectified by resizing the vertical size of your timeline. You can
resize your timeline by clicking on the bottom edge of your timeline and
dragging down:
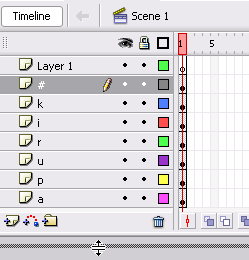
By increasing the size of our timeline, we can easily access all of our
layers without requiring much scrolling.
Anyway, I am sure you would want to get
back to animating:
- Find the layer labeled #, and on Frame 10 of that layer, right click and
select Insert Keyframe:
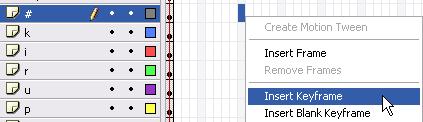
[ insert a keyframe on Frame 10 of your
# layer ]
- After you have inserted a keyframe at Frame 10 of your #
layer, you will see a solid black black dot at that location. Now, click on
the keyframe on Frame 1 of your # layer. You will notice that only your #
text is selected in your work area.
- With your # letter selected, press your left arrow key and move it a
little to the left:

[ move the # letter left a little bit ]
- Now, click on the keyframe you created earlier on Frame 10.
Notice that it has the # letter closer to the other letters in its original
position. What we need to do is find a smooth way to transition the letter
from its new position further left to its original position in Frame 10,
closer to the other letters.
- Click on the keyframe in Frame 1 of your # layer and drag your mouse
right until you reach the keyframe in Frame 10 of the same # layer. Frames 1
through 10 should now be highlighted/selected:
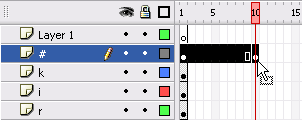
[ select the frames between Frames 1
and 10 in your # layer ]
- Right click anywhere on your selected frames and select
'Create Motion Tween'. Click anywhere else on your timeline to remove focus
from the 10 frames.
Notice that those 10 frames now have a slight purplish background color
applied to them:
[ create a motion tween between Frames
1 and 10 of your # layer ]
- If you were to drag your timeline slider (the partially
transparent red box on the frame labels) between Frames 1 and 10, notice
that your # key smoothly moves from left to right in your workspace.
- No doubt, you would have noticed that all of your other letters
disappear when your timeline slider goes beyond Frame 1. That is because we
have not defined frames for the layers holding the other letters.
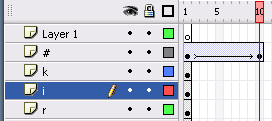
Select the first keyframe on Frame 1 of your k layer and drag
diagonally down until you get to Frame 9 of your a letter
layer. You should now see a large box of highlighted frames. Right click
on any of those frames and select "Insert Frame":
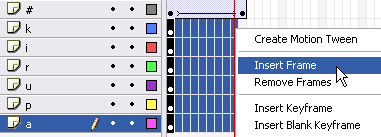
[ select the above highlighted frames,
right click, and select Insert Frame ]
Now that you have frames defined for all of the other layers, notice that
when you drag your slider, the other letters remain visible on your stage.
We have animated just one letter, so let's animate the rest of them.
- Let's create keyframes for the remaining letters. Click on
Frame 10 of your k layer and drag straight down selecting only all of
the Frame 10's in your other layers. Once all of those frames have been
selected, right click on your highlighted frames and select Insert
Keyframe.
Your timeline should look like the following image:
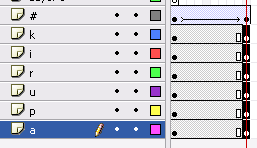
[ insert a keyframe in Frame 10 in your
layers k through a ]
- Now, you need to create a motion tween between Frame 1 and
Frame 10 of each layer. You can add a motion tween to each layer
individually like you did for the # layer, or you can select all the Frames
in the k, i, r, u, p, and a
layers, right click on the selected frames, and select Create Motion Tween:
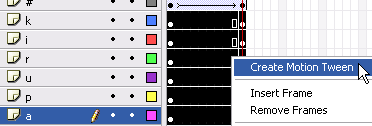
[ creating a motion tween between all
of the frames ]
- All of your letters should have a motion tween applied to
them now. If you slide your timeline slider, you will see that, while all of
your letters display, only the # letter is actually animated. Let's change
that.
Make sure your slider is back on Frame 1, and click on the letter k
on your stage. Press the up arrow key (or drag the k letter up with your
mouse) a few times. Your letter k should be a few pixels above the rest of
the letters:

[ on Frame 1, adjust the letter k by
moving it up a few pixels ]
- Click on letter i, and move it down a few pixels. Move letter
r up a few pixels. Alternate the initial position of each letter by moving
it up, down, left, or right. Here is how my stage looks like after I
adjusted the positions of all the letters:

[ adjust all of your letter positions ]
Preview your animation now by going to File | Publish Preview | HTML. You
will see your animation displayed in the browser. Notice that the letters move
in from their random positions to spell out #kirupa you had initially.
We aren't done yet, but at least our animation is starting to resemble
something cool. Let's add some more animation effects on the
next page.
Onwards to the
next page!
|


