by Danielthelion | 3
December 2005
In the previous
page I introduced two of the twelve principles this
tutorial will cover and the animation we will apply them to.
Let's get started.
Presets
Lets start by opening flash and creating a new document. You
can use whatever stage size your comfortable with but lets
make sure the frames per second is set to 24. This is film
timing and its a good habit to get into to make this a
default fps speed when dealing with character animation:
[ set your frames
per second (fps) to 24 ]
Laying the Groundwork
Create a ground plane. Using the line tool hold Shift
and drag the line across the bottom of the stage. This will
give us a plane of reference for our ball.
Make it a graphic symbol by selecting the line and pressing
F8. Then select graphic and name it ground. It should
look something like this:

[ create a line and
covert it into a graphic ]
Make the Ball
Now let's make the ball. Create a layer above the ground
layer and name it ball. Using the Ellipse Tool, hold
Shift and drag - creating a decent size ball. Place
the ball on top of the line so that it looks as if it is
supported by a ground. Select it, press F8, and make it a
graphic symbol. What you should have should look like this:

[ draw a ball near
your line ]
Timing
We're now at the first principle of animation I'd like to
talk about: Timing. Timing is, in essence, how long a given
action lasts. This is represented by how many frames an
animator assigns to a given action. A big problem with a lot
of student animation I look at, is that everything moves at
the same pace. In real life this rarely happens. So we ask
ourselves "how long do we want this ball falling animation
to last?"
This is something that I usually visualize in my head. I
close my eyes and see the action taking place and then
imagine how many seconds or half seconds it might take. This
is a knack and requires lots and lots of practice. It is
extremely helpful, if not necessary, to have a stopwatch
with you and actually act out the action your preparing to
animate.
That way you have at least some sort of guideline to shoot
for. In this case, lets suppose we want it to last 1 second.
Since there are 24 frames in a second, we'll need 24 frames
for a 1 second animation. So lets go to our timeline and
select frame 24 for both layers, then hit F5 to make the
keyframes extend to that frame. We are creating a frame work
- boundaries if you will, for our animation to take place
in. This keeps us from being overly ambitious as well as
focused on the purpose of our goal. To create a lively ball
bounce.
Animating the Ball
Time to
make it move! We go to Frame 1 of our timeline, and select
the ball. Lets say something that resembles this:
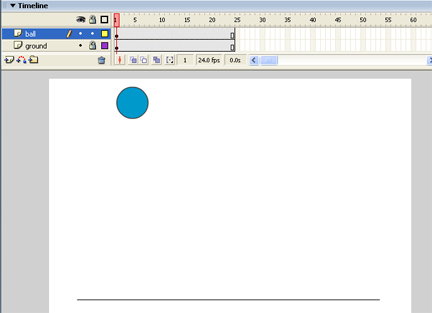
[ place the ball
towards the top ]
Ok,
first frame complete. Now, in traditional animation, the
animators have their drawings play back at 24 frames per
second, which could possibly mean 24 drawings per
second...but not necessarily. You see, through years of
experimenting, animators found out that you can create quite
a nice illusion of life by only using 12 drawings per
second. Needless to say, that was a lot easier on the
animators.
The
way they did it was, instead of having their drawings play
for just one frame, they held the drawing for two frames.
This began to be referred to as "shooting on 2's". You can
shoot on 1's, 2's, 3's, 4's, 5's...*holding for 6 or more
frames creates the feel of a "hold" to the viewer. Still,
according to Richard Williams(Roger Rabbit, Thief and the
Cobbler) who was actually quoting an even older animator,
"Everything looks better on ones!"
In any
case, we're going shoot on 2's for this lesson. Which means,
every other frame will be a keyframe. Go to your timeline,
and on the ball layer create a keyframe for every other
frame by selecting the desired frame and pressing F6.
Your
timeline should look like the following:
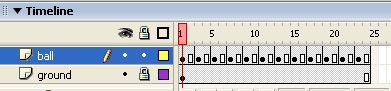
[ notice the gaps
in our timeline ]
There is more to be done. So onwards to the
next page!
|


