 Using
Movie Clips In
Your Animations
Using
Movie Clips In
Your AnimationsAfter
reading Hillman Curtis's great book "Flash Web Design", I
too started experimenting with using Videos in my
animations. And anyone who has any interest in it can too.
You don't even need a video camera at all. Just go to the
web and download some royalty free QuickTime Movie clips
(for free) and add them to your animation. So, below you'll
see an example I did by using QuickTime 4's Sample Movie.
I'm sure many of you who have
QuickTime 4 installed have the movie as well, but just to be
safe, I'm offering the movie in a zipped format for you to
download. The file is only
about 60k in size.
Once you unzip the file, I
highly recommend creating a separate folder on your Hard
Drive for this tutorial. Ok, so let's get started. First,
let me say that this tutorials is basically in two parts.
-
Importing Movie Clips and
Exporting As Sequence of Images
-
Using Movie Clips In Your
Animations
We'll first start of with
learning how to Import Movie clips and Export them as a
series of images.
-
Launch Flash 5 and go to
Modify > Movie. Set the Movie's width and height to 200 x
240 respectively. Then import the QuickTime movie by
clicking on File > Import. Browse to the folder where you
have the "Sample.mov" on and Import it by pressing the
"Open button". See image below:
-
Once you have imported the
movie, place it in the drawing area as perfectly as
possible. Use the Info panel to help you in making the
movie fit snugly in.
-
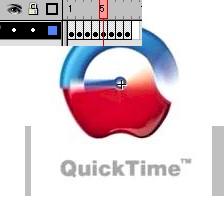
Now you should see the movie in the Drawing area. Now here
comes the easy but confusing part; keep adding blank
frames (F5 Or Right Click > Insert Frame) on the first
layer until you see a big "X" on the movie clip. If you're
FPS is set to 12, then the you should see the "X" on after
Frame 37. See image below:

-
Not too difficult now was it?
Now, here comes the most important part....Exporting the
movie into a form it can be used quite easily in Flash. Go
to File > Export Movie. From the drop down list, choose
"JPEG Sequence". I recommend creating another folder for
this by the way. Give it a short name and click "Save".
See image below:
-
Once you click save, you
should see a box asking for some information like quality,
size, etc. For best results, I recommend using the image
quality setting of "75". See image below:
Click Ok, and the movie
should now be exporting itself into a series of JPEG movies.
You may want to go to the folder where you exported the
movies to and see about 36 individual images in the JPEG
format.
Now that you have imported
and exported the QuickTime movie clip, it's time to actually
make all the JPEG images to good use. If you haven't yet
exported the images, please go back to the
previous page. So, if you've been
following along with me, let's continue.
-
First, create another new
movie in Flash 5. Once you have done that, insert a new
symbol. Go to Insert > New Symbol: Movie Clip. Give the
movie clip a name also if you wish. See image below:
-
Once you click OK, you should
see another Timeline that is similar to the main timeline.
So, let's begin to import the images from our QT
(QuickTime) Jpeg sequence.
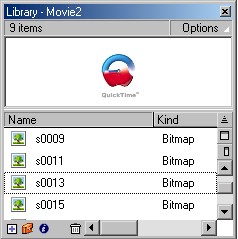
- Go
to File > Import. Navigate to the folder where you have
stored all the JPEG sequences. Highlight every ODD
NUMBERED IMAGE by using Ctrl+ Left Mouse Click. That is
still a lot of images. If your Library hasn't opened up,
open it by going to Window > Library (or by pressing Ctrl
+ L). See image below:
-
Here is the most important
part. If you look at the library, you'll see a lot of
images. That is way too many images that should be in an
animation targeted for a vast majority of dial-up users.
You'll learn how to remove unwanted, extraneous images
- Even though you only
imported odd numbered images, there are still too many
images. Briefly click on each image and look at its
sample that should be visible on the Library's preview
window.
- Once you have previewed
all the images, do you see a lot of the images being
static or not moving. The first few frames and the last
few frames stay stationery during most of the movie
itself. You'll have to remove a lot of these extraneous
images.
- The images I deleted are
as follows: Image no: 0001, 0003,
and all the images after 0015. That eliminated
well over half of our extraneous images. Now, we can
work with this quite easily.
-
Once you "pruned" out all the
extraneous images, here comes the painful task of
arranging these images. Insert about 10 blank keyframes.
Delete the image that is visible in the drawing area (if
you have an image in the drawing area). Now, slowly drag
and drop each image into the respective blank keyframes.
Here's is a tip to help you out:
- First, drag the first
image onto the first blank keyframe. Once you have done
that, the blank keyframe becomes solid once again.
- Next, drag the second
image and drag it ON TOP OF THE FIRST IMAGE on the first
keyframe itself. Align the edges of the second image to
match that of the second image. Then, press Ctrl+X. That
should cut the image and make you see the first image
again. Click on the 2nd blank keyframe. Now press
Ctrl+Shift+V. That should paste the image in the same
location that you cut it from. Now, when you test the
first two keyframes, you should see the images in the
same area. That helps out tremendously when you're
working with large movies, etc.
-
Once you have added all the images onto the keyframe in a
way that actually animates. In other words, you cannot
skip around in choosing which image to use or not use. You
have to follow the same consecutive pattern in setting the
images in a series on your timeline. Once you have done
all that, your movie should look like my image below:
The image has been edited to fit
on this screen
-
Now, you're done with the
movie symbol you created at the beginning of this section.
Click on the "Scene 1" icon on your top-left to be taken
back to the main page. To add this movie to your main
scene, go back to the library and drag the movie clip that
you named onto the main timeline. You should see the first
keyframe of the movie only. See image below:

-
That is all there is to
importing, exporting, re-importing, and using a movie clip
in Flash 5. You can now use that movie clip in your
animations as you would any regular movie clip. You can go
back to the library and try to optimize the images more by
right clicking on them and choosing Properties.
Also, you may be
wondering...why do we need to do all this for the movie? We
could've just imported the movie in Flash and left it in the
quick time format. For this example, we could've left it
that way. But, to get the most out of imported movies, you
can add some interactivity. You could use "Tell Target" and
make only a certain part of the movie play at a certain
time. You could introduce variables and not make the movie
play until you define it to. There are limitless
possibilities.
One last bit of information:
Flash 5 cannot import AVI (Windows Movie Format), but Flash
5 can export your animations (if you wish) into the AVI
format.
Download the Final source if you want to know how my
animation turned out.
Just a final word before we wrap up. What you've seen here is freshly baked content without added preservatives, artificial intelligence, ads, and algorithm-driven doodads. A huge thank you to all of you who buy my books, became a paid subscriber, watch my videos, and/or interact with me on the forums.
Your support keeps this site going! 😇

|


