While you can create a
text mask that can follow your mouse, it is
time to allow the mask to be "drug" around by you dragging!
This isn't a cumulative tutorial, and the partial source
code is provided below. There will be a section explaining
what I have done, so you can understand and implement this
in your own movies.
The example and the tutorial
below will help you to create a mask that can be dragged by
using the mouse:
Click on
the colored area and drag. Click again to release.
Creating A Drag Mask:
Before we start, please
download the partial source below. Don't worry, the partial
source will not have the key elements to make it
work...you'll do that with the information found below. Click here to download the
source.
Here's How:
Once you have opened the
file "drag.fla" that you downloaded from my site, you
should see the text and a circle. I'll explain how to
create the draggable movie, then I'll explain how it
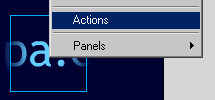
works. Click on the "button" in layer button. Right click
on that and choose "Actions". See image below:
Once you have
done that, it is time to add the actual code in. Click on
the "+" then go to Actions > startDrag. In the target
area, type in "drag" (that is the name of the movie clip).
And make sure you check the box for "Lock mouse to
center". Now, highlight the section of code that says "on
(release)". In the event subsection, uncheck "Release" and
check "Press". Your code should look like that of the
following:
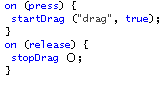
Now that you have setup the drag clip, we need to set
up a way in which the movie won't drag. Conveniently,
Flash 5 has an action called stopDrag. So, highlight the
last line of code " the } " and go to "+" then Actions >
stopDrag. Your code should know look like the image below:
Now, all you have to do is preview the
movie. I usually preview the movie in HTML. Go to File >
Publish Preview > HTML. Below you'll find how the movie
works.
Explanation:
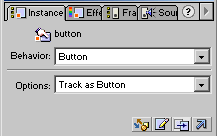
Below you'll learn as to why the
movie works the way it does. It is really important that you
have the "Instance" panel visible. If you don't have it, go
to Window > Panels > Instance. Now, when you click on the
movie, you should see a button. That is what the Instance
window shows. See image below:
So, as you can tell by
now....the button is transparent. To see that, simply right
click on the button and choose "Edit In Place". Here is why
the button is a button and it is transparent.
Because
the button is transparent, you are able to see the movie
below. Had I not done a full "Alpha", the button's color
would have blocked you and me from seeing the cool mask
drag.
The button
takes up the whole screen because I want the drag to work
throughout the movie. I don't want have to move the mask
back to the small area to un-drag it.
Unlike the
previous page, mouse actions only occur on Buttons. For
the drag to work, you need to add the mouseEvent actions.
They will only work in buttons.
That's that about buttons.
Now, if you lock the layer for buttons, and unlock the other
layers that are masked, you should see the whole movie now.
Click on the blue gradient "circle". In the instance window,
you'll see that the object is a movie clip, and that it has
a name "drag". That is why in the code above, we referred to
the "Target" as drag. You can change that name to something
like "clip", and change it manually in the button code to
reflect that. The movie will still work. That is a direct
result of Tell Target. See below for some links related to
these topics.
Just a final word before we wrap up. What you've seen here is freshly baked content without added preservatives, artificial intelligence, ads, and algorithm-driven doodads. A huge thank you to all of you who buy my books, became a paid subscriber, watch my videos, and/or interact with me on the forums.