|
by
kirupa | 6 August 2009
In the
previous page, you used Blend to apply some
easing functions to the two keyframes that needed it
the most. How it all works is still a bit of a
mystery, so let's look into that on this page.
So, what exactly happened in the previous sections?
You noticed that your current animation was pretty
boring, so you decided to add some spiffy easing
effects. You did that by going to the individual
keyframes and adding an easing function. That's it.
You ran your application again, and just like magic,
everything worked. Let's look broadly at what
exactly happened to make this work.
Think of your easing function as a gentle breeze.
It has the ability to alter the course of the
property change, but it isn't very demanding. The
easing function will rarely overload the animation
to a point where the animation's progress is
entirely dictated by what the easing function
defines. Instead, an interpolation goes on between
the animation and the easing function. They find a
middle ground, and it is this middle ground that you
see when you preview an animation with easing
applied.
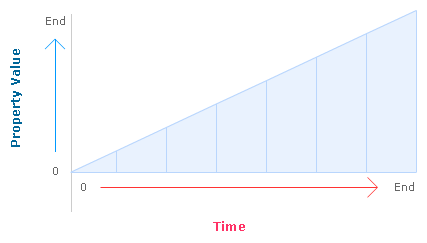
This means that something like your linear
animation...
...is combined (aka interpolated) with your
easing function...

...to create the final animation whose property
changes similar to what you see below:
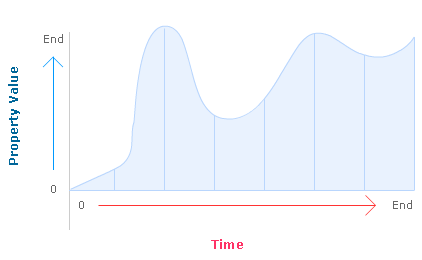
What shape the changes take depends entirely on
the easing function used. Some are pretty serene
like the Cubic ease, and some are pretty whacky like
the Elastic one you used:
[
whacky is the word ]
In case you are wondering, I base sereneness and
whackiness entirely on how complicated the easing
curve preview looks like in the list of eases
available.
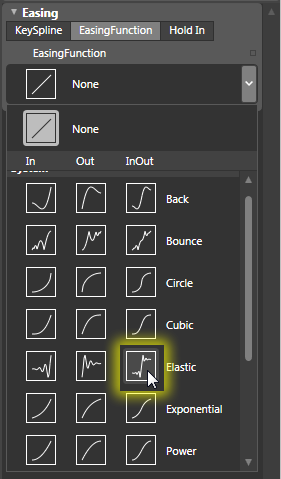
If
you recall, when picking the two easing functions to
apply to your keyframes, you picked them both from
the InOut column. If you look closely at the list of
easing functions, there are two more columns
available for you to use as well - In and Out:
[
what are these...EasingModes? ]
What are these three easing variants? The best
way to explain this is by looking at the easing
functions a little bit closer. All of your easing
functions are defined by a mathematical formula.
This mathematical formula takes your current
animation's progress and alters some things to
affect what your animation looks like. This much you
learned in the preceding sections.
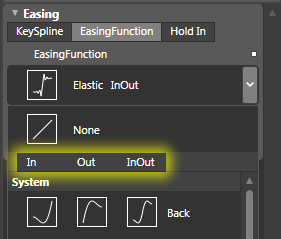
The easing variants you have, known internally as
EasingModes, alter the mathematical formula that
makes up your easing function. For the following
examples, let's say that the mathematical formula I
am using refers to the Cubic ease.
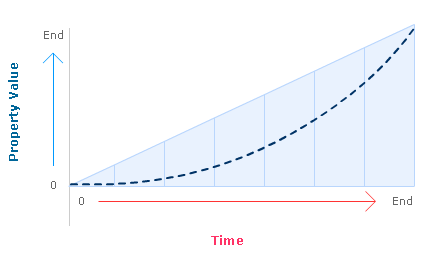
When you are just easing In,
your formula for Cubic ease is applied with no
alteration over your animation:
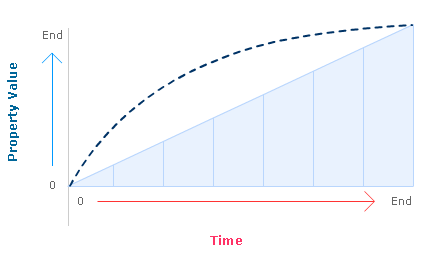
When you are easing Out,
your formula is flipped a bit where the start and
final values are the same, but what happens in
between is sort of inversed. I am not going to go
too mathematical on you, so I will just show you the
diagram instead:
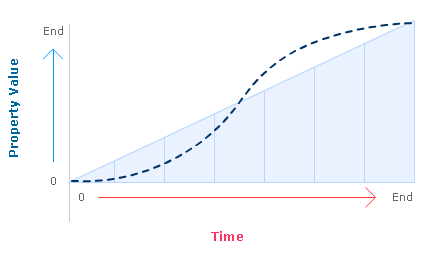
Last and certainly the most fun is your InOut
ease. InOut ease combines both the In and Out eases
you saw above. The first half of your animation is
spent going all In, and the last half of the
animation is spent going all Out:
By playing with the EasingModes, you have just a
few more feathers that you can add to your cap when
tweaking and modifying the easing effect you want to
apply.
Isn't
easing a lot of fun? You just finished learning how
to apply two built in easing effects to a few
keyframes using Expression Blend 3. Beyond just
learning how to add easing functions, I hope you
gained more inight into how easing functions, easing
modes, and your animation work together.
If you are interested in looking at my final
version of the project, feel free to download the
source files by clicking the link below:
Just a final word before we wrap up. What you've seen here is freshly baked content without added preservatives, artificial intelligence, ads, and algorithm-driven doodads. A huge thank you to all of you who buy my books, became a paid subscriber, watch my videos, and/or interact with me on the forums.
Your support keeps this site going! 😇

|


