|
 Introduction to XML in Flash Introduction to XML in Flash
by senocular
Example: Squirrel Finder
This example will cover how to generate a list
of buttons based on loaded XML. Each button
then, when clicked, displays information obtained
from the XML associated with that button.
First, the XML document:
squirrel_finder.xml
It should look a little something like the
following (the entire file is not shown here):
- <?xml version="1.0"?>
- <menu>
- <menuitems
sourceurl="http://spot.colorado.edu/~halloran/sqrl.html">
- <item type="squirrel">
- <species>Abert
Squirrels</species>
- <location>
- <![CDATA[Abert
squirrels (Sciurus aberti) are only
found
- in mountain
regions of North America. In the United
States
- their range
extends from extreme south-central
Wyoming to New
- Mexico and
Arizona. There are six valid subspecies
including
- S.a. ferreus,
True, the subspecies that is found
along the
- Rocky Mountains
in Colorado. Abert squirrels are limited
to
- Ponderosa
pine (Pinus ponderosa) forests in
which they feed
- and build
their nests.]]>
- </location>
- </item>
- .
- .
- .
Here laid out in this file is a list of items
that will populate a simple menu in Flash. Each
item has two strings associated with it, a species
(of squirrel) and a description of the location
of where that particular species can be found
in the North America. Ultimately, when brought
into Flash, a menu will appear with buttons
for each item listed showing on that button
the species of squirrel. When clicked, it will
bring up a dialog which will display the location
text associated with that species. The final
result gives you this:
[
squirrel finder in action ]
XML Structure
Once you decide what you want/need in terms
of your project (in this case, make a squirrel
finder), one of the first things to consider
is the structure of the XML which is going to
deliver your information. I've already decided
that, so that kind of takes away much of the
thinking that would normally take place here.
Still, lets take a look at the XML document
and how its set up.
What we're dealing primarily with is a list
of an unspecified number of containing two specific
pieces of information, species and location
description that ends up becoming a menu. In
addition to this information, such listed items
also have an identifier to specify what kind
of item we're dealing with (there can be many
species of many kinds of things, though here,
we only want squirrels). Since the overall objective
is menu the root document element reflects
that: <menu>. The list of items is itself
its own entity so it deserves its own element
to reside in, aptly named "menuitems."
Menuitems has an added attribute called sourceurl
specifying the location this information was
obtained. It's not used at all by Flash, but
it's good to have nonetheless. Within the menuitems
element are the item elements that contain our
desired information along with an attribute
to specify type of item. Type here is a simple,
known keyword used to describe the element.
Attributes should not be used for housing excessive
text or values of uncertain content. Each item
element appropriately represents a single item
in the list to appear in Flash. The two bits
of information needed about this item are also
contained within their own elements within the
item element. These are <species> and
<location>. Since the species name should
be straight-forward and lacking complication,
a simple text node should suffice. The location
element, however, with the text it contains,
may have some unforeseen characters that might
conflict with a proper XML document. As such,
it is put in a CDATA section.
- <menu>
- root of XML
- <menuitems
sourceurl="">
- container of items
- <item
type="">
- single item w/ type
- <species></species>
- container for species text
- <location>
- container for location text
- <![CDATA[
]]>
- keep questionable text away
from parser
- </location>
- </item>
- - more items...
- </menuitems>
- </menu>
Preparing the Flash File
Now that we have or XML defined and more or
less out of the way for the time being, its
time to begin designing the interface to display
this information. Eventually we will need to
interpret that XML meaningfully when brought
into Flash, but we'll get to that later. First
the physical elements of the movie need to be
constructed.
The squirrel finder's interface is pretty simple.
We have two basic screen elements: an item button
and an information dialog that appears when
you click on an item button. That's about it.
Items are symbols (MovieClips) that would need
to be dynamically attached for each item in
the XML while the information dialog only needs
to be concerned with one instance of itself
which appears only when requested by a clicked
menu item.
The buttons for menu items will have to be
fairly dynamic. The button itself is hand-drawn,
but the label text will be included by the XML
when its loaded. This will simply be a dynamic
text field. on top of the button. The behavior
of this button will also be dynamic, assigned
when the XML is loaded at which point the button
actually has a purpose. That really requires
nothing when making the button other than making
sure you give it an instance name. Once the
button is complete, it goes in an item movie
clip that will reside in the Library awaiting
to be attached (since its being attached, remember
to make sure it has a linkage ID set).

[
item button ]
The information dialog is just a movie clip
with a text field. that has a scrollbar thrown
on to it. A close button is included to close
this movie clip (hide it by setting _visible
to false) when the viewer is done looking at
the information. This movie clip and another
empty movie clip will be the only elements on
the stage when the Flash movie starts. The empty
movie clip is used to attach menu items in (our
buttons) which will be performed when the XML
file has been loaded and interpreted (in the
file, the "empty" clip actually contains
a light grey square though not as a necessity).
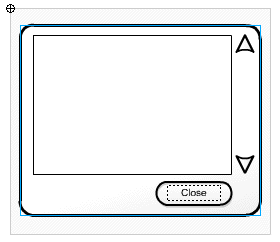
[
dialog on main timeline ]
Scripting the Squirrel
With the visual elements complete,
you can start scripting and testing. Often it
is a good idea, depending on how sure you are
of your coding abilities, to build such interaction
in Flash little by little in ways that allow
you to test an uncompleted version for functionality
before continuing. This is a debug as you go
approach. It can be time consuming but can also
save you frustration in the long run.
There are three basic parts to coding the squirrel
finder. They are: defining basic navigation
interaction - core behaviors of item buttons
and the close button in the information dialog,
successfully loading the XML document, and finally
interpreting that document to build and assign
functionality to the menu that results from
it. We'll start with the navigation.
This is pretty simple. The navigation is simple.
It would be just wrong to make a simple navigation
difficult (and based on that, I haven't). There
are two "screens," one containing
the menu, "menu_mc", and the other
an information dialog, "infobox_mc"
(though the information dialog appears to be
a floating window above what would be the menu,
the menu is hidden for simplification). When
one screen is shown, the other is hidden and
vise versa. Item buttons hide the menu and show
the information dialog while the close button
performs respectively for doing the opposite.
Each of these actions are defined in functions.
Since the close button will actually be present
when the function is defined, it can be set
immediately to be the close button's onRelease
event handler. Item buttons, however, won't
exist until after the XML defining the menu
has fully loaded and the menu has been created.
So in the mean time, it will sit simply under
a generic name, "DisplayInfo", until
it can be set to individual items' onRelease
events dynamically. Each button also contains
code to alter the information dialog's contents.
- function DisplayInfo(){
- menu_mc._visible
= false;
- infobox_mc._visible
= true;
- infobox_mc.content_txt.text
= this.location_text;
- }
-
- infobox_mc.close_btn.onRelease
= function(){
- menu_mc._visible
= true;
- infobox_mc._visible
= false;
- infobox_mc.content_txt.text
= "";
- }
You can see that each action pulls the old
switcheroo in setting visibility between menu_mc
and infobox_mc. DisplayInfo also sets the text
field. text within infobox_mc to be a variable
called "location_text" assigned to
the owner of the function. Right now, that's
nothing, but when this function gets assigned
to an item button, that variable will reference
that button's location_text property, a property
assigned to that button based on content grabbed
from the XML file. Conversely, the close_btn
sets the text to "" or no text clearing
the dialog.
Since both of these movieclips exist on the
main timeline to start and only one can be visible
at a time, that also means we need to set one
to start invisible. That would be infobox_mc.
That little line can go right below the functions
defined above.
- infobox_mc._visible
= false;
Next lets tackle the menu creation. This is
by far the hardest part of the entire file.
It consists of a single function called CreateMenu.
Passed into that function is one argument, the
XML defining the menu which is to be created
- and that is where the fun begins, using that
XML data to build the menu of squirrels (items).
Luckily this is a simple example so it will
be easy to follow.
First we must make sure we understand what
is being sent - what is in the XML. We covered
the XML earlier, but in brief we have the following
to deal with:
- A list of menu items within the root node
under the element "menuitems"
- Each item element has a type attribute specifying
what it is (each item of type "squirrel"
will be represented as a menu item)
- Items have two child elements, "species"
and "location" each with text nodes
(one using CDATA) to store their related content.
Technically, this list of menu items would
be of an undetermined length. We don't really
know how many squirrels will be in this menu
or if/when new ones will be added. The beauty
of using XML is that they can be added (or taken
away) very easily without ever touching Flash.
All anyone has to do is edit the XML with a
text editor and you're set - that is if we're
smart enough to make Flash do that. How is with
a loop.
Looping is what will get us through the list
of menu items. Remember, elements are kept in
childNodes arrays that exist in their parent
nodes. Each item in the XML exists as an element
in the menuitem element's childNodes array.
A loop going through those array elements will
give you each item no matter how many there
are, and this we can tell using childNodes.length.
The loop gets you through each item. From there
its just a matter of extracting the needed content
and attaching a item movie clip to facilitate
it. To help manage the attaching, two variables
are used, one, a constant, to decide how far
apart to space items as they are added and another
to count the number of items attached (also
provides a way to assign a unique depth to each
one). These are called "item_spacing"
and "item_count" respectively.
- var item_spacing
= 28;
- var item_count
= 0;
With that, lets look at what this function
looks like:
- function CreateMenu(menu_xml){
- var items
= menu_xml.firstChild.firstChild.childNodes;
- for (var
i=0;
i<items.length;
i++)
{
- if (items[i].attributes.type
== "squirrel")
{
- var
species
= items[i].firstChild;
- var
location
= items[i].childNodes[1];
-
- var
item_mc
= menu_mc.attachMovie("menu_item","item"+item_count,
item_count);
- item_mc._y
= item_count
* item_spacing;
- item_count++;
-
- item_mc.species_txt.text
= species.firstChild.nodeValue;
- item_mc.main_btn.location_text
= location.firstChild.nodeValue;
- item_mc.main_btn.onRelease
= DisplayInfo;
- }
- }
- }
You can see a fair number of variables being
set here. The first few lines in the function
you can see a couple of variable definitions.
These aren't necessarily required definitions
either. They simply provide shortcuts to paths
in the xml. This not only keeps you from typing
more, but it also makes the code a lot easier
to understand. Its suggested that you do this
as frequently as you can in XML code to help
improve clarity.
The first variable, items, is the child nodes
array of the menuitems element. The menuitems
element is identified with:
- var items
= menu_xml.firstChild.firstChild.childNodes;
where menu_xml represents the XML object passed
into the function. So this is saying get the
child nodes of the first child of the first
child of xml making up the menu_xml object.
The XML object's first child is the root element
menu. Menu's first child is menuitems and its
childnodes represents the array of item elements
we're after.
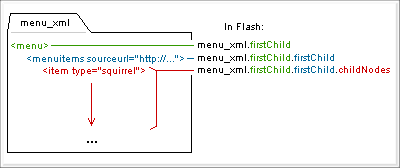
[
referencing items array through child nodes
]
We can now work with items more easily as it
is a simple representation of the item elements
array. There's no point in retyping all those
firstChilds again if we don't have to. The items
variable will also greatly improve code comprehension.
With the items variable assigned to the array
of items, we can no begin cycling through that
array creating menu buttons for each item and
extracting/assigning content text where needed.
This is where the for loop comes in.
- for (var
i=0;
i<items.length;
i++)
{
- ...
- }
As loops go, this is pretty self-explanatory.
This creates a variable i which starts at 0
and increments by 1 while its value remains
below the length of the items array. This lets
us go through each item as item[i] and have
the code within this loop execute for each.
Now we start getting into the accessing the
information of the XML object (through the items
array). There are three pieces of information
we want to extract. First is the type of item
to see if it should be included in our menu.
Second is the species of our item (of our squirrel
item) and finally the text specifying location.
The type of item is probably the easiest to
extract. This information is held in an attribute
of an item element and is accessible through
the attributes object of that node in Flash.
Within the for loop, items[i] represents the
current (item) node in the loop iteration. The
type would come from item[i].attribures.type.
You can see that with the following if statement
in the for loop:
- if (items[i].attributes.type
== "squirrel")
{
- ...
- }
This checks each item's type. If it matches
"squirrel" then the code within the
block (that which creates the menu items) is
run, otherwise, the item is ignored. This means
only squirrel items will make it into our menu
- just in case some other type of item happened
to find its way into the XML file.
Assuming the item is of type squirrel, two
more variables are created. These are species
and location from where we will extract the
text specifying each.
- var species
= items[i].firstChild;
- var location
= items[i].childNodes[1];
The species element is the first child of the
item element whereas location is the second
child. Now, since there is no "secondChild"
property like there is a "firstChild,"
we're just going to have to use childNodes and
an index number to get the second child. Similarly,
firstChild could be written as items[i].childNodes[0];.
Remember, the text within, text nodes and CDATA,
are not a part of the these elements. They exist
as their own nodes - as children of those elements
- whose text are obtained using the nodeValue
property.
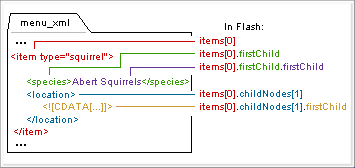
[
referencing child nodes in first item ]
With the species and location variables, it
makes it a little more clear where we are and
what references what. This will prevent the
long stringing of firstChilds and childNodes
references as seen in the chart above - or at
least reduce them a little. You also get a clearer
representation of what non-specific references
like items[i].firstChild is - it's species.
Now, before actually using those variables,
the menu button will need to be attached. The
content we're ultimately extracting with those
variables, the text and CDATA nodes, are going
to be assigned with that button so it will need
to be attached in order for that to happen.
That's where the next clump of code comes into
play.
- var item_mc
= menu_mc.attachMovie("menu_item","item"+item_count,
item_count);
- item_mc._y
= item_count
* item_spacing;
- item_count++;
If you'll remember, two generic variables were
defined earlier in the movie. These were item_count
and item_spacing. In attaching a menu item is
where these guys come into play. The item_count
variable is used to count items as they are
added to the menu. You can see that attachMovie
is used to attach a "menu_item" symbol
from the library into the menu_mc which exists
on the main timeline. Item_count is used in
attachMovie to not only give the new menu item
a unique name, but also provide a unique depth
for it to live within the menu_mc.
The attached clip, item_mc, is then positioned
based on item_count and its value multiplied
by item_spacing. For this example, the item_spacing
was set at 28, or about the height of a menu
button. When this is combined with an ever-increasing
item_count variable, you get vertical positions
starting at 0 and counting up by 28 each time
item_count increases (item_count starts at 0
so 0 * item_spacing is 0 the first time around).
You can see that the attached clip has its _y
property set to this combination. Directly below
it, item_count is increased so that the next
attached button will be properly created and
positioned accordingly.
At this point we can now snag the text out
from the current item in the loop. This will
be both the species text (text node) and the
location text (CDATA section). The species text
will be assigned as the text in the text field.
located within the freshly attached item_mc
named species_txt. The location text from the
CDATA section will go into an arbitrary variable
assigned within the item button (main_btn).
This text is what each item button will send
to the location dialog when it is clicked. It
does this using the previously defined DisplayInfo
function which will will also assign to main_btn
here. If you'll remember, DisplayInfo used the
location_text variable.
- item_mc.species_txt.text
= species.firstChild.nodeValue;
- item_mc.main_btn.location_text
= location.firstChild.nodeValue;
- item_mc.main_btn.onRelease
= DisplayInfo;
This is straight-forward assignment. This important
part is just seeing how the text is referenced
from the XML object - or at least from the variables
we have here that each represent a part of that
object. As text nodes and CDATA, the text exist
as its own node as a child of either species
or location. Also, as such, the nodeValue property
is what retrieves the text associated with those
nodes. So in order to get that text, firstChild.nodeValue
is used on each element.
Having set those, there now exists a new fully
functional item within our menu. It sports the
name of a species of squirrel (assigned to a
text field over the button) and when clicked
will display that particular squirrel's location
information in a separate dialog (sending the
text field. of that dialog text defined in the
button under location_text). All that remains
is loading the XML and putting it into action.
Loading the XML. This should be nothing new.
We already did this earlier. The only difference
here is that a function is called from the onLoad
event which creates the menu desired. Here's
the script:
- var squirrel_xml
= new
XML();
- squirrel_xml.ignoreWhite
= true;
- squirrel_xml.onLoad
= function(success){
- if (success)
CreateMenu(this);
- else trace("Error
loading XML file");
- }
- squirrel_xml.load("squirrel_finder.xml");
An XML instance is created, the white space
is set to be ignored, the onLoad is defined
and finally the actual XML document is set to
load into the XML instance which will ultimately
set off the chain of events that makes what
is the squirrel finder. Above an error message
is traced if the XML didn't load properly. This
will only be seen when working on the movie
from within Flash. It will be ignored when viewing
the movie on the web (so there, it really serves
no purpose).
An Alternate Route
Lets step back a little to the CreateMenu function
and the loop that handles each item as it is
added to the menu. This particular approach
makes sole use of the firstChild and childNodes
properties of XML nodes. However, Flash provides
more ways to reference XML than just those two.
Using other properties, well, namely nextSibling,
we can modify the function a little to perform
the same action but through a different means.
The current approach cycles through each item
in the menuitem element's childNodes array using
a for loop. This marks a position in the array
and walks through it accessing the next item
in the array upon each iteration of the loop.
The procedure involves child access through
parent.
A different procedure can be implemented -
sibling access from another sibling. What this
entails is taking the first child of any set
of children and continuing through each following
sibling until no more remain.

[
items via childnodes vs siblings ]
This approach uses the nextSibling property
to traverse all children and gets rid of the
parent reference altogether (aside from using
the parent to get a reference to the first child
to begin with). But how do you handle this?
Surely not from a for loop? That's right; not
a for loop but a do..while loop. Here's how
that would be set up:
- var currentSibling
= targetParentNode.firstChild;
- do {
- // ... actions on
currentSibling
- } while
(currentSibling
= currentSibling.nextSibling);
You start off with the first sibling in the
set of children of targetParentNode. The do
portion of the do..while loop then executes
allowing you to operate on that particular sibling
immediately. Once that is complete the while
condition is checked. This while condition actually
does two things. It sets and checks. First currentSibling
is assigned to its own nextSibling. This is
what will give you the next child in the set.
Assuming this currentSibling is valid (i.e.
you're not at the last sibling who has no next
sibling) then the while loop will loop back
through the do block. Otherwise it will terminate
and continue with the rest of your script.
The do..while loop, however slick, is not without
its shortcomings. Namely, it does not keep an
index count of which particular child you're
working with. The for loop, for example, gave
you an index representing a position in the
childNodes array (via the variable "i").
This can be disadvantageous. No one's stopping
you from creating your own within the loop.
A simple i starting at 0 prior to the loop and
and a i++ at the end of a do block will give
you this, but is it worth it then? You might
as well just use a for loop then. Then again,
is it ever worth it? You may never use a do..while
to access children this way; it may seem confusing
or just unconventional. Maybe, but it is an
alternative approach and worth noting.
Here is what the CreateMenu function would
like using a do..while and nextSibling to access
the squirrel finder menu's items.
- function CreateMenu(menu_xml){
- var currItem
= menu_xml.firstChild.firstChild.firstChild;
- do {
- if (items[i].attributes.type
== "squirrel")
{
- var
species
= currItem.firstChild;
- var
location
= species.nextSibling;
-
- var
item_mc
= menu_mc.attachMovie("menu_item","item"+item_count,
item_count);
- item_mc._y
= item_count
* item_spacing;
- item_count++;
-
- item_mc.species_txt.text
= species.firstChild.nodeValue;
- item_mc.main_btn.location_text
= location.firstChild.nodeValue;
- item_mc.main_btn.onRelease
= DisplayInfo;
- }
- } while
(currItem
= currItem.nextSibling);
- }
|