by kirupa |
8 May 2007An XML file is really nothing more than
a text file with specially formatted and often balanced tags
with the brackets, funny formatting, etc. While you can
write an application that writes text that adheres to the
XML structure, that is not the most straightforward
approach.
In .NET, you have the System.XML namespace that provides
a lot of extra functionality for working with XML files. One
such functionality allows you to think about XML files in
terms of elements and nested elements without having to
worry about maintaining the XML structure like you would
when writing a raw text file.
At the end of this tutorial, you will learn to write an
application that produces the following XML file:
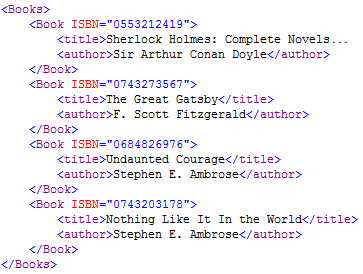
The following sections will take you through creating our
above XML file gradually. Let's begin!
For manipulating XML data in memory, you get a lot of help
from the XmlDocument class. When you create an XmlDocument
object, you are creating essentially what resembles a
virtual whiteboard for XML data in memory. On this
whiteboard, you can fiddle around with your XML data by
adding nodes, removing nodes, playing with attributes, etc.
When ready, you can write the contents from your
XmlDocument object into an XML file, and all of the changes
you made would be represented in the proper XML syntax in
your newly saved/created file.
Let's first create our XmlDocument object. Create a new
C# project, and inside your Main function, add the following
line of code:
- XmlDocument
xmlDoc
= new
XmlDocument();
You just created a new xmlDoc object of type XmlDocument.
This object will store all of your XML data. Your
XmlDocument is now a blank file in memory. We need to
populate it with some data. Let's do that now.
An XML file is nothing more than a tree with each branch and
node storing some sort of information. The name for a node
that stores information is called an element, so if we want
to populate our tree, we need to create a few XML element
objects and add them to our XmlDocument object.
After your xmlDoc declaration, add the following line of
code:
- XmlElement
booksElement
=
xmlDoc.CreateElement("Books");
You are creating a new booksElement object of type
XmlElement. You initialize it to the value XmlElement value
returned by your xmlDoc's CreateElement method. Notice that
your XmlElement is called Books.
Creating the element is not enough, though. You need to
add it to your XmlDocument. You can do that by adding your
booksElement as a child of xmlDoc. Add the following line of
code after your booksElement line:
- xmlDoc.AppendChild(booksElement);
The above line does in code what I explained in English
earlier. You are adding your booksElement element as a child
in your xmlDoc XmlDocument. Since this is the first element
being added to your XML file, booksElement is considered to
be a root element.
Your code, as of now, you should have the following three
lines inside your Main method:
- static
void
Main(string[] args)
- {
- XmlDocument
xmlDoc
=
new XmlDocument();
-
- XmlElement
booksElement
=
xmlDoc.CreateElement("Books");
-
- xmlDoc.AppendChild(booksElement);
- }
We now our XmlDocument, we created our XmlElement object,
and we added that XmlElement to our XmlDocument. Now all
that is left is to save our XmlDocument to disk. That is
actually a lot easier than you think. Simply add the
following line of code:
- xmlDoc.Save(@"C:\Users\Kirupa\Desktop\books.xml");
Your XmlDocument object's Save method takes a file path
as its argument. The file path you specify is where your XML
file will be saved to, and in the line of code, I am saving
the data stored by my XmlDocument xmlDoc into books.xml on
my desktop. Feel free to change it to whatever location you
want.
If you were to run your application, the books.xml file
be created with the Books element added. When you open your
XML file, you will see an empty Books tag:
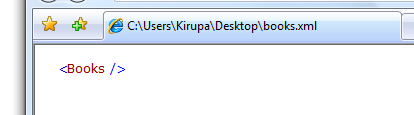
Don't be alarmed if you think it is a mistake and you
should be seeing more. We added only one element with the
Books name, and that element didn't contain any nested
elements or data. In the next page, we'll fix that by adding
in more information.
Onwards to the
next page!
|



 Writing XML Files - Page 1