|
by kirupa |
1 March
2007
Whenever you click on a button or type some text into a
form in your browser, you are using events. More than
likely, you never think about this, because it just works.
You don't worry about how the mouse click is recognized, how
your application knows which key was pressed, etc. The
reason is that many of these lower level details are handled
by your graphics framework itself. Even as a developer, your
work with events is largely on the surface of what really
goes on behind the scenes, but there is plenty of surface
area to cover though! So, in this tutorial, I will explain
how to use event handlers in the Windows Presentation
Foundation (WPF).
Don't let the introduction scare you though. Event
handling is extremely common, and if you've ever made your
application do something when a button was clicked, you
already know most of what is to know about using event
handlers.
An event handler is simply a method that
receives the input from a device such as a mouse or keyboard and does
something with it. For example, the following code shows an
event handler called ButtonOkClicked that is fired when a
button is clicked:
- private
void
ButtonOkClicked(object
sender,
RoutedEventArgs
e)
- {
- this.Close();
- }
There are really two things that need to be done when
using events:
- You need to bind an event handler
to a Control (button, text field, menu, etc.).
- You need to specify an event handler that receives and reacts to an
event.
In this article, I will go over event handlers and how to
use them with events. I will provide code examples to
reinforce what I will be explaining, but this is more of an
article explaining event handlers as opposed to a tutorial
where you create a small application using event handlers.
Let's first look
at how to bind an event to an event handler. There are two
ways of doing this. You can (1) either use an IDE such as
Expression Blend or Visual Studio's WPF Designer (see
blog post), or (2) you can
bind a control to an event using code itself. The end result
is the same, so let's look at both the visual as well as
code-based approaches.
The visual approach is what most of you will use because
there are great tools for designing GUIs using WPF. I won't
go into the details of either Visual Studio or Blend in this
tutorial, but if you have, for example, a button, you can view a
list of the events and assign an event handler next to the
event you wish to fire:
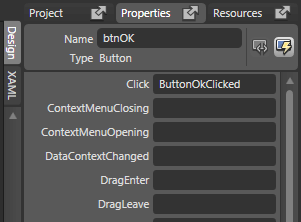
[ assigning a click event to an event handler called
ButtonOkClicked ]
In the visual view, you simply find the event that you
wish to bind your control to such as Click, and specify the
name your event handler will take. When you press Enter you
will be taken to the code view where you can see the event
handler displayed with the name you provided.
If you look at the XAML for the above event-binding, you
will see both the Click event as well as our event handler
ButtonOkClicked appear:
<Button HorizontalAlignment="Left"
Margin="130,92,0,86" x:Name="btnOK" Width="80" Content="OK"
Click="ButtonOkClicked"/>
It is the above XAML definition that tells your final
application to route all Click events attached to the button
to the ButtonOkClicked event handler. A program like Blend
or Visual Studio's Designer serves primarily to provide a
nice interface for creating the XAML snippet I posted above.
While the visual approach I outlined above will be the
preferred way of binding events to an event handler, you can
just as easily use code to accomplish the same thing. You
may be wondering why you would choose a less visual
approach. One good reason is, if you are dynamically creating a control, the only way to attach events would be through code.
I provide an example of that a few paragraphs down, so you
can see what I mean.
Let's say we have a button called btnOK, and our goal is
to attach an event to it using just code. All you have to
do is pick the appropriate event you wish to use and link it
to a new RoutedEventHandler with the name of your event
handler:
- btnOK.Click
+=
new RoutedEventHandler(ButtonOkClicked);
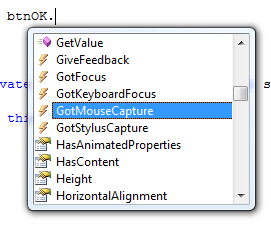
If you use Visual Studio for writing the code, the inline
auto-complete is very handy:

[ auto-complete is quite helpful in times like this ]
Right now you may be wondering how anybody could know to
use RoutedEventHandler without the help of AutoComplete. If
you are just getting started with WPF, it may be difficult
to know that, but just remember that you need to bind an
event to an event handler. Later in this article and in
greater detail in subsequent articles, I will explain these
in more detail.
Like I hinted at in the previous paragraph, one disadvantage with the code approach is that
if you want to use events or event handlers beyond the common ones that you
are familiar with, you will have to spend some extra time
combing through the displayed methods and properties for
your object to find the appropriate event:
[ browsing through methods and properties ]
In the visual approach, all events are grouped
together in one pane, but in the larger scheme of things, it
is just a minor detail that you should be aware of.
Getting the event bound to an even handlers is just one
part of what you need to. The second part is to actually
create an event handler. Before I go into greater detail,
let's first look closely at the event hander I show below:
- private
void
ButtonOkClicked(object
sender,
RoutedEventArgs
e)
- {
- this.Close();
- }
Notice that the event hander takes in two
arguments from the event that fired - the sender and the event. Basically, the sender is the control you
clicked on, and the event (e) is the
particular input that triggered the event handler such as a
key press or a mouse click.
If you took the visual approach, the above event handler
would automatically be created for you. If you used the code
approach, you would need to define an event handler
following a similar structure with the two arguments. Let's
look in greater detail at what the two arguments actually
do.
Like I mentioned earlier, the event handler takes in two
arguments - a sender and an event. In many cases, you really
don't have to know much about them. For example, in the code
from earlier reproduced below, I am not even using either
sender or
e in my method's body:
- private
void
ButtonOkClicked(object
sender,
RoutedEventArgs
e)
- {
- this.Close();
- }
But, you will run into cases where you want to do more
than just have one control bound to an event handler. When
dealing with many interactive controls created using code,
you'll find that knowing more about the sender and event can
be helpful.
If you want know exactly which control triggered the event,
you will need to modify the sender object. The problem,
though, is that your controls are of types like Button, Text
Field, Checkbox, etc. The argument is of type object.
Unfortunately, you cannot simply type in
Button foo = sender.
What you need to do is typecast the object into the type
of the control that called it. The following code shows an
example of how I access the sender Button:
- private
void
ButtonOkClicked(object
sender,
RoutedEventArgs
e)
- {
- Button
clickedButton
= (Button)
sender;
- MessageBox.Show(clickedButton.Name);
- }
Notice that I create a new Button object called
clickedButton that casts my sender object as a Button also.
This allows me to access my button's properties just as if I
were manipulating my button directly by name.
When casting, you should make sure that you are actually
allowed to cast to that object. For example, I cannot cast
my sender object as Checkbox even though both it and a
Button can be based on an object.
Despite us not knowing what the
object type for sender really refers to, internally,
WPF has a good idea :P
If you do try to cast something to a type that it cannot be
cast to, you will receive an InvalidCastException:
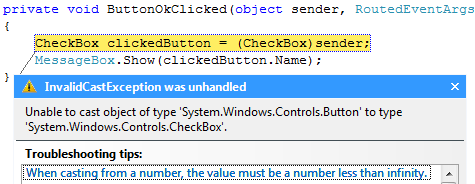
[ I receive an InvalidCastException when tricking a checkbox
to behave like a button ]
If you are in a situation where you don't know what the
type of the control you clicked on is, you can use the
GetType property to find out:
- private
void
ButtonOkClicked(object
sender,
RoutedEventArgs
e)
- {
- MessageBox.Show(sender.GetType().Name);
- }
Now that you have a good idea of how to access the
sending object, let me touch back on a topic that I left
incomplete earlier. Earlier, I mentioned that the above
approach is just as good as if I were "manipulating my
button directly by name." The
question is, why am I not directly manipulating the button?
The reason is that, when you have many controls such as
an array of Buttons that map to the same event handler, you
cannot easily explicitly access each button individually.
For example, check out the following mini-application that
draws many styled buttons and allows you to interact with
them individually:
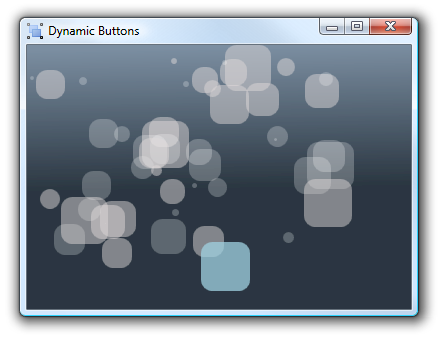
[ a small demo that shows why code-based event handling is
often needed ]
Click here to
run the WPF demo and view/download the source code for the above application.
In the above application, when you click on a button, the
button's name is displayed a as a message box. Because I am
creating each button dynamically using code, I have to cast
the sender object in my event handler so that I can know
which button has been rolled over.
In this section, I explained how to use the sender object to
determine what object is passed in. You are not limited to
using just the sender though. You can actually use your
event e itself to cast the source of the event into what you
want:
Button clickedButton = e.Source as
Button;
The reason I did not explain the above code in this section
because it logically makes more sense to have two arguments
standing for two different things - the object and the
event.
The second argument passed to our event handler is the event
itself. The event really depends on when you want your
control to fire a signal to your event handler. A generic event is what you see in my code called
RoutedEventArgs for a button's Click event:
- private
void
ButtonOkClicked(object
sender,
RoutedEventArgs
e)
- {
- this.Close();
- }
You will get more specialized event arguments depending
on what you are trying to do, and those arguments provide
you with greater flexibility to deal with these events. Let's say you have a textbox, and each time you type a
character, you want to do something. For this scenario, you are looking at a very
particular type of event argument - one that takes key
presses into account.
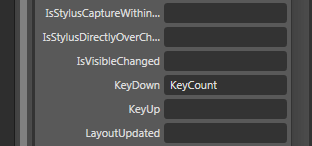
Let's give our text box the name txtBoxMain, and let's bind a KeyDown
event to an event handler called KeyCount. Visually in Expression Blend, you would simply
enter your KeyCount event handler and press Enter:
[ again, you can use a visual approach to bind an event to
an event handler ]
In code, you would do the following:
- txtBoxMain.KeyDown
+=
new KeyEventHandler(KeyCount);
Regardless of which approach (visual or code) that you
took, your event handler would look like the following:
- private
void
KeyCount(object
sender,
KeyEventArgs
e)
- {
- }
Notice that my event argument is now
KeyEventArgs. The
KeyEventArgs class contains a lot of useful methods that I
can use to do more with my event than just recognize that it
happened. For example, the following code shows me displaying the
letter/name of the key pressed in a message box:
- private
void
KeyCount(object
sender,
KeyEventArgs
e)
- {
- MessageBox.Show("Key
pressed is: " +
e.Key.ToString());
- }
The following is the image you see when you run the above
code and press the letter k:
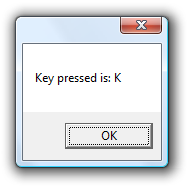
[ by using Key I can determine which key was pressed ]
While this example dealt with keyboard arguments, you can
bind similar events to their respective event handlers for
the mouse, the stylus, etc. Depending on which event handler
variation you use, the number of properties you can access
will vary. The differences in code among
the various actions are too minor to cover in detail in this article.
It would also be a bit too boring!
To give you a flavor of the extent of the variation, your
argument e's type may be
MouseEventArgs for a mouse
related event, and you may not have a
Key structure from
which to determine key presses, but you will have access to
the Left and Right mouse buttons. You can find similar yet
distinct variations among the other input methods.
As you can see, event handling can be as easy or as
complicated depending on what you are trying to accomplish.
Actually, complicated may not be the right word, because one
you become familiar with the syntax and when to use some of
these tricks, many things become easier.
The goal of this article and other articles on this site
(and I'm sure others) is to give you a brief overview of the
common uses of a particular use of technology and cover in
greater detail the subtle, not-so-common uses that cause
endless frustration and sleepless nights. At least that is
how I justify having the trivial Note boxes and providing
similar sets of code for the same task haha.
Just a final word before we wrap up. What you've seen here is freshly baked content without added preservatives, artificial intelligence, ads, and algorithm-driven doodads. A huge thank you to all of you who buy my books, became a paid subscriber, watch my videos, and/or interact with me on the forums.
Your support keeps this site going! 😇

|


