 Tutorials
Books
Videos
Forums
Tutorials
Books
Videos
Forums


This is an archived tutorial from the kirupa.com legacy collection. It covers software that may no longer be available, but it is kept online because the ideas still hold up.
The aim of this tutorial is to point out the possibilities
you have whilst using the extrusion editor. With a little
time and effort you'll find you can come up with cool
looking 3D images, and the best part about this aspect of
swift, is that it's real fun making your own images.
Below is an example; I call it sorro. It was made using the
extrusion
editor as opposed to just using the 3D text option. Now we'll
begin!
[ rollover the above animation to see a cool effect ]
Launch Swift 3D and click on Extrusion Editor, now the fun begins!
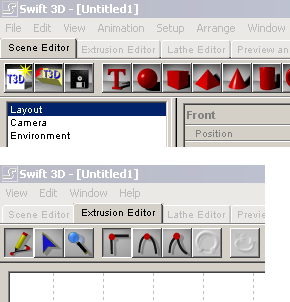
[ the extrusion editor view ]
Once you are in Extrusion Editor mode the
tools, above, are all you
need for your 3D creation. Place your mouse over the
furthest tool
on the left, this is the Add Point Tool. Add enough points
to make the "S" for the word sorro. When joining each dot,
remember to close the shape by alligning the Add Point Tool
where the small "+" is.
Once you have created the points you should end up with something similar to the example below:
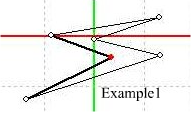
[ the letter 's' outlined in the extrusion editor ]
The next step would be to
complete the rest of the word "sorro" by
using the Add Point Tool to create each individual letter.
This is done
using the same method used in Example1 above.

[ the functions of the buttons ]
| To reshape the object we
use the Shape Tool. Each time we click on a point it
turns red, thus allowing us to drag the point to any new
position we require. On the right there are two examples. Both started out looking the same but Example2 has been altered using the Shape Tool. Experiment using the Shape Tool, try altering all the points in your image to come up with new shapes. |
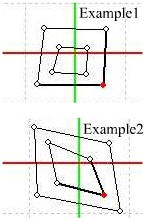 |
Lastly, to give you an idea
of how to use the Curve Point Tool.
Once again click a point which is to be edited/changed, then
click
the Curve Point Tool. Below you can see the point I chose
not only
turned into a red dot, it also has a dotted line with a
clear square at
either end. Take the square at the bottom of the image and
drag it
towards the bottom of the screen. You can now clearly see
how the
Curve Point Tool adds roundness to the sharp square edges.
After
adjusting all the points you should be able to come up with
a circular shape.
Experiment further with the Tangent Point and the Corner Point. The objectives are the same they just bring a different variety to your shapes. First and foremost the key to using the Extrusion Editor is in my opinion, your imagination, let it run wild.
I hope this tutorial is of help to someone! If you have any questions, feel free to post on the forums.
 |
Simon
McAndrews aka lobstars [email protected] |
Just a final word before we wrap up. What you've seen here is freshly baked content without added preservatives, artificial intelligence, ads, and algorithm-driven doodads. A huge thank you to all of you who buy kirupa's books, became a paid subscriber, watch the videos, and/or interact on the forums.
Your support keeps this site going! 😇

:: Copyright KIRUPA 2026 //--