The action script used to make this
effect is amazingly SHORT (only 26 lines of code). We'll apply
the basic lens effect we saw in part 2. Let's do it.
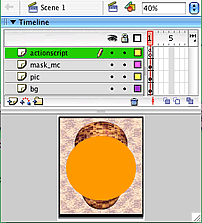
Here's what
the movie should look like right now:
- Pop open your action script window let's add
these first lines of code:
- //Liquefy an image
////////////
-
- //make an empty movie clip
- var
theRubberizer:MovieClip
= this.createEmptyMovieClip("theScene",
this.getNextHighestDepth());
-
- //set up the max num of copies
to make (20 is comfy)
- var
maxImages:Number
= 20;
-
Pretty
self- explanatory:
We created an empty movie clip called 'theRubberizer', and a
Number variable named 'maxImages'.
- create a function called 'dupeAndPlace()' with
one argument called 'image'
- dupeAndPlace
=
function(image:MovieClip):Object{
- var
arrHolder:Object
=
new Object();
- arrHolder.pics_arr
=
new Array(0);
- arrHolder.masks_arr
=
new Array(0);
The function takes one
argument called 'image' and returns an Object. Flash will
expect that whatever we pass into this function as 'image'
will be a MovieClip.
Created a new Object called 'arrHolder', and stuck two
arrays onto it. This is the Object that the function will
return.
- Start filling up the function by adding a
for...loop to it:
- for(var
i=1;
i<
maxImages;
i++){
- var
dnm
=
"image" +
i;
- var
mnm
=
"mask" +
i;
-
A simple beginning to a
'for...loop'. Note we didn't close the '{' bracket yet.
Every time this loop iterates (repeats), it creates a new
variable called 'dnm' and another 'mnm'. And this loop will
iterate 20 times, since that's what maxImages is
set to.
There's also a reason we
started the loop with 'var i=1' instead of the usual 'var i=0'.
We'll mention that later.
- We need our loop to do some other stuff
besides creating those two variables. So let's add more code
in there! Here are five more lines, followed by an
explanation:
- var
imgObj
= {_x:image._x,
_y:image._y,
_xscale:100+(i*1.5),
_yscale:100+(i*1.5)};
- var
maskObj
= {_xscale:Math.floor(100/i+3),
_yscale:Math.floor(100/i+3)};
-
- var
theDupedImage
=
image.duplicateMovieClip(dnm,
theRubberizer.getDepth()+i,
imgObj);
- var
theDupedMask
=
mask_mc.duplicateMovieClip(mnm,
theRubberizer.getDepth()+
(i*50),
maskObj);
-
- theDupedImage.setMask(theDupedMask);
Explanation
(Keep in mind that every line up there happens 20 times in a
row, extremely quickly since it's inside a for..loop):
First we make an 'init object' to stick inside the
duplicateMovieClip() call. It tells
each duplicate where to be placed:
- var
imgObj
= {
_x:image._x,
_y:image._y,
- _xscale:100+(i*1.5),
_yscale:100+(i*1.5)
};
(the same _x and
_y of the image we'll pass into the
function, at _xscale and
_yscale of 100% + (whatever i
is at *1.5). (slightly larger each time the loop repeats)).
The second init object tells the duplicates of mask_mc what to
look like:
- var
maskObj
= {_xscale:Math.floor(100/i+3),
- _yscale:Math.floor(100/i+3),
_x:this._xmouse,
- _y:this._ymouse};
Same _x and _y as the mouse, and
slightly smaller than the original mask_mc with each
repeating of the loop.
 |
Infinity |
|
When you're
using a loop and using the loop's own 'i' to
divide, be careful of 'Infinity', it's what
you'll get when you divide by 0. But that's
not the only reason we're using 'i=1'.
|
|
In the next line we duplicate
image, giving it an instance name of 'dnm', a depth of 'i'
above the Rubberizer's depth, and use the imgObj to place the
copies:
- var
theDupedImage
=
image.duplicateMovieClip(dnm,
- theRubberizer.getDepth()+i,
imgObj);
We duplicate mask_mc, giving it an instance name of
'mnm', a depth of the Rubberizer's depth + (i*50), and use the 'maskObj'
to place the copies:
- var
theDupedMask
=
mask_mc.duplicateMovieClip(mnm,
i*100,
maskObj);
We didn't use the shiny new
'_root.getNextHighestDepth()' to place the copied mc's ?
If you apply this effect to one image, and then to
another, you'd have copies of images and masks created at
progressively higher depths every time you applied the effect.
Then:
theDupedImage.setMask(theDupedMask);
Which sets each 'theDupedMask' as the mask of each
'theDupedImage'.
|
|
Easy Enough |
|
Remember the
'basic lens' effect in part 2? We took an
image, put a copy of it on the layer above
at a slightly bigger size, and then masked
that copy. Well that's exactly what we're
doing above, but we're doing it 20 times.
Every time our for...loop repeats,
it puts a copy of image on top of
the original image at a slightly larger
size. And gives each copy a mask of a
slightly smaller size. |
|
- Last but not least, add these lines. We're
still in the loop, which is inside the 'dupeAndPlace()'
function:
- arrHolder.masks_arr.push(theDupedMask);
-
- }
//the loop is closed
- mask_mc._visible
=
false;
- mask1._visible=false;
- image1._visible=false;
-
- //return the object
- return
arrHolder;
- };
//the function is closed
What:
In the first line, we push 'theDupedMask' into the
arrHolder Object's 'masks_arr' Array. ('push' adds
something to the end of an array)
arrHolder.masks_arr.push(theDupedMask);
Then push 'theDupedImage' into the arrHolder Object's 'pics_arr'
Array.
arrHolder.pics_arr.push(theDupedImage);
and close the for..loop with a '
} '
Then we made mask_mc, mask1, and image1
invisible. 'mask_mc' is on the Stage, this function did not add
it to the array of masks, so we can hide it. Then close the
dupeAndPlace function with a '
} '.
And lastly, return the arrHolder Object:
return arrHolder;
At this point:
You have 20 duplicated images, masked by 20 duplicated masks.
What's left to do? MOTION.
Let's go to the Next Page.
 |
page 3 of
4 |
 |