|
If you haven't yet completed the "Create a Flix Movie"
tutorial or you don't understand how to create a Flix
movie, please click here.
This section will deal with customizing your movie
within Flix itself.
Before we start, you should
have a file (a media clip) such as a movie clip encoded
or setup to be encoded by Flix.
Before we begin, there is
a small clarification I'd like to make. In this page, we
will be referring to tabs. You may be unfamiliar with
what I may be referring to, see the image below for the
4 tabs:

The 4
tabs: File, SWF, Audio, Video
Customizing The Animation To Hyperlink:
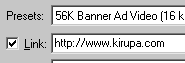
Under the default "File"
tab, you should see a check box and box that say "Link".
When you check the box, you can enter a URL to open in
the user's browser. See image below:
You can modify some more
settings for the URL to display on the user's browser.
Under "Target", you can specify the new page that you
linked to to either:
-
_blank
This is by far the most used target path for
animations in Flash. This will open up the URL in a
new browser window. A great way to link to another
site while keeping the visitors on your site.
-
_self
This is the default target. Clicking on a link with
the _self target will simply load the page in the
current browser window.
-
_parent
This target acts just like the _self target, except if
your animation is inside a frame, this will load the
site inside the Frame itself. This is a great way to
break your users free from "framed" pages with frames
that will not leave the screen.
Customizing The SWF File:
Now,
click on the tab that says "SWF". Once you have that
clicked, you should see some options to customize the
SWF file. See image below:
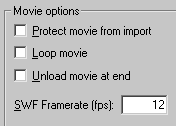
Here is a brief
explanation to what each does:
-
Protect movie from import
Checking this box will prevent users from importing
your movie into Flash and using it in their animation.
-
Loop movie
Checking this box will keep on looping (repeating) the
movie.
-
Unload movie at end
This is more of a feature that should be used when the
animation will be used inside a Flash animation.
Checking this box will remove the movie from the Flash
animation after the movie clip has finished playing.
- SWF
Framerate (fps)
This box is similar to the Framerate box used in
Flash. The higher the number, the quicker your
animation will play, the more system resources are
necessary to play the movie, and a somewhat inflated
file size.
There are
more options on the right that can be used for advanced
flash functions. The Custom Variables box may be used if
you are trying to integrate the movie with another movie
or dynamically updating some content. This should be
ignored for most cases.
Now that you have learned
about the various customization options for the File &
SWF tabs, we only have the Audio & Video tabs left.
Customizing Audio:
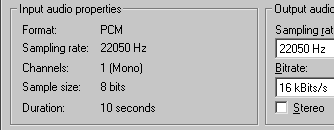
There are
several options in this section that you can modify to
get different results. See a cropped image below:
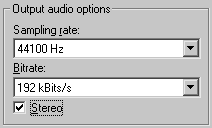
The
Output audio section allows you customize the format in
which the audio file gets exported. A general rule would
be that, the higher the sampling rate, the higher the
bitrate, and the box for "Stereo" is checked, the larger
the file size will be. Of course, sound reproduction can
be almost exactly that of the source by using higher
rates and frequencies. See image below:
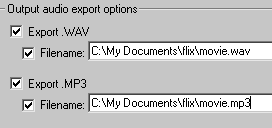
The
Output Export Audio Options area is to simply specify
the name and location of where you would want the audio
file to go. Also, you may choose either the WAV format,
MP3 format, or both to export. See image below:
Customizing Video:
This is the final step to completing this lesson on
customizing your Flix movies. Under the video tab, you
see some options that are very similar to that of
Flash's Publish Settings window. The list below will
help explain what each feature does:
-
Output Frame Options
Here you can adjust the average image quality and/or
smooth all of the images out. The higher the quality,
the larger the output (SWF) file will be. The picture
will look more realistic though.
-
Image/SWF Movie Dimensions
Here you can adjust the width and height of the
resulting movie. For best results, it's best to leave
that area alone. For skewing (stretching) movie clips
will cause the resulting file to lose quality
dramatically.
-
Video Framerate (fps)
Here you can customize how many frames per second that
will display when the movie is played back. The larger
the FPS, the larger the output file.
-
Maximum bitrate
You can specify exactly how many kbps shall be taken
for video only. This option does not include the sound
bitrate, and should be manipulated carefully. If you
didn't specify any sounds, you can keep the bitrate at
any rate you feel like keeping it at.
That
concludes this tutorial on customizing Wildform Flix.
Similar commands are also located on the program's
toolbar.
I hope the information
helped. If you have
any questions or comments, please don't hesitate to post
them on the popular
Message
Board. There is no need to register! Just
post your question and I, or our friendly flashers, will
help answer it.
Happy flashing,
Kirupa Chinnathambi
Author FrontPage 2002: ABG
|