Select the first
frame of lightL layer. In your Tool panel
select the black arrow if it isn't already selected.
Down below a button has appeared in the options
section of the Tool bar. Click on the Scale
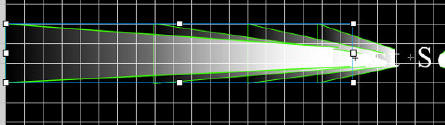
button. 8 white squares appear around the bounding
box of the lightL object. Grab the one on the left
and stretch it out to the left about 100% longer
than itself. Do not grab the corner scalar square,
you only want to extend them to the left, not up and
down.
There is no set amount to scale these.
You will have to play around with them afterwards to get
them just right.
11b)
Repeat this process
for each of the layers up to "t". When you get to
the right of the "S" you have to reverse everything.
Instead of grabbing onto the scaling square on the
left, you will have to scale from the right hand
side of the bounding box, and stretch it to the
left, scaling it down, so to speak. **IMPORTANT:
The graphics after "S" should be shortest
at it's frame 1, and longest at it's
frame 35.
11c)
Select frame 35 of
layer lightL. Select the Scale button. Grab
the left hand scaling square and drag the light
graphic towards the right. You should scale it
somewhere about half it's original size the size it
currently is at frame 15.
So at frame 1 it's twice
as big as it is at 15, and at 35 it's half as big as it
is at frame 15.
11d)
Repeat this for
each of the letters up to "t", then reverse the
process as you did above. Again, the graphics
after "S" should be shortest at it's frame 1, and
longest at it's frame 35.
Play around: When you think
you've got it, grab the red play head at the top
of the timeline. Run it back and forth a couple of
times and edit the scale of each at any keyframe,
based upon what looks natural for light.
11c)
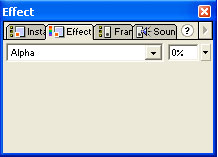
On the timeline
select frame 1 of the "lightL" layer. Open your
"Effects" panel, and choose Alpha. Move the slider
to 0%, or just type 0 into the input field and hit
enter.
Select frame 35 and again select alpha, moving the
slider to 0%.
11d)
Repeat this for each
letter.
11e)
Save your workCtrl+S, or Ctrl+Shift+S
Setting the Easing for the Tweens
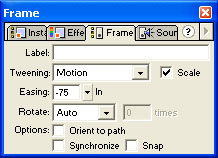
13a)
Select frame 1 of the
lightL layer. Open your Frame panel. Use the
Easing slider to change the easing level to
+75.
13b)
Select frame 15 on
the lightL layer and change the easing to
-75.
13c)
Repeat this for each
letter.
13d)
Save your workCtrl+S, or Ctrl+Shift+S
Moving the Frames so that they Do Not
Overlap, but Sequence
14a)
The animation is
done. We now need to make it so that they start and
finish one after another, with slightly overlapping
animation. This is pretty easy from this point on.
14b)
Using the black
arrow, move the cursor over a non keyframe in layerlighto. Anywhere where there is a line,
and not a dot, your cursor should change to a hand
icon. Click the mouse button and all of the frames
between the first and thirty fifth frame will
highlight. While holding down the mouse button, drag
all of the frames to the right. Drop it so that the
first letter is on frame 10
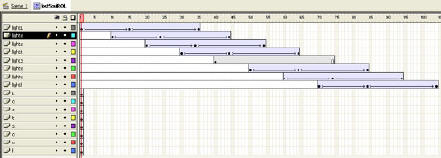
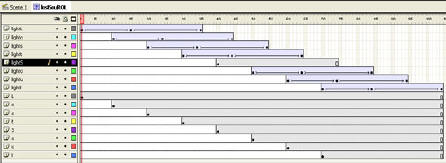
14c)
Do the same for each
light layer, but move it further and further
out, by 10 frames, on each layer. So that it looks
like this.
Play around: repeat the process of
grabbing the play head and moving it back and forth.
It's gotten a little better.
14d) Save your work
Ctrl+S, or Ctrl+Shift+S
Set the letter layers so that the
letters are left behind as the light passes.
15a)
Select frame 104 of
layer L (yeah, remember those layers?)
15b)
Choose menu option
"insert/frame.
15c)
Repeat this for each
non "light" layer. Each should have a solid gray bar
running from it's keyframe at frame one, to a normal
frame ending at frame 104.
15d)
Select the first
frame of the o layer and drag it to the right
until it is on frame 10, directly below it's
light layer counterpart's first keyframe.
15e)
Do the same for each
of these non "light" layer keyframes, except that
you drag them further along so that they correspond
with each of their "light" layer counterparts.
These are placed so that the letters stay
behind after the effect passes. You're timeline should
look like the following image:
Note: It may look more realistic, if
these static letters apear a frame or two later than
the light goes by. Feel free to start them as far as
five or so frames later than the light letter
animations. Play around with these, as well as the
number of frames in the tweens, to achieve differing
effects.
15f) Save your
workCtrl+S, or Ctrl+Shift+S
Lens Flare on Layer Lights:
16a)
The final part of
this animation is the lens flare that you see in the
center letter when the light passes by. It is in
fact a movie clip developed by Master Suga. He gives
you permission to use it to your hearts content as
long as you are kind and remember to not claim
credit for it. It is available for download with all
of the "Ray of Light" tutorials I've seen, and so it
comes with mine. If you wish to break it apart and
make your own, you are welcome to do so. I'm not
going to explain how here.
16b)
Select the starting
frame of the lights layer. Choose menu option
Edit/Cut. The letter should still be on layer
S so it's not necessary to have it on the
lights layer. The keyframe will now be empty.
Select this keyframe if it is not already selected.
16c)
Choose menu option File/Open as
Library, find and select the
rayOfLightLensFlare.FLA, available for download here. You will need to download it first
to your hard drive before you can open it. Grab
that movie clip out of the library that opens and
drag it to the stage. Position the movie clip so
that it sits above the upper left corner of the
capital S.
You are done.
Clean Up!
17a)
Now, you
say "wait!!.. there are all these green lines in my
animation"
17b)
No
problem. Close the library for the
rayOfLightLensFlare.FLA. Open the library for this
movie by choosing menu option Window/Library.
17c)
Now
double click on the graphic symbol to the right of
the lightL name that is in the library. It
will open on the stage. Select a line and
Edit/Cut each one carefully.
17d)
Repeat
this for each light letter graphic in the
library.
17e)
Save
your workCtrl+S, or Ctrl+Shift+S
Now you really are done,
and it should look something like this.