I know what you are
thinking. I set the target to _blank when adding a URL
right? True, but today we are going to go beyond making
simple windows open in Flash. Not only are we going to
open new windows, we will control the attributes of each
window such as the scrollbars, address box, and more.
Best of all, you will add some code in Flash and some
code in HTML!
Click on my name in
the following animation:
You will learn how to
create something similar to the above animation in
Flash. The following instructions will guide you:
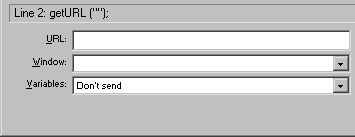
Create a button in Flash. Right click on the button
and select Actions. The Object Actions window will
appear. Select Basic Actions then Get URL to display
the URL commands in Flash.
In the URL field, you will specify path to the Web
page you want to open. For the example animation
above, I used the full address instead: http://www.kirupa.com/kirupa.htm
Therefore, the code in the URL field will be:
Save and Publish the animation. Make sure that when
you publish the animation, the SWF and HTML files are
generated. It is time for us to edit the HTML file!
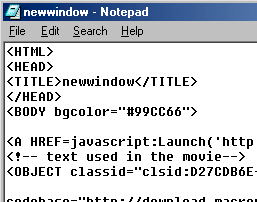
Open the HTML file that
Flash created in an HTML editor such as Notepad
or FrontPage and DreamWeaver in HTML view. The following
image displays how my HTML file created by Flash looks
like in Notepad:
Once the
file has been opened in your HTML editor, place your
mouse anywhere between the <Body> and </Body> tags and
copy and paste the following code:
Once the code has been
pasted, save the file and preview it in your browser.
The button you created in Flash should be visible. Click
the button and a new window should appear with the
address you specified. If you followed my example
verbatim, you will see the 'About Kirupa' page displayed
in a new browser window. You are technically done with
the tutorial, but feel free to stick around if you are
interested in learning how to customize the window that
gets opened.
Adjusting Window Width and Height:
The primary attribute of the new window you will want to
modify is the width and the height. Notice in the code
where it says width=550, height=250. By looking at the
code, you can assume that the width of the new window
will be 550 pixels, and the height of the new window
will be 250 pixels wide.
To set your own width and
height for the browser window, change the values after
width to adjust the width and the values after height to
adjust the height. That is all there is to adjusting the
width and height of a new window. The next section will
explain how to customize a few more attributes of a
window.
Customizing the Window:
Let's talk about customizing the window that gets opened
beyond the width and height. Go back to your HTML editor
and open the HTML file you just modified. Briefly look
at the JavaScript code you copied. You should notice
many familiar terms such as location, menubar,
scrollbars, and more. The terms mentioned in the
code are the attributes of your browser window...in
other words, the things that make your browser window
look the way it looks.
After each window
attribute, you will see a 'yes' or a 'no'. No means that
attribute has been disabled and won't be expressed in
the browser. For example, in the code you copied,
scrollbars are disabled. To enable/disable any
attribute, change the 'no' to a 'yes' or vice-versa.
Download Files
As always, if you want to see how my version of the file
used in this tutorial looks like, download the source
files by clicking
here. You will find the FLA, SWF, and HTML
files conveniently zipped for you! You will need to
download
WinZip if you don't have an unzipping utility.
Just a final word before we wrap up. What you've seen here is freshly baked content without added preservatives, artificial intelligence, ads, and algorithm-driven doodads. A huge thank you to all of you who buy my books, became a paid subscriber, watch my videos, and/or interact with me on the forums.