 Draggable
Menu 2.0 – Part II: Usability
Draggable
Menu 2.0 – Part II: Usability
written by ilyas usal a.k.a. pom
OK, so now it's time to make our little
effect usable for a site presentation. In the first
tutorial, we learnt how make a dragger control a movie clip.
Now, we'll see how to position precisely the clip inside the
window, and constrain the movement of the dragger inside a
box.
The final effect should be look like the following
animation:
[ drag the
blue square ]
Before we can achieve the effect depicted in the above
animation, we need to tackle the animation in several steps.
Take a look at the effect we are going to obtain in the
first place:
[ drag the
blue square ]
The Main Idea
After what we've done last time, you can see that there are
things we have to improve : first the elements we use are
placed on the scene a little bit anywhere, and moving one of
them will make you move everything else. More important :
there's no correlation between the size of the movie and the
amount by which we drag (does that make any sense in English? It does in French anyway). Remember to save your work
often, under different names if necessary, especially at the
end of this tutorial, where tricky techniques will be
explored. Last thing, putting a frame rate of 20 will make
animations look a lot smoother.
Before you begin, I would like you to
download the partial source file for this tutorial. Don't
worry, the source code does not include the coding and other
techniques needed to make the animation work. You will do
that with information found in this tutorial! Click the
following link:
Make sure you have the above file open in
Flash. The tutorial starts.....now!
The Tutorial:
-
OK, so what do we have here ? 3 layers,
"drag", "mask" and "fond", "mask" being a mask for "fond".
We are going to need one more layer for our box, that we
have to put under the "drag" layer. First, unmask the
"mask" layer, and create a new layer between "mask" and
"drag" that you will name "box". Select the rectangle
tool, two colours and drag a
rectangle in that layer. The size is not very important
since we are going to change that.
-
Select the rectangle with the black arrow
tool. You should see grey spots inside it. Open the info
panel (Window > Panels > Info) or the icon at the bottom
of your screen. Enter W:40.0 and H:10.0. Then press F8 to
turn it into a movie clip. Name it "bar".
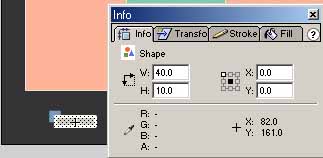
[ change the
width and height of the rectangle in the info panel ]
-
Open the Instance panel, check that the bar
is selected and name that instance "box". We will now
refer to that movie clip as "box". All the objects we need
are now on the scene. We need to change a few things in
the script we put in the dragger movie clip. We first
change it to:
-
Let's explain that. In the onClipEvent (load) handler, we
added an _x and _y information. In fact we position the
dragger at the same _y as the box, and we make so that the x
position of the dragger matches the box's.
|
NOTE |
That's very useful, so let's explain it right.
The line of
code is :
_x = _root.box._x-_root.box._width/2+_width/2;
We access the properties of the "box" movie clip by going
back to the _root where it is located, and then the name of
the clip. We're interested in the _x position, hence the
command _root.box._x.
Making :
_x = _root.box._x ;
only would put the dragger in the middle of the box.
Remember that _x and _y properties refer to the centre o a
clip. So that command would set the centre of the dragger at
the same place as the box centre. That's why we take back
half the width of the box.
_x = _root.box._x-_root.box._width/2;
If we only put that, the x position of the dragger will be
the left end of the box (test the movie to see for yourself
!). That's why we add half the size of the dragger itself.
Also note that it's important to initialize xold after those
lines. |
-
In the onClipEvent (enterFrame) handler, 2 things have
changed. First I changed the sign of the last line, doing
"-=" instead of "+=" so that when you move left, the movie
clip "general" goes right. The most important thing is the
if test. Basically, it checks whether you're trying to drag
the dragger inside the box or outside. If you've understood
the last note, you can understand that one all by yourself.
Save your work now.
-
Hang on, there's one subtlety coming. So far,
we made "general" move 3 times as much as "dragger" moves.
How about making it move proportionally to the dimensions
of "general" and "box" ? That's what we are going to do.
Here's the code :
-
What did we do ? When the movie loads, ratio
is set as the ratio between the size of the big clip and
the box. Then instead of moving by 3 times dxdrag, we move by ratio times.
If you can't see why we're doing that, just consider that if
your big clip is 10 times bigger than your small box, you'll
have to move 10 times as much (ratio = 10). Save your work
now.
-
One last thing : try and make the mask and
the "1" match, so that at the beginning of your movie, it
is the one that appears. Set the "mask" layer as a mask
and save your work. Test your movie. It should look pretty
much like what we want. You can stop here with that
effect. But there are a few things that can be fixed :
position the clip exactly where the mask is, and make the
movement of the clip smoother.
This tutorial will continue into the next
section. Flashing for a long time can become strenuous, so
don't hesitate to take a break before continuing this
tutorial.
Draggable Menu- Part III : How Not to
Make it Work
[ drag the
blue square ]
The Idea of Mask Positioning
Here we are going to put "general" exactly where our mask
is, wherever you put it on your scene. In order to do that,
we'd need to know it's position. Unfortunately, a mask in
Flash is a strange object whose properties we cannot access
or change (hence the drag mask trick in my other tutorial,
ha ha !). That's why we have to be trickier than Macromedia.
Save your work under a new name, just in case...
-
First, unmask and unlock all the layers.
Press Ctrl + F8 to create an new movie clip that you'll name
"positioner".
Draw a square (rectangle tool and hold SHIFT), any color you
like, any size, but centered. Create a brand new layer for
that clip. Name that new layer, er.., well.., "position" ?
Drag and drop the clip from your library in that layer. Give
it the Instance name "pos" in the instance panel. Don't try
to align it with the mask or anything. Instead, select the
"mask" (NOT "pos") and open the Info panel. Put rounded
numbers in the height and width boxes, and remember the H
and W values. Lock the "mask" layer and select the "pos".
Enter the exact same position and dimensions in the Info
panel. In the Effect panel, choose "alpha", and set it to 0.
Lock the layer and save your work.
-
We now have to position exactly the "general"
clip accordingly. Click it and open the Actions panel. Enter
this code (it's the same as we did previously) and save your
work. Test your animation now. It's all perfectly aligned!
Copy and paste the following code:
The Idea Behind Smoother Movement
That's a trick I learned from Suprabeener. We'll see it in a
minute (part IV). What we are going to do now is change the
way things are. Let's look at what's happening : we drag the
"dragger". When it moves, it tells the "general" to move as
well. Well, now we are going to make the "dragger" tell
"general" : GO THERE ! But smoothly. See the difference ? We
tell "general" a position to go to, not a variation of
position, and then "general" gets the position and goes
there. But smoothly. Easy.
First, unmask and unlock all the layers.
Press Ctrl + F8 to create an new movie clip that you'll name
"positioner".
Draw a square (rectangle tool and hold SHIFT), any color you
like, any size, but centered. Create a brand new layer for
that clip. Name that new layer, er.., well.., "position" ?
Drag and drop the clip from your library in that layer. Give
it the Instance name "pos" in the instance panel. Don't try
to align it with the mask or anything. Instead, select the
"mask" (NOT "pos") and open the Info panel. Put rounded
numbers in the height and width boxes, and remember the H
and W values. Lock the "mask" layer and select the "pos".
Enter the exact same position and dimensions in the Info
panel. In the Effect panel, choose "alpha", and set it to 0.
Lock the layer and save your work.
-
The first thing we need to do is to give an instance name to
our "dragger". Let's call it "drag". dxdrag will now be the
distance between "drag" and it's original position. We don't
need to reset xold on every new frame any more, nor do we
need to tell "general" to do anything. The code in "drag"
becomes (you need to keep the onClipevent (load) as
well of course...) :
[ copy and paste the following
code ]
-
Now, we have to get that destination in the movie clip
"general" to be able to move accordingly. Open the Actions
panel of "general" and put in the following code :
[ copy and paste the following
code ]
-
We set a variable "positiongeneral" equal to the
original position of "general". We set the destination, the
present position, and tell it to move... smoothly. Save your
work. Test the movie. It looks awesome ! You can stop here
if you want.
take a
breather
Draggable Menu- Part IV : Confusing Everything
-
You think you're done with the tutorial, don't you ? Ha ha
ha !! No way ! I told you some serious stuff was ahead. We
are going to see in that last part of the tutorial how to
define a function, and then a movie clip prototype. Save
your work under a new name.
-
First the function. We'll put it in the clip of "general".
We *just* need to change the code a little bit:
[ copy and paste the following
code ]
|
NOTE |
|
When the clip loads, we define a function, that we call
move, with no parameters, hence the () with nothing between
them. That function does everything we made the clip do, I
didn't change a single line. Take a long look at how you
should use functions. |
-
You can see that the code becomes much more readable, and
you can use that function at different times in your movie.
If you want to use it later in the same clip, simply type
move (). But what if several clips need to use that function
as well ?, will you ask me. Good question. In that case, we
use a prototype.
-
Delete the function from the onClipEvent (load) handler. Be
careful to delete only what's inside the {}, no more, no
less. Keep the move () instruction though. In the main
timeline, create a new layer, with nothing in it, and name
it code. Open the Frame Actions panel and put this code :
[ copy and paste the following
code ]
-
What we did is create a function that applies to any movie
clip, just like startDrag for instance. Now, any movie
clip in the movie can call that function. The advantage of
that method is that it makes the code much more readable,
even for yourself, and that you can define several
functions, and change your movie very fast. For instance, if
I want to give my movie an elastic motion, I can define the
function move2 () just under the other one and then call it
in general, and will be it! The code follows:
[ copy and paste the following
code ]
This is a tricky tutorial....therefore, I
have provided the final source code for you to download. It
includes all the code and trimmings!
OK, now take a deep breathe, and just read this whole
thing all over again if something's missing. If you've
completed this, you can be very proud of yourself. Have fun
with this effect !
This
tutorial is written by Ilyas Usal. Ilyas is also known as
ilyaslamasse
on the
kirupa.com forums!
Just a final word before we wrap up. What you've seen here is freshly baked content without added preservatives, artificial intelligence, ads, and algorithm-driven doodads. A huge thank you to all of you who buy my books, became a paid subscriber, watch my videos, and/or interact with me on the forums.
Your support keeps this site going! 😇

|


