|
by
kirupa | 29 July 2007
One of the popular things to do with WPF is use its data binding features.
Data binding allows you to, as its name implies, link data. More specifically,
you link data between a target and a source. For example, you could have a
textbox whose value is tied to the horizontal position of a slider control. As
the slider control is adjusted, the value inside your label changes:
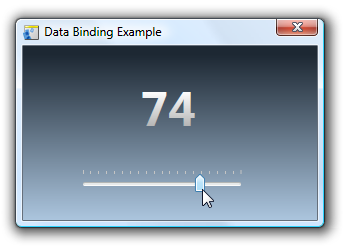
This is an example of data binding where your
source is the slider's Value and the target is your
label control's Content property. In this scenario,
the mapping between your slider's position and the
value displayed on your label is pretty
straightforward and a built-in converter takes care
of displaying the right values.
In numerous scenarios, though, such a a direct
mapping between your data does not exist. The
built-in converter simply will not know what to do. In this
tutorial, you will see one such example where you
are taking a slightly different RGB value from the
Adobe Kuler recent themes and setting it equal
to the background of your window.
The color value returned by Adobe Kuler is in a
form such as FFFFFF.
The format WPF brushes uses for displaying colors is
#FFFFFF. The
difference is in the #
symbol that WPF seeks but which our data source from
the Kuler feed does not provide. Reconciling this
difference is where value converters
come in.
I mentioned in the earlier
section that WPF looks for a RGB value in the form
#FFFFFF. While that is true, technically, WPF deals
with ARGB where you have extra bits for storing the
Alpha values. When you don't provide the Alpha
value, the alpha value is set to the maximum and
added for you automatically.
To learn more about ARGB values, check out this
blog post where I discuss that in greater
detail.
In one way of looking at this, a value converter
acts as a mediator. It takes incoming data from your
target, makes some modifications, and returns a
version of the data that your source can understand.
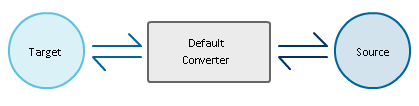
For example, in data binding, the following diagram
shows you the default relationship between the
source, the target, and your data when not using
your own value converters:
When using your own value converter, the
following is what your relationship between the
target and source looks like:
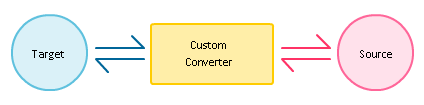
As you can see, there really isn't that much of a difference. A value converter
is used regardless of whether you specify your own value converter or not.
Another thing to note, because value converters are used with your standard data
binding models, the arrows move both ways. What that means is that your value
converter not only is designed to take input form the target and modify it for
the source, it does the exact where data from the source is updated on the
target also. This is part of the two-way data binding that you setup if you
want.
In this tutorial, you are going to learn how to create your own value converter
that will be used instead of a default value converter. Because our data binding
will be one-way, our value converter will primarily exist to take data from our
target and convert it into a form our source will understand. Let's get started
on the next page.
Onwards to the
next page!
|



 Using Value Converters - Page 1