Easing
w/ After Effects
Easing
w/ After Effects
written
by Reef | 07.31.05
In After Effects, we all want to achieve smooth
animations. No body likes to see choppy motion.
In this tutorial, you'll learn a few methods on
how to control the speed with a few clicks. Here
is an example:
[
butter is better - click to play ]
Setting Up
Open After Effects with a canvas large
enough to experiment on and import your graphics
(ctrl+i). Set an FPS (frames per second) rate
of about 24 to 40 and a duration of 0:00:01:00
respectively. Start your movie out at 0:00:00:00.
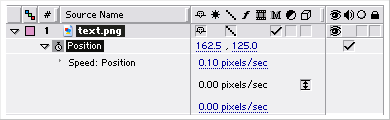
Keyframing Animation:
Once we drag an
object on the stage, we can go ahead and create
some basic motion.
-
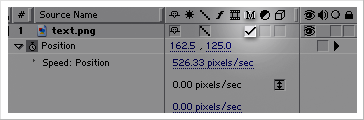
Select the layer of the object and press the
"P" key to reveal the position properties.
Hit the stopwatch and set a keyframe. Press
the small triangle besides "position"
to reveal the speed properties as well.
-
Move
the current time marker to a further time.
Select the object on your stage and shift
it's position down to a good amount, I moved
my text down about 100 pixels. There should
automatically be a second keyframe now as
well as a speed curve.
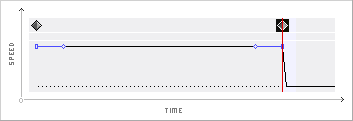
The
Heart of Butter
We
see a curve on the timeline window, this is where
all the magic happens. The curve determines the
speed of the animation to the time of the movie.
Currently, our motion is constant.
Now,
we want our animation to start out fast and then
progressively slow down to a speed of 0. In order
to do this, drag the 2nd small point down all
the way and left a bit and release.
If
you're good with the pen tool and know how to
easily manipulate points and curves, this should
be a snap for you. You
can keep practicing by dragging both points
in every direction to see what the result ends
up as. This is a very powerful method, giving
you full control.
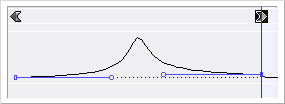
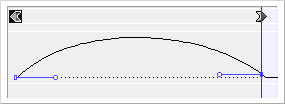
Try some other custom curves:
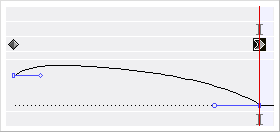
[
downhill - quickly ease in ]
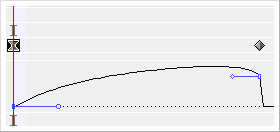
[
mountain - speed up, slow down]
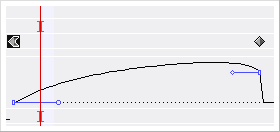
[
bridge - slowly rise and drop back down ]
Automatic Ease Options
There are 3 automatic
ease options in After Effects, we can access them
by right-clicking on a frame, selecting 'keyframe
assistant' and then one of the 3 ease options
from there.
- Easy Ease - can be applied
to a frame to either a) slow down when approaching
a keyframe frame or b) speed up when it leaves
a keyframe.
- Easy Ease In - can be applied
to selected frame in order to ease speed and
slow it down when the frame is approached.
- Easy Ease Out - can be applied
to selected frame in order to ease speed coming
out of the frame, thus starting it slowly and
stopping with a faster speed.
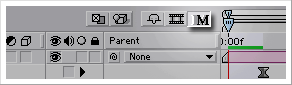
One
Tip For Smooth Animation
If
you'd really like to produce a realistic effect
of liquid motion, you can also use the motion
blur technique. This will blur any movement between
2 keyframes. In order to do so, check the "M"
for a layer.
Then,
click the "Master Motion Blur" button
on top of the timeline window to activate motion
blur for all layers.
Last
Words:
As
usual, the source files for the After Effects
document used in the example at the top of this
tutorial has been provided. Make sure you practice
as much as you can, it's the only way to make
magic.
You can always post
your comments, complaints, fast-food orders or
any questions on the
KirupaForum. We can't guarantee the best
food, but we can guarantee the best coffee and
yes, we are open late at night.

|
{
Reef }
The
trashcan on the left is not mine |
|