Let's get on with it.
Step 2 -
Installing APACHE
Okay. Open up the Apache installer
(apache_2.0.50-win32-x86-no_ssl.msi) and whiz by the common
options they throw at you, up until you see a weird
box little like this:
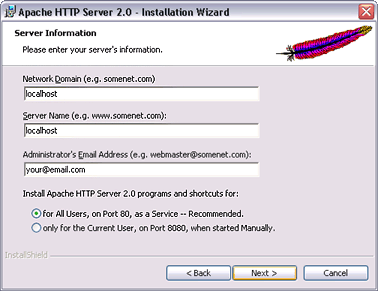
[ this is
what your form should look like with the correct information
]
Replace 'network domain' and 'server name' with
'localhost', and the
'administrator's email' you can fill in with whatever you
please. It is highly recommended that you select "for
All Users, on port 80" because the
tutorial is constructed that way.
What we just did was tell Apache that our server's DNS
(Domain Name System) is 'localhost'. Localhost is your
internal IP (Internet Protocol), 127.0.0.1,
that only you can access and kind of works like
www.kirupa.com, which points to the IP
64.207.129.18. We are going to install Apache our root
folder 'Web', which will use 'http://localhost/' as
a pointer. Sounds confusing? Well, that was the
most confusing part of the tutorial!
Press next, and continue on to the install
directory tier which you must change from C:\Program
Files\Apache Group\ to C:\web\.
Please note again that we are only using Drive C as a
reference and can be installed anywhere. This
tutorial is optimized for Drive C though.
Setting up
APACHE
- Click the Apache icon in your task tray (purple
feather with the 'go' button) and you should see a green
light menu, denoting its successful
install:
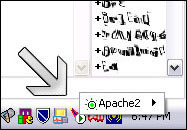
[ green light! ]
And of course, the install is a no
go if you get:
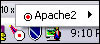
[ red light :/ ]
- Lets do a quick-edit to the config file. Open up
C:\web\conf\httpd.conf and search "LISTEN 80".
Replace that with "LISTEN localhost:80"
so it will focus the connection on port 80 (web-browser
default) only for you. Now that's dedicated!
- Next, search "localhost" until you find "ServerName
localhost:80". Make sure it is set so, because
without our pointer 'localhost' the website cannot be
accessed.
- Now we test it. Open a browser and type
http://localhost/
If you get that page as seen in the intro of this
tutorial, then you are set.
 |
Note - Web Server for
the Entire Local Area Network |
|
If you would
like to make your web server available
throughout your entire LAN, then
just navigate yourself to
Start->Run->cmd and type in "ipconfig".
You should get something like: IP
Address. . . . . . . . . . . . : 192.168.1.3
now hop back
to step ii and make it
"LISTEN 80" instead of "LISTEN
localhost:80" and in step iii
remove 'localhost:' from "ServerName
localhost:80". For example in my case,
it will be "LISTEN 80" and "ServerName
192.168.1.3:80". Go and try, type in
http://yourIP/ from another computer in the
network. |
|
Nice work.
Lets advance to
the final stage.


