by kirupa |
12 January 2007Resources are used when dealing
with external content. When you have an application with
images, icons, external text files, etc., you can refer to
the external content by accessing the file's path directly, for
example: C:\Kirupa\title.gif. That approach works
well, and your application will access the file from that
location. There is a catch though!
When you decide to share your application with others,
unless their computers have a title.gif in their
C:\Kirupa folder, they won't be able to see the
external content that you could see on your computer. Web
developers are are all too familiar with this problem when
they accidentally refer to a file that works on their
local computer but not on the web server because they forget
to upload that file to the server.
Resource files solve this problem by localizing external
content to the currently running application. To look at it
another way, think of your application's executable as a zip
file that contains inside it other files such as your
external content. When you run your application, since all
of your external content is contained inside your
executable, it does not matter how or where your application
is run. As long as you know where your application is run,
you know where your external content is.
While the example in the previous paragraph isn't
representative of how an actual application works, it does
give you an idea of how having external content stored in
one file allows you to refer to the external content without
referencing the exact location the file is stored on a
user's file system.
While using resources may seem unnecessary because of the
extra steps needed to access your external content, it makes
it pain-free when deploying your application for other users.
To use resources, there are three steps you need to follow: getting the
external file into your project, changing the external
file's Build Action, and being using code to refer to that
file. Note that the next section will discuss how to use
Resources when accessing WPF-specific elements.
Before you can use resources, you need to first import the
external file into your Project. To import a file, right click on
your project icon from the Solution Explorer and go to Add |
Existing Item:
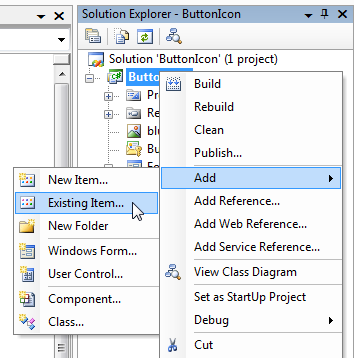
[ import an item by going to Add | Existing Item ]
The Add Existing Item dialog window
should appear, and you can browse for the file or files you
want to import into your project. After you have imported
your files, you should see it in our your Solution
Explorer. For example, as shown in the following image, I
inserted an image file called
blue.png, and I can now see it in my
Solution Explorer:
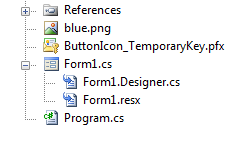
[ the imported blue.png file displayed in
the Solution Explorer ]
By default, when you publish your application, your external
files are kept separate from your final application. For
what we are trying to do, we want our external file to be a
part of the executable itself, and we can do that by changing
our file's Build Action.
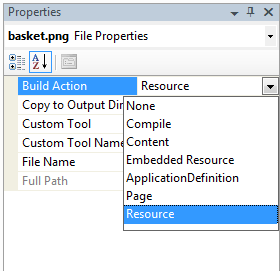
To change the Build Action, select your newly imported
file in your Solution Explorer. Once you have selected the
imported file, which in my case is blue.png,
take a look at the
Properties grid panel:

[ select your imported file and take a look at your
Properties grid panel ]
Notice that there is an entry for Build Action. Select
the Build Action entry, and when you select it, you should see a drop-down arrow
appear to the right of the Content text. Click on that arrow
and select Embedded Resource:

[ change your Build Action to Embedded Resource ]
By tagging your file as an embedded resource, you tell
Visual Studio to include this file as part of the
assembly instead of referencing this as a separate file.
With your file imported and tagged as an embedded resource,
the final step is to use the embedded resource in your
application. Since I've been using blue.png as an example file for the
past few sections, I'll continue using that file in my
example.
If I wanted to add blue.png to a WinForms
button called btnSubmit, I would use the following code:
- btnSubmit.Image =
Image.FromStream(Assembly.GetExecutingAssembly
().GetManifestResourceStream("ButtonIcon.blue.png"));
Let's look at the above code in detail. Because I want to
insert an image into my application, I use the Image class's
FromStream method (Image.FromStream)
which takes a stream as its argument. The reason I am
looking for a method that takes a stream as an argument is
because that is the main format my embedded resource will be
accessible to the application.
Moving on, the Assembly class allows you to explore the various
metadata associated with your program. You use the
Assembly class's
GetExecutingAssembly method
to return an Assembly object that points to the assembly
that is currently running. In other words, you are trying to
find a way
to explore the metadata associated with your current
program!
Now that you have access to your assembly by using
Assembly.GetExecutingAssembly(),
the next step is to get the manifest from this assembly.
More importantly, beyond just the manifest, we also want the
resource the manifest provides access to. We do that using
the GetManifestResourceStream()
method and passing a string to the internal location of the
file.
The internal location of the file follows the
Namespace.filename.extension format. In my example,
the namespace under which I will be accessing my blue.png
resource is called ButtonIcon, and the
file's name is blue, and the extension is
png. Putting it all together, we get:
ButtonIcon.blue.png. That's
all there is to it.
Because I feel one example for something this complicated
is not adequate, I have also provided the code I used to
access an Embedded Resrouce text file called words.txt:
- TextReader tr = new StreamReader(Assembly.GetExecutingAssembly().GetManifestResourceStream("IncrementalSearch.words.txt"));
Notice that in the above example, I am using another stream
method - except on that supports text files such as
StreamReader. The namespace
of that particular application is called
IncrementalSearch, and the name of the file I am
accessing is words.txt.
With the .NET Framework 3.0, you can create
applications that use Windows Presentation Foundation (WPF).
One of the changes introduced with .NET 3.0 is a different
way of dealing with resources. Most of the steps from the
previous sections still apply, and the basic idea remains
the same. There are some details that are different, so
let's take a look at them.
When importing external files into your WPF projects, your
files' Build Type is automatically set to a new
value that was not available in WinForms projects:
Resource
The differences between Resource and Embedded Resource
are minor, but Resource was designed with WPF in mind. As I
will explain next, the way you access a Resource from an
assembly is different in the WPF world.
Referring to Resources in a WPF Application
If you want to assign a resource to a WPF-specific control,
you will use a new URI-based approach for specifying
how your resource will be loaded. For example, as before, let's say I
have a button called btnSubmit, and I want to set
it's content to the blue.png image from earlier.
The code for displaying blue.png would be:
- Image imageContent = new Image();
- imageContent.Source = new BitmapImage(new Uri("pack://application:,,,
/blue.png"));
- btnSubmit.Content = imageContent;
The first thing to notice is that the earlier approach of
accessing the manifest from the currently active assembly is
no longer used. Instead, the bizarre syntax
pack://application:,,,/blue.png
is used to access our resource.
The bizarre syntax is part of the Pack Uniform Resource
Identifier (URI) used in the
XML Paper Specification (XPS), but I won't be devoting
time in this tutorial to discuss the internals of why the
syntax is the way it is. The reason is, for almost all of your
applications, you will simply use the same URI string with
the only change being the filename/extension. You do not
even have to worry about specifying your
application's namespace like you did earlier.
The above method works only with content that
supports URI-based resource handling such as all
WPF-specific content. Because you may run
into situations where you cannot use URIs, you can
always use the traditional method for embedding resources.
The following code provides an example where you use both
URIs as well as as the resource path:
- Image
imageContent
= new
Image();
- imageContent.Source
= new
BitmapImage(new
Uri
("pack://application:,,,/blue.png"));
- btnSubmit.Content
=
imageContent;
-
- TextReader
tr =
new
StreamReader(Assembly.GetExecutingAssembly()
.GetManifestResourceStream("IncrementalSearch.words.txt"));
- txtMain.Content
= tr.ReadLine();
When attempting to use the assembly path approach, just
remember to set the Build Type for those files to Embedded
Resource.
Just a final word before we wrap up. What you've seen here is freshly baked content without added preservatives, artificial intelligence, ads, and algorithm-driven doodads. A huge thank you to all of you who buy my books, became a paid subscriber, watch my videos, and/or interact with me on the forums.
Your support keeps this site going! 😇

|


