by kirupa |
19 February 2006
The sliding menu is a nice, compact way of displaying information. Instead of
displaying content over multiple pages, all of your content is located one large
movie clip. The content the user wishes to access simply slides into place.
In this tutorial, I will explain how to create an easily extensible, horizontal
sliding menu. You can see an example of the sliding menu below:
[ click on the colored squares on the left to see
the menu in action ]
Let's get started:
-
First, download the
partial source file for this tutorial.
It only contains the sidebar with the buttons. That way, you can focus your
energies on creating the sliding menu as opposed to worrying about other,
unnecessary details:
-
Once you have downloaded and extracted the contents of the
file, open the easing_tutorial source file in Flash. After you
open it, you should see a large gray rectangle with sidebar on the left with five
buttons. Each button has an instance name: b1, b2, b3, b4, b5.

[ background and buttons ]
-
Let's create the sliding content rectangles. Insert a new
layer and call it content. On your new layer, draw a colored
rectangle using the Rectangle Tool.
-
Select your newly drawn rectangle and, by using the
Properties Panel, ensure it has a width of 250, height of 200, X
offset of 50, and a y offset of 0:
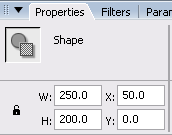
[ the width and height properties ]
-
As you can see, the rectangle now covers up the large gray
space not occupied by the sidebar. This will be our first content movie
clip. Select the rectangle again and press Ctrl + F8 (Modify | Convert to
Symbol). Select Movie Clip and press OK.
-
Your rectangle is now a movie clip. Give your rectangle
movie clip the instance name content1.
-
Let's create another rectangle. On your content layer,
using your rectangle tool, draw another rectangle with width of 250 and a
height of 200. This time, set its X offset to 300, and the Y offset will
again be 0.
Your new rectangle should neatly appear directly to the right of your
earlier rectangle:

[ the new rectangle you drew ]
-
Just like you did before, convert this Rectangle into a
movie clip. Give it the instance name content2.
-
Repeat steps vii and viii to create three more rectangle movie
clips. Ensure that each rectangle movie clip's x position is 250 pixels more
than the x position of the rectangle it is following.
The following list should help you with the x positions:
-
Rectangle 3's x position: 550
-
Rectangle 4's x position: 800
-
Rectangle 5's x position: 1050
The other properties for the rectangle will stay the same.
The width for all of the rectangles will be 250 pixels, the height will be
200 pixels, and the Y offset will still be 0.
Do not copy and paste a previous rectangle movie clip
and place it in your new location. When you want to add content to your
movie clip, you will find that the same content will be displayed in all
three of your other duplicated movie clips. You usually do not want that!
-
Ensure that you now have five rectangle movie clips on the
stage. Each movie clip should have the instance name content1, content2,
content3, content4, or content5.
The following is an image of my stage at 25% zoom level:

[ a zoomed out view of all of the rectangles ]
So far, in this page you saw an example of what you will
create, and you made some good progress in recreating the example animation. You
now have five movie clips that will represent the content (menus) in our
animation.
In the next page, we will pick up from here and get a few
steps closer towards finishing up this sliding menu.
Onwards to the next page!
|


